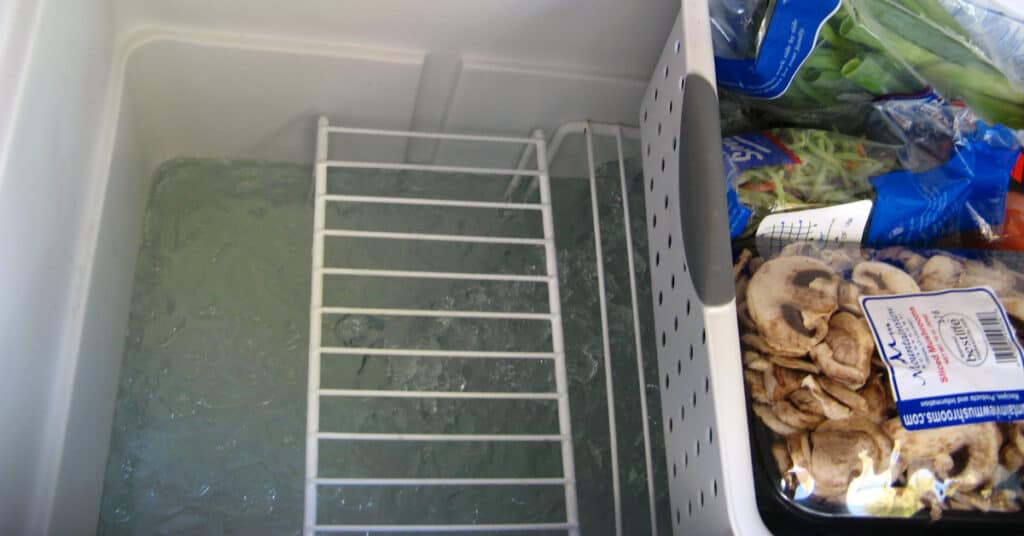
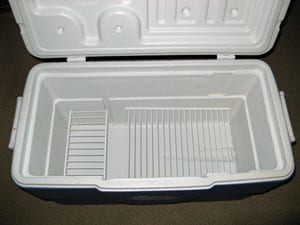
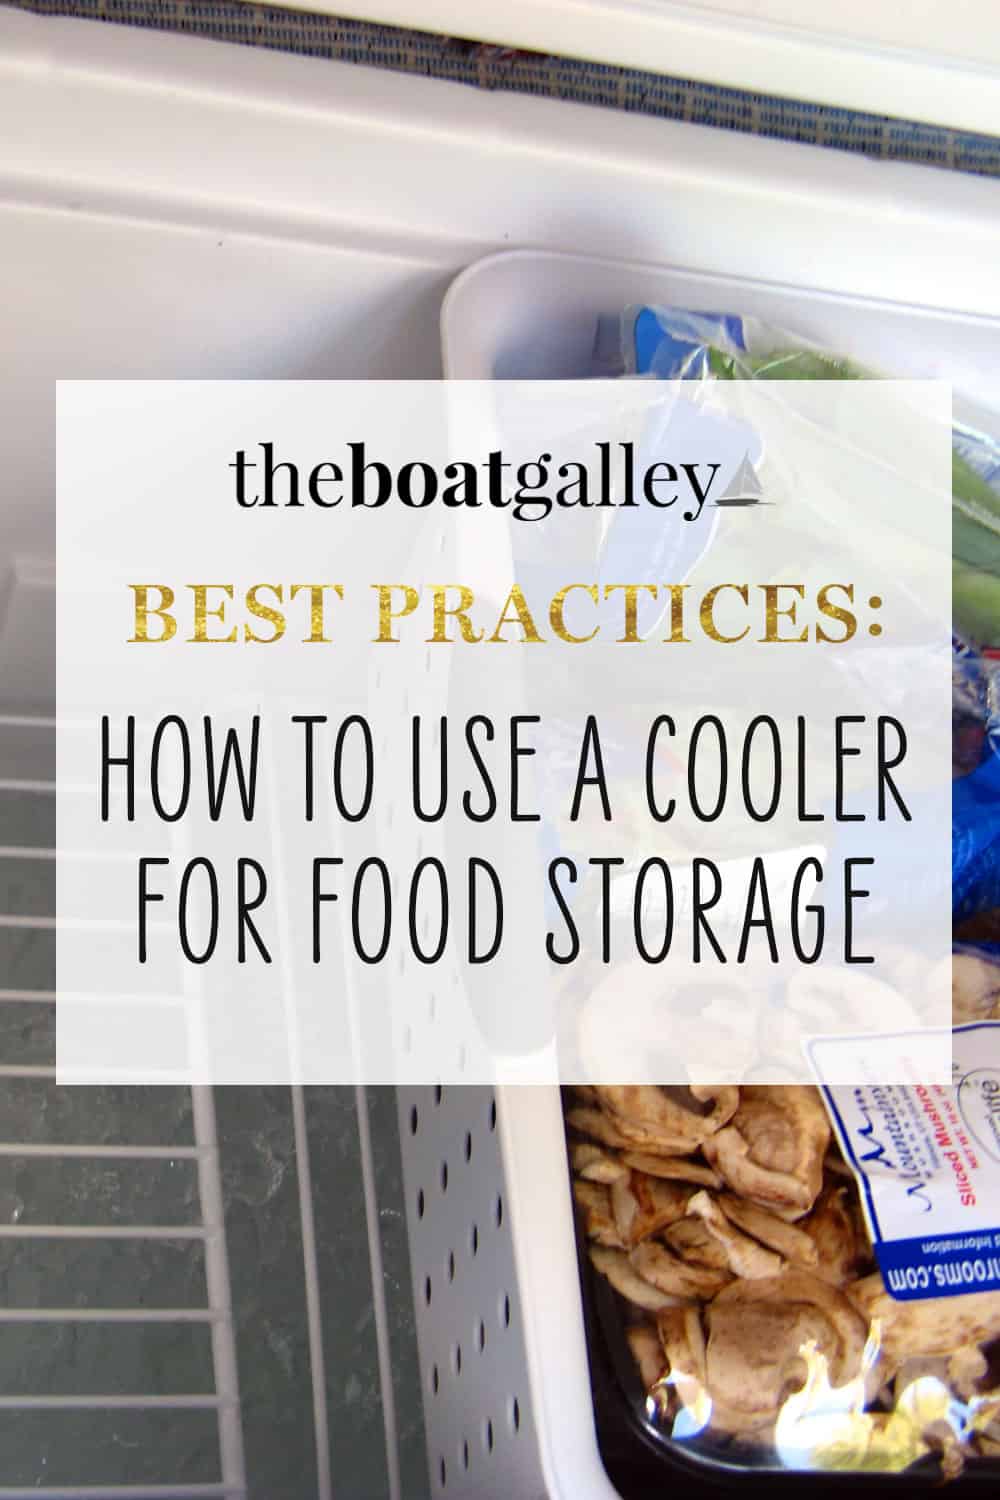
The right way to use a cooler for food storage is to keep the food completely out of the meltwater: ice on the bottom, removable racks above the ice, and food in bins on the racks. With this setup and a few simple habits, you can keep food dry, cold, and organized for days at a time without a refrigerator. Dave and I have done it for two months or more on four separate occasions, eating real meals the whole time.
The Basic Concept
Most people pile food directly on ice and end up with everything sitting in cold, soggy meltwater. The solution is simple in principle: raise the food above the ice on removable racks, and keep it in bins so it stays organized and protected. Cold air still circulates up through the vented bin sides. Melt water drains harmlessly below. The food stays dry.
Getting this right requires one step of planning before you go shopping.
Step 1: Measure Your Cooler, Then Buy Your Racks
Before heading to the store, measure the length and width of your ice box or cooler. If it’s not a rectangle, sketch the shape and write down the dimensions. You need this to find racks that will fit and form a solid, level base inside.
The racks need to sit 5 to 6 inches off the bottom to leave enough room for ice underneath. You have two options, depending on how handy you are.
The first option is plastic-covered wire organizers from the housewares aisle, sized to fit your cooler. They don’t have to perfectly fill the floor — they just need to cover enough of it to form a solid base for your bins, with no protrusions that would stop the bins from sitting flat.
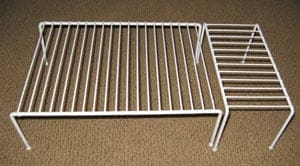
The second option is cutting wire closet shelves to size and mounting small 1×1 wood strips inside the cooler walls for the shelves to rest on. This is sturdier for spanning a larger cooler. Either way, the shelves must be removable so you can replace ice and clean the box.
Step 2: Buy Bins to Fit Your Racks
Once you know your rack dimensions, get bins sized to fit. Solid bottoms are better than holes, as there will be less bruising on fragile produce. Ventilated sides allow cold air to circulate. Both racks and bins are typically in the housewares or storage aisle at Walmart or similar stores.
Think about what you’ll actually be storing before you buy. If you like celery, you need a bin long enough for it.
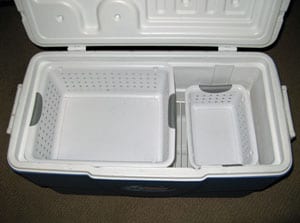
Depending on the depth of your cooler, you may be able to stack a second layer of bins on top for extra capacity. If you do two layers, put the things that need to stay coldest on the bottom, closest to the ice. Hot air rises, so it’s always warmest at the top of the cooler.
How to Make Your Ice Last Longer
Block ice lasts far longer than cubes. In a well-insulated ice box, block ice holds for 5 to 7 days even in 90-degree-plus weather. Cube ice lasts only one to two days. For food storage, get block ice whenever you can.
If you freeze your own blocks, remove them from any plastic containers like milk jugs before putting them in the cooler. The plastic insulates the ice and reduces how much cold reaches your food. See my tips for making block ice for the full process.
Put the ice under the racks and the food in the bins on top. If your ice box has a drain, leave it closed except when you need to drain water out. A little water pooled around the ice is actually helpful — it’s colder than the air and helps maintain temperature. Leaving the drain open just lets hot air in.

Day-to-Day Habits That Make a Big Difference
Use a separate cooler for drinks. This is the single most effective thing you can do to preserve your food ice. You’ll open a drinks cooler far more often, and every time you open it you’re letting cold out and heat in. If the drinks ice melts faster than expected, warm drinks are an inconvenience. If the food ice melts early, you may lose your food.

I use the food cooler primarily for fragile produce and dairy: the things that genuinely need to stay cold. What looks like a bottle of ketchup in the photo above is actually milk in a repurposed bottle, which is a much better shape for a cooler than the original carton. See more about boxed milk and why it’s worth keeping on board.
Pre-frozen, commercially vacuum-sealed meats can also go in the cooler right in the ice and will keep for a few days.
The Cooler Can’t Hold Everything. Here’s How to Make It Work.
Cooler space is limited, and if you try to refrigerate everything you normally keep in a home fridge, you’ll run out of room fast. The good news is that many foods you’re used to refrigerating don’t actually need to be cold. Cabbage, carrots, peppers, onions, tomatoes, garlic, and a wide range of other vegetables store well at room temperature with the right technique. Moving them out of the cooler frees up space for the fragile produce and dairy that truly need to stay cold.
My book Storing Food Without Refrigeration covers exactly this — how to keep fruits, vegetables, eggs, dairy, meat, and condiments without ice, so your cooler can be used for what really needs to be kept cold and you won’t have to make daily shopping trips.
- Paperback from Amazon
- Paperback or PDF from our store (PDF means no shipping, start reading immediately)

Carolyn Shearlock has lived aboard full-time for 17 years, splitting her time between a Tayana 37 monohull and a Gemini 105 catamaran. She’s cruised over 14,000 miles, from Pacific Mexico and Central America to Florida and the Bahamas, gaining firsthand experience with the joys and challenges of life on the water.
Through The Boat Galley, Carolyn has helped thousands of people explore, prepare for, and enjoy life afloat. She shares her expertise as an instructor at Cruisers University, in leading boating publications, and through her bestselling book, The Boat Galley Cookbook. She is passionate about helping others embark on their liveaboard journey—making life on the water simpler, safer, and more enjoyable.
Samm says
Do you have any recommendations for an ice box (brand and/or model) under $50 that would work effectively this way?
Carolyn Shearlock says
Absolutely — see The Best Cooler for Food Storage!
Diane says
Our first sailboat only had and icebox – no refrigeration. I purchased a wire coated shelf like you showed in the article. However, we froze water at home in plastic milk jugs. Since cold air sinks, I placed the frozen jugs on the shelves and the items that had to be kept the coldest (meats I had frozen at home)went under the shelves. Produce/fruits went in front of the shelves. On our first week long cruise, we only had to get one additional block of ice. The key was to FILL the icebox. I covered the entire contents of the icebox with spare beach towels to fill the box. This also helped reduce the amount of coolness lost when the box was opened to retrieve something. By freezing water in the gallon jugs, we had the benefit of “good” cold water for making coffee/drinks as the ice melted.
Since our icebox was unfortunately right next to the engine compartment and I didn’t want to reduce the storage space by using foam, I lined the wall of the box next to the engine compartment with a spare blanket (heavier than the towels)to help keep the extra heat out. I would have preferred to use a “space blanket” but was unable to find the one I had or find a new one in our local stores. Admittedly, this setup would be a pain for a cruise of any length, but for a week or two, it worked for us. Some marinas will also allow you to put a couple of water jugs into their icebox overnight to refreeze them!
Thanks for all the good info on this site! We are taking our first “long” cruise this winter…I’ve gotten so much help here already!
Carolyn Shearlock says
Our refrigerator was also right next to the engine compartment . . . makes you wonder who comes up with these design ideas, doesn’t it?
Thanks for sharing your tips and have a wonderful trip!
Pam says
You could use a matalic bubble insulation next to the engine compartment. We have an electric ice chest in a compartment down below on our motor home. We made a cover for it, because when the weather is hot it helps keep things frozen. We use it as a freezer instead of a cooler. Pam
Ice Cooler says
One other important thing for getting long use from the cooler is to make sure the orginal things that are placed into the cooler are already cooled. Great post. Thanks for sharing!
Janarthanan, K B. says
Please suggest me for purchase of Cool Box (below 20 lts capacity) for storing Ice.(Cooling should last for 7days)
Carolyn Shearlock says
I’m not sure if any cooler that small will hold ice for 7 days. The really well insulated coolers just don’t come that small — the smallest I find (Yeti) is 35 quarts (liters).
Carolyn
Bob Vivian says
I believe he is referring to the 20L Nomad cool box cooler from the UK.
sam says
check out engel coolers
Sage Seeley says
Hi! I am a live aboard in the Fl. Keys. I have a Norcold top loading fridge some say it is a icebox? According to specs on my boat it has 3″ of insulation. The compressor is in a sail locker & fridge is next to engine. I find it runs none stop. Tried some insulation from Home Depot around the inside of box. This on my trip over to Abaco collapsed. I like the idea of using wire racks to support the items. I have temporarily placed two mixing bowls in the bottom of fridge , there is a v shaped deep void in the bottom of fridge that is hard to fill in. I then place a board over it and have my sterlite containers balanced on top. When I return home I want to devise something more permanent. My thoughts I want to run by you are:
Fill in the void with insulation covered by space blanket. Find racks to sit on top of that. Then I can place the bins on racks and perhaps add another layer of space blanket. I made a vent in my locker to provide more ventalation for compressor. But was thinking about a computer fan in the locker as well?
My goal is to restore my fridge, have the compressor run less (as it is a big drain on my batteries) & avoid ice if possible.
Your thoughts and suggestions would be greatly appreciated ! Thanks Sage
Carolyn Shearlock says
Hi Sage!
You have a refrigerator, not an icebox (an icebox has no compressor — it’s basically a built-in cooler).
Unfortunately, in the summer in the Keys, it IS likely to run all or almost all the time. There are a couple of articles here on the boat galley that tell ways to make a refrigerator more efficient:
Improving Refrigerator Efficiency
Adding Extra Insulation to Your Boat Refrigerator
The foam insulation sheets will help — use a little silicone caulk to hold them in place and they shouldn’t fall down. Your idea about a computer fan in the compressor locker will help, too — I know of one person that added two — one oriented to suck cool (well, relatively cool) air in and one to exhaust hot air. If it was working well in the winter, it’s probably insulation. If it’s running all the time in winter, too, you may want to have a marine refrigeration tech check it out to make sure it doesn’t need recharging (basically like your car air conditioner) — and if it needs recharging, that’s a sign that there may be a leak.
If you decide that it just has to be replaced, a lot of readers are extremely happy with the Engel units — they say they run far less and take less power when they do. We did not have one but I’ve literally never heard anyone say anything bad about them. They’re not cheap, but they are less expensive than a lot of other alternatives and much easier to install.
tami says
If it is available, we supplement our ice with dry ice. Leave the dry ice in a plastic bag, lay it in the bottom of the box, then lay the ‘wet’ ice on top of that. The ‘dry ice’ is amazing at keeping the ice alive for a little longer, as in a couple of days longer.
Sherry says
Yep. We do that too. Lay the dry ice then bags of ice on top (about 5 bags, two opened and dumped and the others left in the bag). Then all our food in tubs in the chest. It was in triple digits and we had ice for about 7 days. It was awesome.
Sue peck says
We have a very large icebox on our sailboat and I find the use of the wire shelves very helpful. My hubby also mounted some shelves on the back wall to hold bottles and condiments that need to be kept cold. One idea I used on our last trip out that worked well for a week supply of meat was usunf a small cooler. In the week before we left i froze 4 separate meats in ziplock bags and then foe them one at a time in the cooler with ‘layers’ of ice in between. One inch of ice in the bottom of the cooler first then the steaks with a bunch of ice cubes so they wouldn’t float….freeze that layer and then the pork tenderloin etc. I had the chicken at the top. The whole cooler then can be put down below the water line or in the ice box if you have room. I had to chip the pork out of the ice on night number 5 and the steaks were perfect on night number 7!
Nancy says
I have also used this method and find the same results. Greg and I have been cruising the Sea of Cortes since late 2006 and find a cooler works great. Since we are out away from land for weeks at a time we have carried a small portable ice maker with us since early 2007. It take less power to run the inverter while we are motoring (which on a sail boat seems to happen at least an hour a day, usually more) then running our refrigeration. When in port we buy ice when necessary.
I also use the racks and baskets which helps to reduce the time the cooler is open. Just grab the meat basket, cheese basket etc.
Nick says
thanks so much for the information. I am an OTR “Over The Road” Long Haul truck driver and have been wasting so much money on soaked food. The ice would always melt and spoil all the food. I have tried everything and thought i was doomed to eat at these truck stops and gain 200 LBS, but you have saved me from that. So simple to and yet very creative. Thanks again.
Martin Henry on Facebook says
Great article – we have done this for a number of years. Love cucumbers, celery, carrots and peppers chilled and they last quite awhile.
Melanie says
I have been so frustrated using coolers over the years. I have thought someone in the cooler making industry would have come up with a solution like what you have done. I have thought for years that they needed some kind of removable shelves. I never tried making my own. The one thing I did do on our last camping trip that helped our ice last longer was to pack our two coolers by putting all of the items we would use on the first day in one cooler including drinks and everything for the last 2 days in the second cooler. On the second day I repositioned some things back into the first cooler that was nearly empty of food items but still had some ice. I always try to make my own ice in large containers so it melts slower too.
Peter E. says
I have been studying this conundrum for a while, and I did actually come up with the same idea as you about the racks, only I hadn’t yet figured out how to keep them from rusting.
The plastic coated organisers solves this problem, as long as you don’t start “cutting to fit”, which would bring up potential rust problems.
My company has just started manufacturing and selling plastic trays to address this problem (for those that are less skillful at wire bending 😉
I design plastic trays to sit on the ledges formed on the inside walls of many coolers, such as the one pictured in your example. Of course if your cooler doesn’t have these ledges, I can’t make a tray for it, and you’re back to the rack idea.
I’m not a boat cruiser, rather I do lots of camping and long road trips in a sports car, so my focus for my first product was on that situation. My cooler of choice for those activities is the Coleman 28 quart with the bail handle, because it’s just the right size for use by one or two persons, where space is limited, like in a small car. The bail handle allows you to carry it with one hand, leaving the other hand free to open doors or carry other things. It also makes it much easier on your back to put it in/out of the back seat, trunk or hatch of the car.
My future designs for larger coolers will look much like your Sterilite bins pictured, except they will hang above, rather than sit above, the ice and water below.
Great Lakes Scuttlebutt Magazine says
We took down 40 pounds of food to the BVI last year – dry ice and a cooler on wheels! Worked perfect!!
Gary Green says
Lise, this is a good article for us.
stephen says
Why do people always put ice on the bottom, it should go on the top remember cold air sinks
Carolyn Shearlock says
Yes, but if you put the food on the bottom, it will end up sitting in water from the melting ice.
Peggy says
In addition to racks, I use frozen gallon or half-gallon water jugs, then we have water when the ice is gone and have to replace with block ice. Also, I further insulate the TOP of the cooler with folded newspaper (ten or so sheets) that fit to the edge, overlapped if necessary. What a DIFFERENCE this has made! Our cooler is a large thermos cooler, and now I get at least an additional two-three days from the ice. Food is always re-packaged in freezer Ziplocs…no worry about water. Fruit/berries: rinse in bowl with 1 or 2 tablespoons of vinegar, dried thoroughly, and stored in hard plastic containers. The tablespoon of vinegar in the water rinse extends the fruit ‘life’ since it keeps mold from forming
Sarah says
Hi I’m glad I found your article. I’ve been having this idea for a bake sale to keep my baked goods cool and I wasn’t sure if it was a crazy idea.
Do you think that cans of frozen soda or beer could replace the ice? I’ve got a ton of expired beer (like reaaally 2012 expired) and was thinking to use that instead of ice! Doable?
Carolyn Shearlock says
Frozen beer or soda can explode . . . so it might work or might not.
Jenn Hebert says
Hello! I just wanted to thank you for the tips – I don’t know why I never thought of using racks in my cooler! I’m a historical reenactor, and we’re often “camping” for 1-2 weeks at a time.
Susan Condon Dawson says
Great info for my upcoming camping trip too!!!
Rodney Lewis says
Nice. I’m gonna have to get some class and stop using the empty beer cans for that.
Desiree Golen says
This is awesome! We lived out of a cooler for about a year. Wish I had read this then!! Next time I’ll be prepared!
Lucy Untiet says
Instead of loose ice we use frozen water bottles
The Boat Galley says
That works if you’re leaving from home!
Lucy Untiet says
That’s all we get to do for now. Someday, we’ll get to go on s big trip. For now it’s long weekends.
Kelly Lerigny says
Tupperware makes super vented veggie keeper boxes that are perfect for coolers. Vegetables keep ages longer than other storage methods and you can stack them. We have also made a very inexpensive insulating blanket with a hardware store purchase of reflective thin insulation which comes in rolls. We had used it to line the hull in the V-berth under our bed to eliminate the condensation and cold and had some left over. Just loaded up our cooler box for a two week cruise in San Juan Islands, WA. Trying a chunk of dry ice for the first time on top of my lasagne. Have to see how it goes:).
Charlotte Taylor says
Thank you for this article. Very useful!!!
Rick Garvin says
I love your articles. I read and reread them every day.
The Boat Galley says
Glad to hear that! Comments like that make my day!
Raul says
How much does the food in an Ice Box typically weigh?
Carolyn Shearlock says
That totally depends on the size of the ice box! I know that with a 40 quart cooler, the food/ice/cooler is about 30 pounds — I can lift it by myself, but it’s awkward and easier with two people.
Andrés Blanco says
Hi great article. Have you ever tried placing an ice mat on top of those bins? or a mylar blanket? Cheers from Costa Rica!
Carolyn Shearlock says
I’ve put a blanket over the whole cooler; I’m sure it would also help to put one inside over the bins.
Karen says
I’ve had good luck on a boat by putting wet towels over coolers. Keep the towels wet and the evaporative cooling does the trick, even keeps produce cool enough for a day or two. Similar in concept to the zeek I think it’s called. I also use the silver bubble wrap but inside the cooler
Rebecca says
We love to go camping but never have enough room in the fridge! Also like going on day trip picnics while on the Blueridge Parkway and need a cold cooler that will last more than a few hours. I love the idea of the frozen water jugs. I freeze a water bottle to take to work with me and drink the melted water during the day. Don’t know why I didn’t think of the jugs in the same way for camping! Thanks ?
Linda Corbin says
Heat rises, cold travels down…ice should be on the top for best cooling. Buy dry ice, lasts long time for food and regular ice for drinks cooler. Drinks in water as ice melts will be nice and cold.
Carolyn Shearlock says
Dry ice can be impossible to get in many places. Also, produce does better on top of ice — you don’t want to freeze it. We use a separate cooler for drinks so that we are not in and out of the food cooler so many times a day.
Susan Kam says
Anita, will have to get some containers for the summer trip and something to raise up the food.
Christie says
So helpful for an upcoming road trip–thank you!
M Stiles says
I’m confused as to why you would use plastic milk jugs and not cardboard? The cardboard is already a perfect rectangle. The plastic jugs seem like a space nightmare. When you said milk jugs I just asssumed cardboard until I read plastic milk jug.
Carolyn Shearlock says
Closed top — no spillage.
Jeannette DeFriest says
Now I have a 10L PVC drybag I use only for cubed ice. Those 7 – 10 lb bags of ice melt so fast and flood the bottom of the cooler. By slipping the plastic ice bag into the drybag I can roll the top closed and lay it on top of all the contents. I still get some water from condensation on the bag but nothing like a flood.
Jenni says
Thank you for sharing these tips. Great ideas to help make our yearly camping trip easier
Sue says
I got a roll of the silver, bubble insulation from the hardware store and made a removable cover for my cooler! I live and camp in AZ, and have been able to keep ice in it for several days. It wraps around the entire cooler, with slits wear the handles are, and an easy, lift off top to access the goodies inside!
Monica says
Love all the comments and great article. I freeze a large rectangular plastic container and keep it in the bottom of my cooler, sealed. I place the items that need the most refrigeration closest and least refrigeration furthest from the frozen container. No water leaks out of the container as it thaws. Once I have to replace the thawed solid ice in my container I fill it with ice cubes, seal it and again place it in the bottom. The solid block of ice and subsequent ice cubes last a very long time and nothing gets wet. I love the idea of using baskets for various items to reduce the amount of time the cooler is open. Thanks for your excellent newsletter.
Jennifer Biron says
I am so glad this article is still available. Even though I have a camp fridge and a trailer fridge there is still not enough room for all of my vegetables and fruit and I am tired or ruining them in the cooler because of melting ice. I just heard about the carton ice and now have some in my freezer but I wondered about how cold it would be while still in the carton, now I know! Thank you so much for taking the time to write this.
Sara M says
Just bought a 1986 Catalina 34’ Sloop in beautiful condition, but only an ice box. Since that will probably meet our needs, I’d like to fabricate a custom “ice block form” to use at home to freeze a block that fits the bottom 6” of of the box. Do you have any direction on how I might make a mold the exact shape of the ice box? I’m thinking: line it with a plastic garbage bag, mush modeling clay alomg the edges, let harden, and then lift gently.
Carolyn Shearlock says
Your idea to line with a trash bag is good, but I think I’d use a can of spray foam to fill it, so you get a solid block. I think that using clay just around the edges won’t keep the shape as you remove it.