Several factors go into deciding how you’ll make coffee in your boat’s galley. No one system is right for everyone.
The only method that I don’t recommend is a 12-volt coffeemaker. Everyone complains they take too long to brew coffee. One friend switched from a 12-volt to a 110-volt coffeemaker with an inverter and used less power because it was faster.
Considerations for Making Boat Coffee
First, answer these questions for yourself. The answers will help determine which system is best for your situation.
How much coffee do you need to make at a time? A ceramic mug or insulated cup typically holds 12 to 16 ounces. However, most coffee pots are labeled in 6-ounce cups (a few consider 4 ounces a single cup). So if you have two coffee drinkers on board who each want two mugs of morning coffee, that equals 8 to 10 “cups.”
Are you a fanatic about coffee made one particular way? Some people are hard-core French press fans. Others want drip coffee. And still others think perked coffee is best. If you have a strong preference, stay with that system.
How much space is available? This includes storing coffee, equipment, and making it. Some methods take up more space than others.
Is electricity available and are you willing to use it for coffee? Electric coffeemakers typically draw 800 watts (more on initial start-up). They won’t run off the small inverters you plug into a cigarette lighter. You need at least a 1000-watt inverter, a generator, or access to shore power to have an electric coffeemaker.
Will you primarily make coffee at a dock, at anchor, or while underway? Some methods will make coffee in almost any conditions. While others are best only in calm waters.
Are you willing to have a glass pot? If so, you’ll have to protect it from breakage when underway or in a rolly anchorage.
How often will you be making coffee? There are some methods that you might be willing to use occasionally. This method may work for part-time cruisers. Or as a backup when underway. But you may want something entirely different if you live on the boat full time.
Do you want a hands-off operation? Or are you willing to be more active in making your coffee? Some methods require constant attention. Others require timing. And others can be started and left.
How long are you going to want to keep your coffee hot? Will you have a cup or two in the morning and that’s it? Or will you want to have another cup hours later, perhaps in the middle of a watch?
Boat Coffee Systems to Consider
There is no one method of making boat coffee that’s right for everyone. Here are a few system with the pros and cons. I also choose recommended models for a boat galley.
One safety issue you should note. Any of the stovetop methods need a gimbaled stove and pot restraints to boil water if the boat is moving at all. The dangers of a pot of boiling water tipping or sloshing are just too great. And for the same reason, I prefer to use a tea kettle or my 4th Burner Multi Pot instead of a saucepan . Water doesn’t slosh and it’s easier to pour accurately.
No Electricity Methods for Making Coffee
Living on a boat means always making tradeoffs to have the electricity you need when you need it. But anyone living on a boat will benefit from conserving electric. So we’ll start by looking at a few way s of making coffee the don’t require electricity.
Instant Coffee
Many serious coffee drinkers blanch at the idea of drinking instant. But you can’t deny it’s convenient–easy to store and requires no electric to brew. And one good option are single coffee bags you steep like tea. Folger’s Coffee Singles (Amazon) are a recognizable brand available online and at most American grocery stores.
Manual Drip Cone
I started making coffee on board using a drip cone, a Thermos, and a tea kettle. You might be familiar with a Melitta cone from your college days — it’s the same thing. But newer designs make it less likely to spill the grounds.
A drip cone is simple. Put a filter in the cone and ground coffee in the filter. Then place the cone over a mug or carafe and pour boiling water through.
While it doesn’t take longer than other methods, it seems like it does because you have to monitor the flow and keep pouring more water through (and changing the grounds if you have a crowd). But it doesn’t take electricity and can be set up without glass.
While I used an old Melitta cone, I prefer the newer cones with a funnel that sticks down into the Thermos. They’re less likely to slide off and make a mess. Although I still recommend wedging it into the sink when making the coffee. This can be dangerous in rough seas, due to the chance of spilling boiling water. But, if you wedge it into a sink and use a tea kettle instead of a saucepan, spilled water isn’t likely to spatter you.
Pros: Can make as much at one time as your container will hold, makes good coffee, moderate space required, no electricity, easy to buy components without glass
Cons: Have to keep pouring water in, Thermos or pot with the cone on top can be tippy and cause a big mess (wedge it in the sink for best results), can spill boiling water on yourself
Keeping it hot: Drop coffee right into a Thermos.
Cost: $15 to $30 or more, depending on whether you drip coffee just into a mug, a glass pot, or a Thermos (and then it depends on the size of the Thermos)
My choices for a drip cone system from Amazon.com (note that this carafe and drip cone fit each other):
- 1.85 liter Zojirushi stainless thermal carafe — holds 4 mugs/8 cups
- Drip cone with funnel (note that it uses #6 filters, although you can use #4 filters in a pinch)
- 2-1/2 quart stainless tea kettle
- Insulated mug that will fit in most drink holders
French Press
With a French press, you pour coarse ground coffee into the bottom of the unit. Then fill it with boiling water and let it steep. After the recommended time, slowly depress a plunger attached to a mesh filter, which traps the grounds at the bottom of the pot.
An advantage over some of the other no-electricity methods is that you don’t have to watch it as closely. Although no method is as “start it and forget it” as a Mr. Coffee.
The biggest gripe is getting grounds in your coffee if you use too fine a grind. Many people also complain that it’s hard to clean, particularly on a boat where water is precious.
A French press doesn’t use electricity. But less expensive units all have glass pots. The more expensive ones have a thermal carafe that will keep coffee warm for a few hours. I really prefer these as there’s no danger of broken glass.
In rough seas, this is probably the easiest system to wedge into the sink without it tipping over while the coffee is brewing. But you still have to be careful not to spill boiling water on yourself when pouring it into the pot. Also, boil the water in a tea kettle to reduce the risk of boiling water sloshing out and also to enable more accurate pouring.
I’ve never owned a French press. But I know several people who love them. One of my best friends, Robin on The Cat’s Meow, uses and recommends the ones listed below.
Pros: Some think it makes better coffee since oils aren’t filtered out, moderate space is required, no electricity, can buy a thermal carafe press without glass which keeps coffee hot for one to two hours
Cons: Some attention is required to time how long coffee has steeped; largest presses produce about 50 ounces; less expensive setups have glass pots
Keeping it hot: Can get a system that makes the coffee right in a thermal carafe (which will stay hot for a couple of hours), or buy a separate Thermos to keep coffee hot for up to 12 hours (depending on the Thermos)
Cost: $15 for a small press made of glass to $100 for a stainless press with thermal carafe that will make 50 ounces (4 mugs)
Good choices for a French press from Amazon.com (several sizes and variations):
- 8-cup press with stainless thermal carafe (makes 4 mugs)
- 34-ounce shatterproof press (makes two mugs — not insulated)
- Insulated mug that will fit in most drink holders
- 1.75 quart stainless tea kettle
Stovetop Percolator
The stainless stovetop percolator has been a camping classic for years and can work just as well for boaters. The trick is getting the water to come up to a boil until it begins perking. Then turn the heat down so that the basket with the grounds does not overflow with water. Dump grounds into the coffee and let it steep until it’s as strong as you like it.
With a bit of practice and a timer, it’s not hard to do if you’re not distracted. But if you’re fixing the rest of your breakfast, listening to the net, and so on, you may not like the results.
One way to improve your chances is to use a wrap filter designed for percolator baskets (or use basket filters or a paper towel and poke a hole in the center fold the edges over and stick them on the perk tube, too), so that the grounds don’t escape – it also makes clean up less messy.
Also, a stovetop percolator is a little more dangerous than some of the other methods. If the boat is moving, the pot sits on the stovetop (as opposed to being wedged into the sink) for a longer time. And forget about making coffee if it’s too rough to have a pan on the stove.
The biggest problem may be the little glass dome that is prone to breaking – and without it, you can’t perk.
Pros: Can make 10 to 12 cups at a time (also lesser amounts), takes little space, no electricity, inexpensive
Cons: Takes attention to keep the pot perking but not so hard that grounds are getting in the coffee, little glass dome prone to breakage, needs a separate Thermos to keep coffee hot, messy clean up
Keeping it hot: Need a separate Thermos
Cost: $20 to 30 for a good stainless percolator, plus the cost of a Thermos if desired.
My choices for a stovetop percolator system from Amazon.com:
- 4 to 8-cup stainless percolator (makes 2 to 4 mugs)
- 12-cup stainless percolator (makes 6 mugs)
- Insulated mug that will fit in most drink holders
- Percolator wrap filters
- 68-ounce stainless Thermos (keeps 5 mugs hot for hours)
I used a percolator for years on camping trips. It’s not a bad system unless you’re prone to distraction . . . which I am! Once I learned how long it took to begin perking and set the timer on my watch to turn the fire down, I got much better results.
American Press
After using a cone system for years, I tried the American Press. It has several boat-friendly features and makes a great cup of coffee.
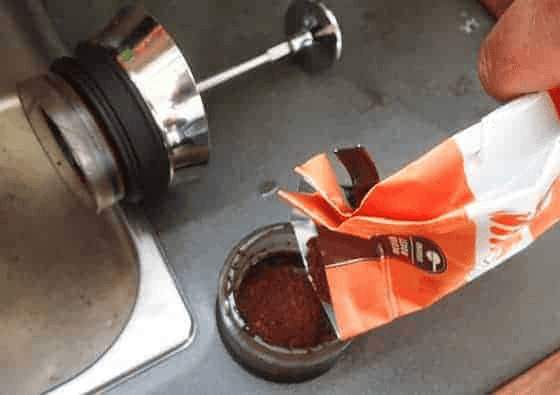
The ground coffee goes in a pod — just fill it up and then screw the top — with the plunger — on. You don’t need a filter or any special grind of coffee. TIP: If the top does not easily screw onto the pod, check for coffee grounds in the threads. It only happened once to me, but took me a few minutes to figure out why it wouldn’t go together.
Pour boiling water into the flask, up to the fill line. The flask is double-walled BPA-free plastic — the same type as is used in baby bottles. So that you don’t accidentally pour boiling water on yourself if the boat moves, always put the bottom down into the sink and then pour the boiling water into it.
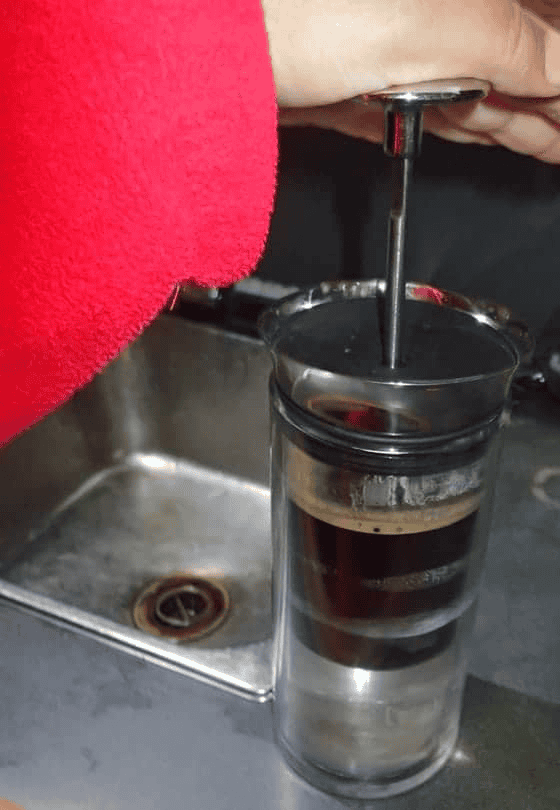
Then put the top on and press the plunger just so the pod is fully under water. Stop there for a minute or so. This is called pre-infusing and helps get the full flavor out of the ground coffee. Then slowly push the plunger down the rest of the way. Alex, from American Press, suggested taking a couple of minutes to press. What I usually do is slowly press it a third of the way, let it sit 90 seconds while I’m doing other things, then slowly press another third, let sit again, and then press it to the bottom.
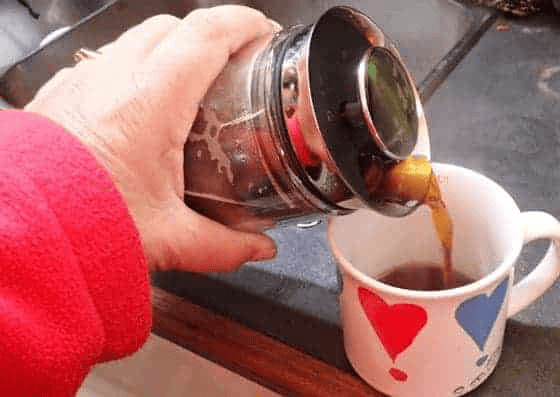
When done, either pour the coffee into a Thermos to keep it hot (it will stay hot for 15 to 20 minutes if just left in the flask) or into your mug. The flask is warm to the touch but insulated enough that it’s comfortable to hold in your bare hand.
Let the coffee maker cool for a minute or two, then you can remove the top, unscrew the pod, and dump the used grounds out. Most will come out and there is no need to get them all out or wash the unit if you’re going to immediately make another pot.
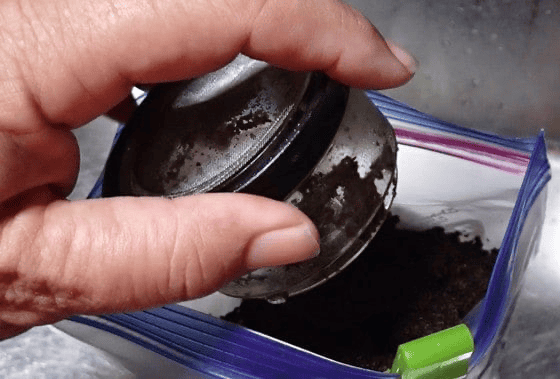
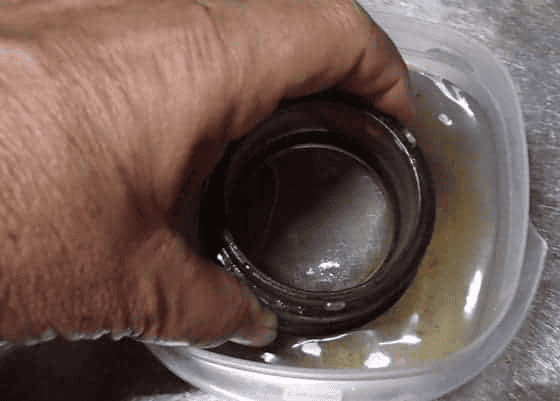
I’ve found that the easiest way to clean the pod without using a lot of water is to put some water into a small container and swish the top and bottom of the pod around to get all the grounds out.
Every week to 10 days, I soak both parts with denture tablets to get all the oils out. A bent toothbrush works well to give a quick scrub out, too (see how to make one here). The flask is easy to wash out with a bottle brush.
Here’s a one-minute video showing it in use:
Pros: Less likely to tip over since it’s not top heavy, doesn’t take much tending, no glass, no filters, small size, requires no special grind, doesn’t take much water to clean
Cons: Only makes 12 ounces of coffee at a time, requires a Thermos if you want to keep it hot, and it’s a more expensive option
Keeping it hot: Need a separate Thermos
Cost: About $80
You can buy the American Press on Amazon (US) or directly from the company:
NOTE: American Press gave me one of their coffee makers for review purposes. But I wouldn’t say I liked it if I didn’t — this is my honest review with the pros and cons as I see them.
Aeropress
Several readers have recommended the Aerobie Aeropress Coffee and Espresso Maker as being wonderful on a boat. And while I’ve never used one, I wanted to pass on the recommendation as it looks like a great solution.
Using an Aeropress is a little more complicated than a cone-style drip coffeemaker, but not hard. The video below explains it well — on a boat, I’d suggest putting the mug and Aeropress into the sink so that if the boat moves, any spill is contained in the sink.
Pros: Makes great coffee or espresso without electricity, plastic instead of glass, inexpensive, doesn’t take much water to clean.
Cons: it’s a hands-on system, requires filters, takes more water to clean
Keeping it hot: Need a separate Thermos
Cost: About $33
- Aeropress Coffee and Espresso Maker on Amazon
- Aeropress plus 350 filters
- Stainless permanent filter (Note: some users like the permanent filter, others don’t)
So those are some good options for making coffee on the boat without electricity. But with improvements in solar panels and batteries, many cruisers find electricity is not as precious. Here are some recommended ways to make coffee on a boat using electricity.
Using Electricity to Make Coffee
If electricity is plentiful on your boat, you have plenty of options that don’t hog the watts and provide a good cup of coffee.
Electric Percolator
I somehow always associate an electric percolator with the 1950’s or 60’s. I remember everyone having one as I was growing up, then everyone switching over to a Mr. Coffee in the 1970’s. So somehow I think of the electric percolator as, well, dated.
But the reality is that if you’re willing to use electricity to make coffee, an electric percolator is a great alternative to a drip coffeemaker (“Mr. Coffee”). An electric percolator makes good coffee with the same “start it and forget it” ease as a drip coffeemaker but is considerably smaller for the same number of cups and doesn’t have a glass pot. Most come with a detachable cord, which can also be a help in stowing it.
Clean-up can be messy and take a fair amount of water if you don’t use a filter to line the perk basket. There are special wrap filters designed for percolator baskets. Or you can use basket filters or a paper towel and poke a hole in the center, fold the edges over, and stick them on the perk tube, too.
In rough conditions, wedge the percolator into the sink – with this, you can probably still make coffee in conditions where stovetop methods can’t.
Try to get one where even the basket and perk tube are stainless for the longest life. The one listed below is all stainless.
Also, be sure to check out the electric draw if you’re going to use it on an inverter, and make sure it will work with yours. Most draw about 800 watts and thus requires a full-boat inverter and not just one that plugs into a cigarette lighter. Read more about inverters.
Pros: Smaller than the other electric options, start it and forget it, all stainless, no glass perk dome to break
Cons: Uses electricity (800 watts), clean up can be messy if you don’t line the perk basket with a filter, need a separate Thermos to keep coffee hot
Keeping it hot: Need a separate Thermos
Cost: $45 for a good stainless pot, plus the cost of a Thermos if desired
My choices for an electric percolator system from Amazon.com:
- 12-cup all-stainless percolator (makes 6 mugs, stainless basket & perk tube)
- Percolator wrap filters
- Insulated mug that will fit in most drink holders
- 61-ounce stainless Thermos (keeps 5 mugs hot for hours)
Electric Drip Coffee Maker with Glass Pot
Ashore, practically everyone is familiar with the electric drip coffee maker (aka “Mr. Coffee”). Wondering if you can use one on board? Well, plenty of people do. But be aware of the demands on your electrical system and make sure your inverter is sufficient.
You can buy a basic drip coffee maker for $20 or less for smaller sizes. Programmable ones cost more but you can only use them in a marina with shore power so you can leave it plugged in. And if you’re thinking about getting an electric drip coffeemaker and intend to use it on an inverter or 1000-watt generator, check the specs on the electrical draw. Read more about inverters here.
They’re easy to operate. And you can get the filters in most towns of any size (in a pinch, use a paper towel or a piece of cotton cloth). Stowage, both in terms of protecting the glass pot and the overall space required, the possible glass breakage, and the electricity required are the downsides.
Pros: Can wedge it in the sink, start it and forget it, inexpensive (some models)
Cons: Electricity required (800 watts or more), glass pot, stowage space, need separate Thermos to keep hot
Keeping it hot: Need a separate Thermos or have enough electricity to keep it plugged in
Cost: $25 plus the cost of a Thermos if desired
My choices for an electric drip coffee maker system from Amazon.com:
- 5-cup (2 mugs) Mr. Coffee coffeemaker
- Insulated mug that will fit in most drink holders
- 61-ounce stainless Thermos (keeps 5 mugs hot for hours)
Electric Drip Coffee Maker with Stainless Carafe
If you don’t insist on having your coffee piping hot 3 hours after you make it and are more concerned about not having glass on board, a drip coffeemaker with a thermal carafe can work. A couple of our cruising friends used them and were quite happy with the system.
A thermal carafe drip coffee maker works like a conventional one, but the coffee drips directly into a keep-warm container and there isn’t any hot plate.
The biggest drawback is that users complain that the thermal carafes generally aren’t up to the task of keeping coffee piping hot for very long. They’re also large to stow. The real selling point (particularly for use in a boat galley) is that the carafe is unbreakable.
If you’ll be using it on an inverter, be sure to read Inverters 101.
Pros: Can wedge it in the sink, start it and forget it, no glass pot, stays hot without additional electricity or a separate Thermos (although not forever)
Cons: More expensive, uses electricity (typically 800 to 1025 watts), does not keep coffee as hot as a good Thermos, large to store
Keeping it hot: Included – but these carafes do not do as good a job as a good Thermos.
Cost: $45 to $85, depending on size and insulating properties of the carafe
My choice for an electric drip coffee maker with a thermal carafe (note that this unit uses #4 cone filters, not the typical basket filters) — this one is available on Amazon, you’ll probably others in local stores that are similar:
- 12-cup (6 mug) coffee maker with thermal carafe
- Bottle brush for cleaning the carafe
- Insulated mug that will fit in most drink holders
Keurigs
Readers have asked about Keurig brewers and I’ve heard from a couple of people who are using them and loving them. I once received one larger than what I’d use on a boat as a gift. These are my thoughts.
For those who aren’t familiar with Keurig brewers, they are single-serve electric coffee makers. A small pod of ground coffee (or the makings for another drink) is placed in the machine and it works like a mini drip coffee maker. On some models, you can select one of three cup sizes — 6, 8, or 10 ounces; others have just one or two cup sizes.
Both for size and power reasons, most boaters look at the Keurig Mini Plus or Desk Pro. Neither of these has a large water reservoir; you put water in each time you use it.
I’m unsure whether I like the Keurigs or not. I don’t think it makes a better cup of coffee than any other method. If you’ve been using a mass-market brand of coffee and switched to a premium coffee pod, you’ll notice a big difference. But you’d also notice a difference if you used the same method of making coffee and switched to premium coffee. And if you use the same mass-market brand in a refillable pod, it’ll taste about like it did with your old coffee maker.
Probably the best thing to say is that I don’t dislike them. They have a few good points. And they can work well on a boat, particularly if you are mostly in marinas with shore power and cruise in generally protected waters. I’m just not sure if it’s worth the cost.
The Mini uses 1500 watts, so it’s iffy with a 1500-watt inverter. I recommend a 2000-watt one (read Inverters 101 if you have questions). A small cigarette lighter inverter won’t do it. Equally, you can’t run it off a 1000-watt generator, it will have to be 2000 watts minimum.
If you’re thinking about getting a unit with a water reservoir, note that they are about 3″ larger in all directions, use 1500 watts and weigh 12 pounds (approximations as each model is slightly different). With these, you’ll have to dump the water before storing and there is always some water left in the unit which could leak out in rough conditions or if the unit falls on its side.
Refillable Pods. If you are going to get a refillable pod, the ones that are one piece (instead of three as the official Keurig one is) are much easier to use and much less likely to have a part go missing. I got a two-pack (see my choice below) so that I could fill them for both of us at once and make two cups consecutively instead of making one, letting it cool so I can handle it, emptying it, refilling it, and then making the second cup.
Using a filter inside the pod makes it much, much easier to empty the pod. The pod that I got — and recommend below — does not require a filter. So you don’t have to worry about running out and not being able to make coffee.
Pros: coffee making is hands-off and fast, great when crew like different drinks, only takes 1 amp hour per cup, both units turn off automatically, no need for a Thermos to keep it hot, offers other drinks besides coffee, no breakable pot
Cons: machine and pods are expensive, refillable pods are messy and hard to use, can’t make larger cups on the strong setting, tough to use in rough seas
Cost: machines cost from $85 to $100 and the pods are about 65 cents each.
Buying. Typically, Keurig has the best prices on the machines of any online or local store, but they don’t sell the Desk Pro to consumers. As I’m writing this, Keurig has free shipping on all brewers and usually has the best prices on coffee pods (K Cups) if you buy enough to meet the free shipping minimum. Amazon has the Desk Pro available for single-unit sales at the best price I’ve found and has the best prices on refillable pods and filters.
From Amazon (US):
- K-Compact (makes 3 size brews; draws 1000 watts)
- Brew & Save Refillable K Cup
- K Cups Filters for use with a refillable cup (don’t need otherwise) — package of 50 or package of 300
Keurig offers many, ever-changing options on their site.
Best Way to Make Coffee on a Boat?
So can I tell you the absolutely best way to make coffee on a boat? Nope. There are just too many variables. But hopefully spelling out my experience and the pros in cons will help you choose the best coffee maker for your boat.
Related Posts

Carolyn Shearlock has lived aboard full-time for 17 years, splitting her time between a Tayana 37 monohull and a Gemini 105 catamaran. She’s cruised over 14,000 miles, from Pacific Mexico and Central America to Florida and the Bahamas, gaining firsthand experience with the joys and challenges of life on the water.
Through The Boat Galley, Carolyn has helped thousands of people explore, prepare for, and enjoy life afloat. She shares her expertise as an instructor at Cruisers University, in leading boating publications, and through her bestselling book, The Boat Galley Cookbook. She is passionate about helping others embark on their liveaboard journey—making life on the water simpler, safer, and more enjoyable.
Simplify meal prep on board with proven strategies for provisioning, maximizing fridge space, and cooking delicious meals aboard your boat.


Carolyn Shearlock says
Thanks for the information! I love it when others share their recommendations . . . here’s the link:
Bialetti Moka Express Stovetop Espresso Makers — it comes in 5 sizes from 1 cup to 12 cups.
Also, another reader sent me an e-mail to recommend the AeroPress Coffee and Espresso Maker — it makes one cup at a time and is all-plastic so it won’t break.
Carsten says
I’m a big fan of the moka pot, to take it a step farther I might suggest a hand coffee grinder. I use one similar to:
https://amzn.to/41Eshkg
Looking for those ceramic stones!
Carolyn Shearlock says
That’s a second vote for the Aeropress. Thanks for the link to the manufacturer’s site — lots of good pictures and information. They also have a listing of places that sell the Aeropress, as they don’t sell them directly. I took a look at several of the online retailers listed on the site, and Amazon again seems to have the best price . . . and sells the filters as well.
Amazon: AeroPress Coffee and Espresso Maker
Steve O says
Another vote for AeroPress. I use it at home and on the boat. Makes some of the best coffee I have ever had
Carolyn Shearlock says
Thanks for the idea! I don’t think I’ve ever seen those outside the US, but in the US they’d be great . . . or take some in your luggage.
If you’re not familiar with these, they’re called “Folger’s Coffee Singles” (clicking on that will take you to an Amazon page where you can see them). They also come in decaf.
They’re available in most grocery stores — if you can’t find them at yours, you can buy them at Amazon in a “6-pack” of 19 bags per pack (114 bags total) through the link above.
Louis Bullard says
I’ve seen a similar product at Starbucks.
Susanna says
I also scrolled down to mention that your No Electricity Needed section is missing the stovetop espresso maker. We use this (ours is the stainless Cuisinox) on a daily basis. (Breaking all rules, we do also have an Aeropress as well as an insulated stainless French press, the latter for when we have company and need to pour more cups).
The Boat Galley says
I like that concept: “heart starter”!
Shane Bartus says
How timely: http://www.practical-sailor.com/issues/37_37/features/Brewing-Coffee-in-the-Galley_11296-1.html
The Boat Galley says
I just saw that and was coming here to put a note about it . . . hmmm, great minds . . . 🙂
Amos says
Same thing happened to me and like you, I found the coffee boiled in the pot to be every bit as good if not better than the fancy coffee makers with nothing to break. If you are very fussy about the grounds, you can use a cone filter as you pour it into your cup but I never bother.
Anne says
Easy cleanup is exactly why I’d use a french press or perc. Considering that coffee grounds (and not the filters, obviously) are purely woody plant material that will break down in a matter of a week or so, why not bury those ashore or dispose overboard? Seems the best place. By contrast, your greywater is going overboard and that has cleaners and soaps in it. I can see not putting peels overboard or somesuch that would show up on someone’s beach, but grounds are another matter.
Carolyn Shearlock says
I put them in with my other “food scraps” and dispose of them when back ashore — as I do with all our trash.
Paul Alcock says
We do the same, the issue is the clean up.
Getting the used coffee grounds out of the perc strainer or the french press is a messy job and I keep looking for a way to clean them out without using half a roll of paper towels or getting grounds all over the galley counter top.
We have not found a coffee maker that has the ease of a Kurig type. But at least they are easy to clean up, Toss it in the garbage. But it’s not exactly eco friendly and does (IMHO) not make the best coffee.
Anonymous says
and no heat
Anonymous says
Wow need to ck this out. Just got back, two weeks of good FP coffee in the boat but I bet I still have coffee grounds on me!! 😱
The Boat Galley says
Looks interesting
The Boat Galley says
I’ve done that on occasion. Actually, our whole first year of cruising. Then I discovered other ways I liked better.
Carolyn Shearlock says
But you can buy the refillable/reusable pods! You don’t have to use the disposable ones.
Carolyn Shearlock says
Nice! I want to anchor next to you and be invited over for a morning cuppa! Lots of space and power make it possible.
Dee Anderson says
I love French Press coffee and discovered French Press brewing bags by Plum labs LLC. I brew 3 cups at a time (my husband drinks espresso) in my REI insulated press, and when the pot is empty I pour the pod into the garbage. No muss, no fuss.