Do you know how to use propane on your new-to-you boat? Don’t be embarrassed if you don’t. I didn’t when I began cruising.
Before our first charter trip, I had no idea how to use propane on a boat. I hadn’t even used a propane camp stove or gas grill! And I had very little experience with a gas stove or oven at all. I remember a few friends having them and seeing them when I helped in their kitchens, but I never used one.
So you could say I had more than a few questions. When we bought our own boat and began cruising, I had more.
Propane Safety Basics
I won’t cover every detail of using propane on a boat in this article. For example, I won’t cover maintenance or troubleshooting. But if you’re unfamiliar with it, as I was, these are the important things you need to know.
Explosive
Propane is a potentially explosive fuel. Be careful around it! Some charter companies require you to turn it off at the tank any time you’re not actually using it. But most boaters only turn it off when they are going to be away from the boat for an extended period of time, say, more than a day.
Propane Smell
Propane has no odor, but one is added to it so that you can tell if there is a leak. If you smell propane, turn the propane off at the tank immediately. Turn off all electricity, and be very careful not to generate static electricity sparks. Propane is heavier than air and “flows” with gravity very similarly to water. It will collect at the lowest point it can reach — generally in the bilge. On most boats, it is safest to use the manual bilge pump to rid it from the boat. Do not use an electric pump because of the risk of an explosion from a spark. Be very careful as you locate and repair the leak (the specifics of that are way beyond the scope of this article).
Three Important Safety Items
Your propane system has numerous parts, from the tank to the stove. But I want to talk about three in particular and the role they play in your safety.
Propane Locker
If you store your propane in a locker, vent the locker directly overboard (not through a hose) from the lowest point in the locker. Propane is heavier than air, and any leaked from the tank will collect in the bottom.
Solenoid
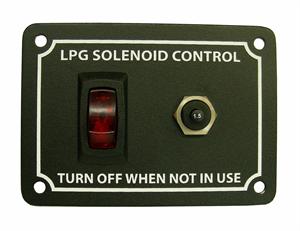
A solenoid is a valve in the propane line from the tank to the stove. It’s electrically operated. Typically there is an on/off switch near the stove. Turn it on when you’re ready to light a burner and off when you’re done using the stove. With many, a red light comes on when the solenoid comes on as a visual reminder that it’s on. It’s a safety feature and is designed to fail closed. That means that if there is no electricity coming from the batteries, it will not operate. If you lose all power on the boat, you will have to devise a way to bypass the solenoid to cook.
As a safety precaution, when you are ready to turn the last burner off that you’re using to prepare a meal, turn the solenoid off and let the propane in the line go to the burner and burn. When the flame goes out, then turn the burner off. Unfortunately, this is often hard to remember. I often found myself either just turning the burner off and later remembering to turn the solenoid off, or turning the solenoid off and forgetting the burner until later!
Thermocouple
A thermocouple is another safety device. It ensures that propane does not flow to the burner if there is no flame. That is, if the flame accidentally goes out, propane won’t keep flowing. Since it is invisible as a gas, it could collect along the floor or bilge and cause an explosion. That’s great, but how do you get the propane to the burner so you can light it? You have to turn the knob on and push it in. Pushing the knob in causes the propane to flow regardless of whether there is a flame or not. Generally, hold it in for a few seconds after the burner lights until the thermocouple warms up. Check with your stove’s documentation for more details, as every stove can be a little different.
Lighting a Propane Stove
Many marine stoves have some sort of automatic or push-button igniter, where you don’t need a match or other lighter. But they don’t always work. I’ll share methods for stoves with an ignitor and those you have to light yourself. Many use an AA or AAA battery somewhere in the system for the igniter, so if your igniter stops working, check your documentation. And always keep some kitchen matches and/or long-nosed lighters (like you’d use for lighting a grill) on hand. Igniters are notorious for not working (mine never did).
Lighting A Burner With A Starter
To light a burner with the starter, first turn the solenoid on. Turn the knob for the burner to the “start” or “light” position (or to medium-high if there is no marked “start” or “light”) and push it in and hold it in. Then press the starter — it may take several tries. If it doesn’t light in three or four clicks, let the knob out and wait several minutes before trying again, in order to let the propane dissipate and reduce the risk of a mini-explosion (or worse) when it does light. Continue to hold the knob in for a few seconds until the burner is nicely burning, then let the knob out. If the flame goes out, repeat and hold the knob a little longer (with time, you’ll learn how long it takes with your stove and it’ll be second nature). Now you can adjust the burner to the desired setting.
Lighting A Burner With A Flame
To light a burner with a “fire starter” (long-nosed butane lighter), again begin by turning the solenoid on. Light the fire starter and hold the flame beside the burner element. Turn the knob for the burner to the “start” or “light” position (or to medium-high if there is no marked “start” or “light”) and push it in and hold it in. It may take a couple of seconds until the propane reaches the burner, but the burner should light. Remove the fire starter but continue to hold the knob in for a few seconds until the burner is nicely burning, then let the knob out. If the flame goes out, repeat and hold the knob a little longer (with time, you’ll learn how long it takes with your stove and it’ll be second nature). Now you can adjust the burner to the setting desired.
NOTE: If the directions that came with your stove state a different procedure, follow those instead. These are sort of “generic.”
How Long Does a Tank of Propane Last?
Well, that depends on the size, how much and what types of cooking you do, and so on. In my experience of full-time living, a 20-pound tank (also called a 5-gallon tank in some places) lasted about 3 months. I baked and did everything I would ashore — in some ways, probably more as I heat dishwaster on the stove and also boiled water for coffee instead of using a coffeemaker. I hear this same number from other liveaboards, and even a friend who lives ashore and uses a 20-pound tank.
A common guideline is that you will use one pound per person per week.
For boats, the two sizes of tanks most often used are 10-pound and 20-pound tanks. Many full-time cruisers have two tanks, so they are never without. A spare tank needs to be kept where any leak will not drain into the boat.
Refilling the Tank
Our first question was whether the propane tank had to be empty before it’s refilled or could we do it when it was convenient? Nope, it doesn’t have to be totally empty, although you probably won’t be charged less. You can check how full your tank is by weighing it. You can use a luggage scale (Amazon) for this. Make sure you subtract the weight of the tank itself (the tare weight). You’ll find it stamped on the side of the tank.
Many marinas do a refill service. Take the tank to the office or other designated place by a certain time on a certain day and someone takes them to the tank farm. They’ll generally return them the same day or the next. Other times, you’ll have to go to the tank farm yourself.
In the US, you can exchange tanks at home improvement stores, grocery stores, pharmacies, and big box stores. These are easy, but note that they usually only have 15 pounds of propane in a 20-pound tank and thus last about 25% less time.
Many boats, particularly in saltwater, have aluminum tanks. If this is the case, don’t use the “swap-a-tank” services you see at so many convenience stores, supermarkets, and so on — those tanks are steel! However, if you have room and are cruising where it’s possible, have one steel tank for swapping and one aluminum for refilling. This is a great strategy if you’re cruising the Great Loop or ICW.
Every New Thing To Learn
Cruising involves a lot of learning. Big topics, like safety and navigation, get lots of attention. But how do you learn the little everyday things without someone to teach you?
That’s why I created The Basics of Living on a Boat, a step-by-step guide to make moving aboard easier. Available as a standalone course or part of the All-Access Pass, it’s a good first step to making living on a boat easier. Whether it’s using propane or repairing a dinghy engine, there’s a lot to learn as a new cruiser. So why make it harder by trying to learn everything on your own?
Read Next:

Carolyn Shearlock has lived aboard full-time for 17 years, splitting her time between a Tayana 37 monohull and a Gemini 105 catamaran. She’s cruised over 14,000 miles, from Pacific Mexico and Central America to Florida and the Bahamas, gaining firsthand experience with the joys and challenges of life on the water.
Through The Boat Galley, Carolyn has helped thousands of people explore, prepare for, and enjoy life afloat. She shares her expertise as an instructor at Cruisers University, in leading boating publications, and through her bestselling book, The Boat Galley Cookbook. She is passionate about helping others embark on their liveaboard journey—making life on the water simpler, safer, and more enjoyable.
Leave a Reply