Have you thought much about water intrusion gear on your boat? After writing about our high water bilge alarms, I got some questions about what we carry to stop a major leak . . . either a failed thru-hull or a crack/hole in the hull itself.
Let’s face it: if water is coming in, it has to be stopped. Bilge pumps will quickly be overwhelmed – they can buy you some time and they can get water out after you’ve stopped or significantly slowed the water down, but they aren’t going to save the boat by themselves.
Here are a couple really eye-opening videos showing techniques for dealing with water intrusion:
Simply put, some of the techniques we’ve all heard about just take too long to implement . . . and some others work surprisingly well. As you watch the videos, think about the time it takes to set these up and remember that (a) they know the emergency is about happen and (b) everything is out and ready to go.
EMERGENCY SUPPLIES WE CARRY TO STOP A LEAK
You can do a lot to stop water intrusion with just cushions and odd bits you find on the boat. But a few items designed to stop leaks can come in handy, especially if you have to travel any distance before the problem can really be fixed.
Wood Bungs
Soft wood plugs can be pushed/pounded into a failed through hull (almost like a large cork) and do a good job of stopping the water. There should be one tied near each through hull (not just sea cocks) such that it can be quickly grabbed and used in an emergency.
Remember to put one on every drain and holes that are normally above the waterline, too – if the boat takes on some water, these could end up below the waterline and you wouldn’t water to enter here as well as in the problem areas! We have them for all thru-hulls and a bag of extras, too.
You can get these from a number of places. If you’re ordering other things from Defender, they have good prices (shipping will eat up the savings if not part of a larger order); otherwise Amazon has sets for both large plugs and smaller:
- Amazon set of 10 smaller plugs (1/2” to 1-1/2” max plug size – up to about 1-1/4” thru hull or hole)
- Amazon set of 9 larger plugs (holes from about 1” to 1-3/4”)
- Defender set of six plugs for holes 1/2” to 2”
Forespar Sta-Plug
This is a fairly firm still yet still pliable foam plug that can be used in thru-hulls and also in larger hull breaches, including ones with irregular shapes. The base of the plug is 5” in diameter; it could probably plug holes to 4” in diameter and slow the flow in larger odd-shaped ones (you can also use more than one to fill large holes). These are fairly new on the market – an earlier version had smooth sides; the ridging on these makes them seal better. We have two on board – they can be compressed by hand and/or twisted some to insert them into holes, but it does take a bit of strength to do so.
Again, they can be purchased at most marine chandleries at widely varying prices. We bought one from Defender as part of a larger order and one from Amazon when we decided we wanted a second:
Hull Survivor Emergency Hull Seal
A 10” diameter circle that can be deployed from inside or outside the boat to cover larger holes or cracks. The emergency hull seal uses the pressure of the water outside the hull to hold it in place and also can be tied in place from the inside and sealed with epoxy from the outside. If you watched the first video above, it’s similar to their tying a line to a cushion and pulling it against the hull, except that this is faster to deploy as there’s nothing to set up.
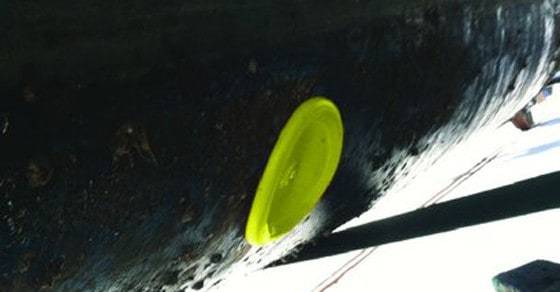
It’s a fairly new product and I don’t find any reviews, but I like the idea that it’s flexible and can be rolled up and then deployed from inside the boat. We have helped with saving two sinking boats (when we were in the Sea of Cortez) and one of the problems with both is that it took divers to apply patches to the outside of the hull. That takes time. This seems like it’d be much faster to deploy – as well as safer (diving under a boat with wave action can cause serious head injuries).
I’ve only seen them on Amazon:
Splash Zone Epoxy
Splash Zone will cure underwater (or in air) and can be applied to wet surfaces with no surface preparation. It also can be used on most surfaces that boats are made of – fiberglass, steel, aluminum, wood and even cement. It is designed to be mixed by hand and with “approximately equal” amounts of the two parts. Perfect for emergencies. Good for sealing a patch. I’ve seen it in action twice where it saved a boat. It comes in several sizes; we carry a half gallon. If you need it, you want enough.
IMPORTANT: Splash Zone comes with Part A and Part B held together with a plastic connector. Take this off before storing it. Be careful not to hole the can! It’s a bear to get off (at least ours was) and took Dave about 15 minutes to cut it off. In an emergency, you want it NOW.
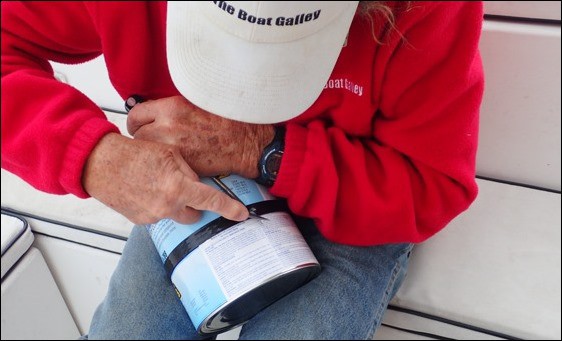
We store all our emergency supplies in an under-the-floor storage compartment just inside the door to the cockpit. In an emergency, you want them in a very convenient place!
Read Next

Quickly find anchorages, services, bridges, and more with our topic-focused, easy-to-use waterproof guides. Covering the ICW, Bahamas, Florida, and Chesapeake.
Explore All Guides

Carolyn Shearlock has lived aboard full-time for 17 years, splitting her time between a Tayana 37 monohull and a Gemini 105 catamaran. She’s cruised over 14,000 miles, from Pacific Mexico and Central America to Florida and the Bahamas, gaining firsthand experience with the joys and challenges of life on the water.
Through The Boat Galley, Carolyn has helped thousands of people explore, prepare for, and enjoy life afloat. She shares her expertise as an instructor at Cruisers University, in leading boating publications, and through her bestselling book, The Boat Galley Cookbook. She is passionate about helping others embark on their liveaboard journey—making life on the water simpler, safer, and more enjoyable.




Mark Sierakowski says
Merran Sierakowski, couple of good videos. Worth a view.
Jonathan says
Thanks Carolyn for this post and product recommendations. Very important to think about. Watch the videos. My major take aways from the videos:
In real life this will happen at night, with the boat bouncing around in seas, with major panic going on.
Not calmly sitting in the slings with a boat you have just holed on purpose in daylight.
Most of the stuff he tried didn’t work or wouldn’t work in the above circumstances. The inflatable PFD was brilliant (if the jagged hole doesn’t puncture the bladder.) The board and sealant would have worked if he had a good drill handy to make pilot holes and then drive self taping screws.
My plan: start the engine, have big electric pumps wired as close to the batteries as possible, triage the leak, stuff soft bits into the hole. If pumps are not keeping up with the residual leak, go to Abandon Ship protocol. But remember it may be hours before the ship actually sinks so don’t get into the liferaft prematurely.
Carolyn Shearlock says
Similar thoughts — my big take away is that you have to significantly slow the leak immediately. And that means knowing about it (the bilge alarms) and finding it (sometimes easy, sometimes not). And then you’ve got to have stuff to work with and a creative mind that works well under pressure.
Cheryl @ Mid-Life Cruising! says
Great post! We don’t have any of these products yet, but will definitely be getting some. I’d much rather spend about $100 bucks for these rather than watch my boat sink!
Peter says
If it is getting to the point where the bilge pump(s) aren’t keeping up with the incoming flow, and the water is a bit above the floor boards, as a last resort, with the engine running, close the raw water intake seacock, remove the hose from it, keeping the hose below the water level, use it to additionally remove water from the boat.
Carolyn Shearlock says
Yes. I’ve heard of people doing that, or even plumbing in a Y valve so you can just flip a handle.
Candy Williams says
Carolyn, you always post such useful tips…keep up the good work!! BTW…I enjoy re-reading your old posts as reminders! Thanks for all you do for us! Smooth Sailing!
Dan says
I’ve always carried a “blue tarp”, with lines attached at the corners. No matter how large the breach, slide the tarp under the bow, back to the problem area and, voila, water pressure solves the problem.
Carolyn Shearlock says
Dan, if you watch the video where they do that, it becomes painfully obvious that it takes WAY too long to get it in place. The boat would be sunk long before it was in place. You need things that are much faster to deploy.
Dan says
Hate to disagree, but I have had the misfortune of having to deploy it. The secret to success is having it properly set up and READY. Deployment took us approximately 20 seconds total.
Bill McNutt says
Then you did just have it “set up and ready,” you’ve DRILLED, haven’t you?
Bob Grenier says
Carolyn,
I thought that I would let you know. I purchased a 1/2 gallon kit of Splash Zone yesterday. I was concerned about separating the two cans from the ring connecting the two cans. I think that the company has changed this ring as I was easily able to slip a small flat blade screwdriver in between the cans and the ring and it easily popped off. It took less than 10 seconds. I still will not replace the ring to connect the two cans as I don’t want to have to find my small screwdriver and worry about this during an emergency. Thanks for all of your tips and articles. (p.s. I also purchased several fire blankets) Thanks again
Les Griffith says
As a supplement to wood bungs I’ve always carried a wax toilet bowl ring, it is pliable and should work with smaller holes or seal around bungs once in place. I’ve been blessed to never had to find out first hand how well it works.
Carolyn Shearlock says
The wax toilet rings work really well if you get a leak around your prop shaft or — heaven forbid — the shaft falls out. I’ve had friends who unfortunately got to find out that it did work well . . .
Paul says
Staying with the toilet bowl wax ring idea ….
Stay afloat … kinda like a tub of wax … http://www.stayafloatmarine.com/
or
Duct putty … found in most box store electrical isles. A lower cost alternative I’ve heard people speak highly of https://www.lowes.com/pd/Gardner-Bender-1-lb-Pug-Duct-Seal/4595233
Joanne Clark says
I read an interesting story that I will pass on. A sailboat and crew were making a delivery and were offshore at night. The captain was on deck at the helm when a crew member ran up to the cockpit and said they were taking on water. There was water all over the floor and rising.
They checked every thru hul, port, any opening they could find, but they were all secure.
Someone had the presence of mind to taste the water. It wasn’t salty! It was fresh water! It just so happened that their fresh water tank sprang a leak and that was what the problem was!
This a good reminder to check the water! This happened to me a few years ago when my marina launched my boat. They want you on board to check for leaks….sure enough, after the launch, I saw water all around my floor. I panicked, checked seacocks, then remembered to taste the water.
Guess what…it was my fresh water hose that came unhooked (the c clamp was loose) and it was lying on the floor pouring out water. I immediately hooked it back up and all was well.
Mind you though, this situation would only work when you are in salt water!
Carolyn Shearlock says
People who are in fresh water say it’s pretty easy to taste the difference between the lake water and tank water. I’ve never done it, so don’t really know! I’d think that “eau de bilge” would overpower the difference.
Sheila Campbell says
Tried to order the hair voodoo but looks like they won’t ship to Canada.
Sheila Campbell says
Couldn’t find the Hull Survivor on Amazon. Any other suggestions of where to look?
Carolyn Shearlock says
It’s on Amazon US. Try this link if the other one does not work. https://theboatgalley.com/water-coming-in
Anonymous says
Stuart…really good info!
Anonymous says
The reason my Tartan 26 project will have no thru-hulls is to eliminate that as a means of sinking the boat.
Anonymous says
I should add that as many compartments as possible will be watertight, similar to what was done on this Allied Seawind 30: https://www.youtube.com/watch?v=KTH106UdiUc
Anonymous says
We always carry Splash Zone on our boat! Plus bungs wooden and Forespar’s all in one plug.
Carleen says
Hey Carolyn and Dave. Will the Splash Zone adhere to ablative paint? Hi from the great White North!
Carolyn Shearlock says
It will stick to just about anything. After Marty, cruisers who were rescuing various boats had no problems with using it over ablative paint.
Anonymous says
If your boat has actually been holed , ie, submerged containers floating just below visible sight the immediate thing to do is drop the headsail, leaving all lines clipped on pass the sail under the bow to the spot where the damage has occurred, too big for bungs etc, then tighten up on the sheets and halyard, pulling the sail tight into the hull, if too far aft rearrange the lines to the winches , this will stop the water flow down to something manageable, then sit quietly in the stern and drink either medicinal brandy or scotch or whatever is at hand , set of your epirb and pray
Anonymous says
You are the one yo know Maurie
Jim S/V Amity says
That sail under the hull manoever was called fothering.
Robert fletcher says
If you have a hull breach near the bow should you make sternway to keep water from running into aft compartments if you have still have main propulsion ?
Carolyn Shearlock says
Sounds like a great idea but the priority is to keep water from coming in. You can only do so much at once. Concentrate on stopping the flow.
Steve Tudor says
Have you or any of your contributors tried ‘Flex Seal’ in a test or in an emergency on the bottom of their boat? In their advertisements, they cut a row boat in half, then patch it with Flex Seal and happily motor across the lake with no leaks! I know that advertisements can sometimes be ‘in accurate’ so I was wondering about actual use. I note that it is available on Amazon, as well as many hardware stores and big box stores.
Carolyn Shearlock says
I’ve seen those ads and wondered myself. I took a look online and a pro fisherman tried doing the deal where they put a screen door in the bottom of a fishing boat and sealed it up with Flex Seal — it didn’t last long. See the video here: https://www.wideopenspaces.com/video-can-flex-seal-really-repair-a-giant-hole-in-a-boat/
And in one of the questions on Amazon, the company says that it’s not for continuous immersion in water. So I don’t think it’s a long-lasting solution. But for an emergency? Yeah, it might work. For an emergency, I’d probably use the tape as the liquid takes 24+ hours to cure.
Jackie says
Do you have a FB page or You Tube? I would like to see how you are doing these things.
Thanks
Carolyn Shearlock says
Yes, The Boat Galley’s Facebook page is: https://www.facebook.com/TheBoatGalley/