Filling in a thru-hull is a straightforward project involving fiberglass and epoxy. But it takes significantly more time, materials, and layers than most boaters expect going in. When Dave and I did it on our Gemini 105 catamaran, we learned plenty of things the hard way — stuff the books don’t cover and that other boaters in the yard gave us only in bits and pieces.
This isn’t a step-by-step how-to. For that, Don Casey’s Complete Illustrated Sailboat Maintenance Manual and the West System website both give excellent technical guidance. What we’re covering here is everything else: the supplies you’ll go through faster than you think, the tools that made a huge difference, and the things that’ll save you time, skin, and a lot of frustration.
Protective Gear: Get More Than You Think You Need
Fiberglass is itchy, sharp, and hazardous. The materials involved in filling a thru-hull are genuinely unpleasant on your skin, in your lungs, and in your eyes. Get proper gear before you start — and get more of it than you think you’ll need.
You’ll need:
- Sanding/particle masks (Amazon)
- Tyvek bunny suit (Amazon)
- Safety goggles (Amazon)
- Latex or nitrile gloves (Amazon)
Dave also wore a paint spray hood (Amazon) during the worst of the fiberglass grinding to keep the dust from getting around his neck. It worked well.
We went through about 10 masks and 25 pairs of gloves on a two-thru-hull job. Buy more than you think you need.
You Really Do Want a Second Person
You can fill in a thru-hull solo — and some steps, like grinding, are really one-person jobs anyway. But once you’re working with wet epoxy and fiberglass cloth, a second set of hands makes a real difference.
Just make sure that second person is also suited up.
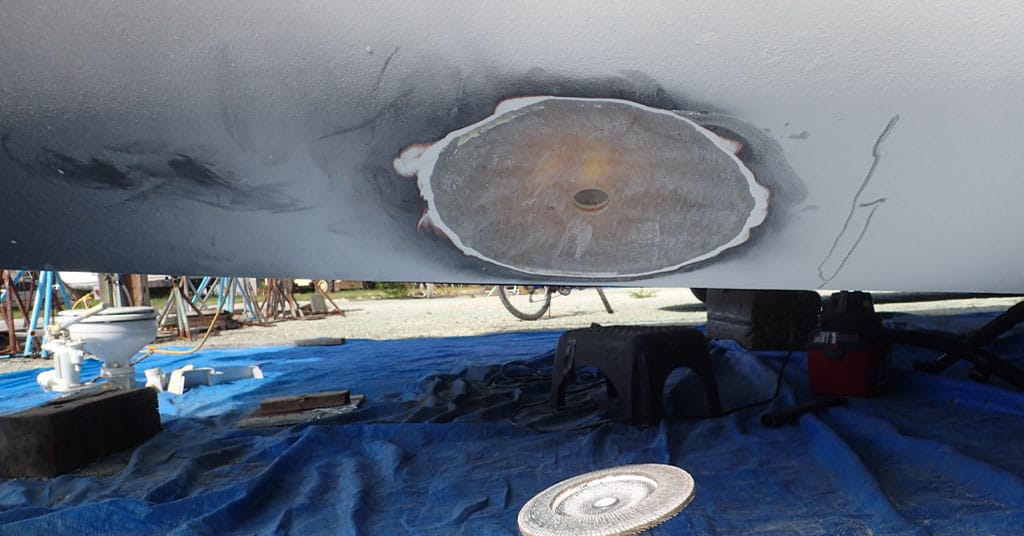
Fill the Wood Backing Plate First
If your thru-hull has a thick wood backing plate (ours did), you’ve got a hole through the wood to deal with before you even get to the fiberglass hull itself. We decided to fill that hole, as well as the one in the fiberglass, as a sort of “belt-and-suspenders” move to ensure the hull wouldn’t leak.
The easiest way to handle it: use a hole saw of the right diameter to cut a wood plug. Use thickened epoxy to secure it in place — and if you need something to hold it in your fingers while positioning it, run a screw into the drill hole left by the hole saw. Once the epoxy has cured, remove the screw and fill the hole with epoxy as well.
Shower Immediately After Every Work Session — With Cool Water
Fiberglass gets into everything. The moment you finish for the day, take a cool shower (not hot — heat opens your pores) and change into clean clothes. Don’t wait, don’t sit down first, just go.
A note that’s slightly TMI but genuinely useful: be careful not to transfer fiberglass shards when using the bathroom. It hurts. Badly. For days.
Also: don’t even consider doing this project at a boatyard that doesn’t have decent showers.
Budget More Time Than You Think
We filled in two thru-hulls in about 10 days. Part of that was due to the brutally hot summer conditions. We could only work about 4 hours a day in direct sun.
But even in better weather, this isn’t a weekend job. Grinding and sanding are hard physical work. Cleanup — both yourself and the work area — takes real time every day. And you can only apply so many fiberglass layers per day before the heat buildup from curing becomes a problem.
This is a hole below the waterline. Do it right, not fast.
How Many Fiberglass Layers Per Day?
The books warn against applying too many layers at once because of the heat that builds up as epoxy cures. There’s also the weight of wet fiberglass on a vertical surface — gravity will eventually start winning.
In theory, you can do multiple rounds of layup in a single day: apply several layers, let them start to go off, apply more. We were too exhausted to manage that. Instead, we did 6 or 7 layers in one thru-hull, then the same in the other, took a break, then repeated — 13 layers total per day per hole. NOTE: The top layer from the previous day must be sanded and wiped down with acetone before starting again (this is only required before starting each day, so that the epoxy will adhere to the now-cured epoxy from the day before).
Casey’s book mentions holding fiberglass cloth against vertical surfaces with masking tape. We tried that, and it created a mess. Just the epoxy worked better for us.
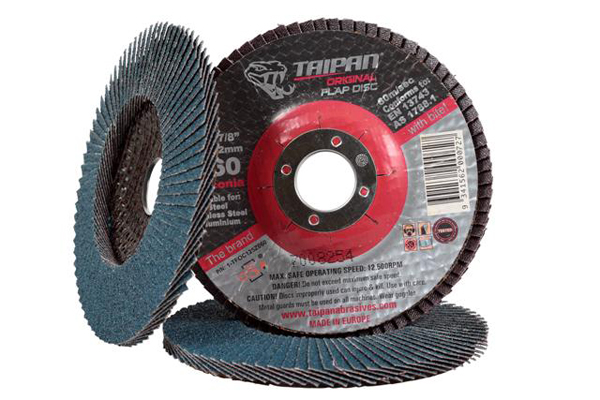
The Flap Disk: A Tool You Probably Haven’t Heard Of
The instructions say to grind the fiberglass out to a diameter 12 times the depth of the hole you’re filling. The tool that makes this possible — and that neither Dave nor I had ever encountered before — is a flap disk (sometimes called a flap wheel) mounted on a buffer/sander.
Dave used a 4″ diameter, 36-grit flap disk to rough things in, then switched to an 8″ diameter to finish. It was a huge help. Most hardware stores and home centers typically stock them.
Sandpaper: Plan on More Than You Expect
Because we spread the fiberglassing over three days (plus a fourth day for the fill coat), Dave had to sand the previous day’s top layer each morning before starting. We went through about 30 discs of 80-grit sandpaper.
Don’t use the flap disk for this step — it’s too aggressive. Stick with regular sandpaper.
Acetone and Rags
You’ll use acetone both to prep the surface before each day’s work and to clean up afterward. We used about two quarts. Stock up on rags and blue paper shop towels, and plan to throw the rags out rather than trying to wash epoxy out of them. Always wear gloves when using acetone.
Use Bristle Brushes, Not Foam
We started with throwaway foam brushes. Don’t bother. They’re useless with epoxy. Cheap bristle brushes work far better. We used 1″ and 1-1/2″ widths and went through at least two fresh brushes every day. We also used a squeegee occasionally, but the brushes did the real work.
Fresh Epoxy Pots Every Batch
If you mix a new batch of epoxy in a pot that still has old epoxy starting to cure in it, the new batch will also kick off almost immediately. (We learned this the hard way.) Always start each new mix in a clean pot.
That said, you can reuse the same pots the next day. Just pop the cured epoxy out. The pint Mix ‘n Measure pots held up well for us. Don’t use red Solo cups — we found that out the hard way too. Whatever pots you use, make sure they’re chemically resistant.
Epoxy Pumps Are Worth It
West System epoxy pumps (Amazon) are worth every penny for getting a consistent mix ratio every time. Leave them in the cans for the duration of the project — cleaning them every day wastes epoxy, acetone, and time. We found that two pumps each of resin and hardener was a good working amount, but your preference may vary.
One critical note: different brands of epoxy use different resin-to-hardener ratios. Make sure the pumps match your epoxy brand.
Plan for a Lot More Epoxy Than the Books Suggest
Every boat is different, but on our relatively thin-skinned catamaran, we used over a quart of resin (plus corresponding hardener) just for two thru-hulls. Budget generously.
You’ll Use Far More Fiberglass Layers Than You Think
This was our biggest surprise. We expected maybe 10 to 12 layers per thru-hull based on what we’d read. We ended up using 39 layers per thru-hull.
We could only source 6 oz. cloth rather than the 10 oz. Casey recommends, and 6 oz. thins dramatically once wetted with epoxy. We used almost 3 square yards of fiberglass fabric on two thru-hulls. Other boaters in our yard reported the same experience — they’d budgeted 6 to 12 layers and ended up using 30 to 60+.
Buy more fiberglass cloth than you think you need. Seriously.
Cutting the Fiberglass Circles
Yes, you’ll be cutting a lot of circles — we cut 78 of them. They graduate in size from the diameter of the thru-hull up to the full diameter of the ground-out area.
A few things that help:
- Don’t cut fiberglass in your lap, no matter what you are wearing as protection. Use a large piece of cardboard as a cutting surface.
- Wear gloves any time you handle fiberglass cloth.
- Fold two or three layers of cloth together in quarters, then cut a quarter circle — much faster than trying to cut full circles one at a time.
- Don’t stress about being exact. Fiberglass cloth is a loose weave and distorts when you apply epoxy anyway.
- Don’t be surprised if you end up going back to a smaller circle mid-layup to keep things level. It happens.
Use a Straight Edge to Monitor Your Progress
A straight edge long enough to span the full ground-out area lets you check whether the surface is staying level as you build up layers — and tells you how far you are from flush. It also helps during final fairing with epoxy/silica. We used an old 18″ metal ruler, but even a piece of dowel would have worked.
One More Step After the Epoxy Cures
Before applying bottom paint to the repaired area, check with the tech support line for your specific bottom paint to find out whether a primer is required over the new fiberglass. Don’t assume — some paints need it, some don’t.
Advice From Other Boat Owners
As I mentioned above, we got some helpful tips from other boat owners in the yard. Cruisers hep other cruisers. Here are a few more tips we got from others who have done this job. They fall into two categories: advice about the work and about protecting yourself.
Other Boat Owners’ Advice about Filling a Thru-Hull
Paul M found that his job went much easier with “EC Cutter” electric scissors. It made cutting the fiberglass mat a breeze. He bought his EC Cutter from Jamestown Distributors.
Richard F uses heavy plastic sheeting (he suggests the kind used for boat wrapping). He suggests that when you are ready to place your fiberglass patches, wet out the hull a couple of inches larger than the hole. Place your patches per normal, then cover them with a chunk of the heavy plastic that is 2 inches larger than the repair. The plastic sticks to the epoxy tenaciously, holding the patch in place, but it will peel off fine in the morning. The excess epoxy that held the plastic sands away easily.
If you want to be fastidiously accurate, Matthew B suggests using a scale to determine the amount of product you’re using. His experiments find that epoxy pumps are less accurate than they claim. We found the pump was convenient and measured the amounts well enough to cure the epoxy, so I probably wouldn’t bother. But everyone has to work to their own standard.
Other Boat Owners’ Advice About Personal Protection
We’ve also gotten some good tips on ways to better protect yourself when doing this work. James D and Helene M both recommended white vinegar for cleaning up your skin, instead of acetone. It’s much gentler and gets the job done. However, Scott mentions that vinegar can soften or dissolve resin, both cured and uncured. Make sure you clean up spills immediately and rinse with water.
Some boaters rely on baby powder. Desiree G said that covering your neck, arms, and legs with baby powder can keep fiberglass shards from getting trapped against your skin. John H also sprinkles some inside his gloves to make them easier to put on and take off.
What’s not to love about anything that makes a messy job just a little bit easier?
More Tips Every Week
If this kind of hands-on project knowledge is useful, the TBG newsletter is packed with it. Every Wednesday, 22,000 subscribers get practical guidance on boat systems, seamanship, provisioning, and the real realities of life afloat. Sign up here, and it lands in your inbox every week without fail. It’s free!


Carolyn Shearlock has lived aboard full-time for 17 years, splitting her time between a Tayana 37 monohull and a Gemini 105 catamaran. She’s cruised over 14,000 miles, from Pacific Mexico and Central America to Florida and the Bahamas, gaining firsthand experience with the joys and challenges of life on the water.
Through The Boat Galley, Carolyn has helped thousands of people explore, prepare for, and enjoy life afloat. She shares her expertise as an instructor at Cruisers University, in leading boating publications, and through her bestselling book, The Boat Galley Cookbook. She is passionate about helping others embark on their liveaboard journey—making life on the water simpler, safer, and more enjoyable.
Leave a Reply