Need new or better window (port or hatch) screens for your boat? Aftermarket screens from Waterline Designs are a solid option that’s less expensive than most hatch manufacturers’ offerings and will even keep no-see-ums out.
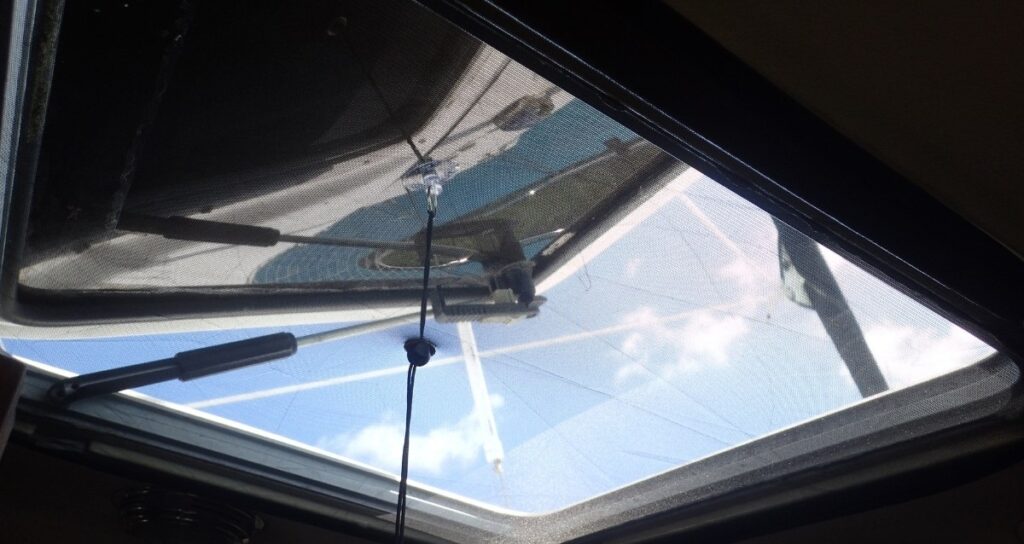
Our boat came with screens for the four main hatches. They were part of the Bomar hatches that had been used when the boat was originally built. But that was 17 years ago, and we’d begun to notice a few problems:
- One of the hatch frames was just slightly bent and would let mosquitoes in. We tried to straighten it out but couldn’t get it perfect. I checked the price for a replacement (gulp!) . . . instead, we used 2” wide tape to seal the gap.
- Being regular screen, no-see-ums could still get in . . . a real problem at Glades Boat Yard and in the Florida Keys on nights with no wind. More than once, we totally closed the boat to keep the bugs out. Talk about hot!
- We have four smaller ports that help considerably with cross ventilation, but those had no screens. I looked at buying some from the port manufacturers, but the cost just seemed too high.
To be honest, most of the time we don’t use screeens. If there are no bugs, we prefer the extra ventilation of not having a screen in. But if there are mosquitoes or – worse – no-see-ums, we want screens!
Just as we were leaving for the Bahamas, Waterline Designs contacted me. Would we be interested in trying their after-market screens? I looked at them online and, as they seemed to solve several of the problems we had, said yes, we’d be interested in trying them and providing feedback.
We used them anchored off mangroves in the Florida Keys – notorious for both mosquitoes and no-see-ums unless the wind is blowing – as well as in a few “no wind” anchorages in the Bahamas. Overall, we liked them.
Details of Waterline Designs Boat Window Screens
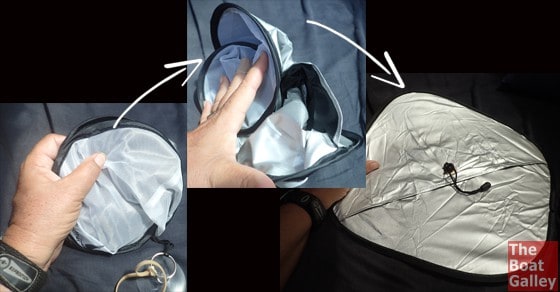
- The best way to describe them is that they are like the “instant pop up” tents that you may have seen: they have a frame made of a very springy material that just pops into shape; a twist of the wrist folds them back up. Consequently, they are very compact to store – much smaller than our “original” ones with aluminum frames. You also don’t have to sorry about a bent frame letting bugs in.
A blackout hatch screen popping open:
- They are “universal fit” boat window screens in several size ranges, which makes them far less expensive than custom screens or replacement ones from the manufacturer.
- The screen is fine enough to keep no-see-ums out, which is a big plus. The downside (which is true of any screen that keeps no-see-ums out) is that less breeze passes through. I’ll take less breeze in order to block the no-see-ums!
- They also have screens with a blackout shield. This is good for the off-watch sleeping during the day on passage (you might not want the hatches open underway but you can use these without opening hatches) or just to avoid early sunrises and late sunsets as when cruising high latitudes in summer (the company is based in Sweden).
Installing Waterline Designs Boat Screens
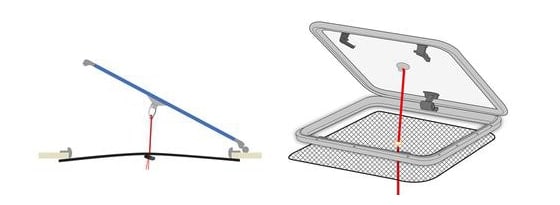
So, how do they mount? There’s an ingenious suction cup/drawstring arrangement. The suction cup goes on the hatch and then the drawstring with cord lock is tensioned to keep the screen snug on the hatch or port opening. For vertical portholes that open in, the screen will be on the outside. The company’s drawing shows it far better than any of the photos I took.
There’s definitely a learning curve to setting up these boat window screens, but it’s not insurmountable. Two tips: clean the hatch well where the suction cup will go – salty air collects on the hatch and then the suction cup won’t stick well (if it still doesn’t stick, wash the suction cup off too — something may have gotten on it); and don’t pull the drawstring too tight or you’ll pull the suction cup off the hatch/port.
We were a little frustrated trying to get them “just right” at first, but within a few days started to get the feel for making them tight enough to keep out bugs but not so tight as to pull them off. Strong winds would dislodge the suction cups and the screens would drop into the boat, but if there were strong winds there weren’t bugs so it wasn’t a problem.
Sizing: you want the screen to overlap the hatch area by at least an inch, two is better. We should have used the next larger size. If in doubt about the size you need, order larger.
BOTTOM LINE
The Waterline Designs screens cost much less and take up a lot less space than “original replacement” screens or custom screens. While there’s a learning curve to putting them up, once you’ve mastered it they do a good job of keeping mosquitoes and no-see-ums out of the boat. Some air flow is blocked, but no more so than other no-see-um screening. And if you want to sleep while it’s still daylight out, their light blocking shades are excellent.
WHERE TO BUY:
You Might Also Be Wondering About . . .

Carolyn Shearlock has lived aboard full-time for 17 years, splitting her time between a Tayana 37 monohull and a Gemini 105 catamaran. She’s cruised over 14,000 miles, from Pacific Mexico and Central America to Florida and the Bahamas, gaining firsthand experience with the joys and challenges of life on the water.
Through The Boat Galley, Carolyn has helped thousands of people explore, prepare for, and enjoy life afloat. She shares her expertise as an instructor at Cruisers University, in leading boating publications, and through her bestselling book, The Boat Galley Cookbook. She is passionate about helping others embark on their liveaboard journey—making life on the water simpler, safer, and more enjoyable.
Dawn Read says
Ingenious.
Sandy Driver says
I’d love to have custom-tailored pop-up screens for our RV.
Gillian Lisa Johnston says
Clever
Chrystal Lakeway Henthorne says
Must have some!
Jim says
I developed screens for the companionway by attaching 3 narrow overlapping screens that snap to the hatch and hang down… I can walk through the screen either direction when my hands are full. I made simple overhead hatch screens by screwing snaps to the corners of the hatches and putting snaps on the corners of the screens. Not quite a clever as the screens here, but super cheap and easy.
Jennifer Hegreness says
Hi Carolyn,
Thanks for all your great articles! I’ve read many of them. We recently had some custom windows made for our Moody 376. Screens were not available. But I had an idea from reading one of your posts about flexible cutting sheets. I ordered one of those really heavy food grade cutting sheets large enough to cover the opening side ports, but flexible enough to bend. We created a template of the window opening, setting the cardboard (yes cardboard from a cereal box!) into the track of the window. Then I traced it onto the cutting sheet, cut out the center sections (I left one strip in the middle for extra support), cut some screen to fit, and hot glued it onto the “frame.” since the cutting sheet is flexible it bends enough to set it into the track. So far it has worked wonderfully!
Carolyn Shearlock says
Great idea!
Paula Biles says
Regular screens can be sprayed with Avon’s ‘Skin So Soft” to keep out no see-ums, which also works great on skin and doesn’t stink. Another option is WD-40, which doesn’t smell nearly as nice. The WD-40 should be sprayed with care, since carriers of the spray can damage plastics on your boat. This can also be a problem with sunscreens.
Michelle Jacques says
Thanks for sharing this, Carolyn. We have long needed a new solution for our hatch’s bug screen and blackout shade. However, I went to their website Q&A and can’t tell if this device fits on a round hatch, as all of the examples shown/described are square. Can you advise on that, please? Much obliged, thanks.
The Boat Galley says
Yes, it will work with a round hatch. The screens are square, but as long as the sides of the screen are longer than the diameter of the port, they’ll work fine.
Aimee Christenson says
Recently purchased these hatch screens for our new-to-us boat. They are my MOST FAVORITE improvement to our 30+ year old boat! They are quick and easy to install and the price is great. They also arrived in a very timely manner! Highly recommend. Thanks for sharing!
Patricia Pytlak says
I made screens for our hatches by sewing wide binding tape around cut-to-measure (about two inches larger all around than the opening) screen material, then sewing on adhesive velcro. The adhesive side is attached to the inside (ceiling) of the salon. It works quite well. This could work for opening ports as well. The only disadvantage is you have to partially open the screen from the inside before you can operate the hatch or port. They are easily removable and roll up for storage.