Using a baking stone (also called a pizza stone or bread stone) is actually quite simple. And it can make a huge difference in the quality of all your baked goods, particularly if your oven has hot spots or heats unevenly (see Galley Oven Problems). The biggest problem that people have with a baking stone is that it can crack or break. If you have a stone that’s at least 1/2-inch thick, and take care to follow the precautions below, yours should have a long life.
Store Your Baking Stone
In general, your baking stone should just be left in the oven. The more you handle it, the greater the chance of dropping it or otherwise knocking it against the oven and cracking it. By leaving it in the oven, it will start out at the same temperature as the oven itself. And it will safely cool off when you are finished baking. Whatever you do, NEVER put a cool stone into a hot oven. It’s almost certain to break!
To avoid breakage, your stone would just fit inside the oven and not slide around at all. Unfortunately, that wouldn’t allow air to move inside the oven, which would cause other problems in baking. So it needs to be sized so that there is about an inch of space on all sides.
Keep it Stable
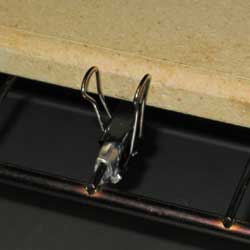
So how then to keep it in place so that the movement of the boat doesn’t chip the edges on the walls of the oven? I use little binder clips! It takes a bit of fiddling to set up at first, but then you can just leave everything in place. I use four clips, two on each side of the stone. I just clip them onto the oven rack (where the wires are too thin for the clip to stay in place, I put a little aluminum foil around the wire of the oven rack). If you do this, be sure that your clips are all-metal — no plastic!

Using a Baking Stone
If your boat oven has two racks, put your baking stone on the lower one. Otherwise, put the rack low enough that your pan will fit in the oven on top of the stone, with at least 1 inch (preferably 2) of airspace on top. Let it preheat 20 to 30 minutes before baking.
You can bake pizza or bread directly on the stone but it’s hard to do without a “peel” (those long-handled paddles you see in pizzerias) to slide things on and off with. And peels are both hard to use and store in a boat galley. So on a boat, place your pan directly on the stone (again, thick pans will conduct the heat more evenly than thinner ones, so using a baking stone with poor quality pans won’t solve all your problems). NEVER place something cold or wet (from the refrigerator or freezer) onto the hot stone – it will crack. Equally, never let liquids spill onto a hot stone (using a pan will help keep liquids from getting on the stone).
Cleaning the Baking Stone
Unless something spills on it, you don’t need to clean the stone. It will turn a little darker over time, but that’s no reason to clean it. The stone is very porous and needs little care. If you do spill something on it, wait until the stone is completely cold, then begin by scraping what you can off with a plastic scraper (don’t use metal) – a plastic putty knife (like you’d use for tight spots when bottom cleaning) works well and is a lot cheaper than scraping up your good kitchen utensils.
Then soak the stone in water – no soap! Soap will permeate the stone and be impossible to rinse out. To be honest, I skip the “soak in water” stage unless it’s something that didn’t fully scrape off. Anything else will just bake off the next time you use it.
If you REALLY need to clean your baking stone, mix a thick paste of baking soda and water, rub it on the stone and let it sit for 15 minutes (if you’re in a really hot climate, put it in a plastic bag so it doesn’t dry out) and then rinse with hot water.
Don’t use the stone again until it is thoroughly dry – it will crack if heated when wet or even damp.
Buying a Baking Stone
Despite being called a “stone,” a baking stone is actually made of ceramic. And ceramics can crack or break. And breakage is even more of a concern on a boat, due to the motion. So there are several things to look for when buying a baking stone:
Thickness
The thicker the stone, the less likely it is to crack or break, not only if you drop it but also in heating it up. A thicker stone will also heat more evenly. The disadvantages of a thicker stone are that it will weigh more and take longer to heat up and thus you’ll use more propane.
Baking stones — also called pizza stones — come in a range of thicknesses from 1/4-inch to 2 inches. Although the thickest ones are generally only found in commercial kitchens. For boat use, the best thickness is about 1/2-inch. It’s much less likely to break than one that’s only 1/4-inch thick. But still isn’t too heavy and doesn’t take forever to get to temperature. Most of the stones made for home kitchens are only 1/4″ thick, but it’s worth the time and slight extra expense to get one that’s thicker.
Size
Ideally, a baking stone should just fit your oven with about 1″ of space all around for air flow. As most boat ovens are smaller than home ovens (which the readily available stones are made for), you will probably have to buy one that’s larger than what you really need and have a tile shop cut it down to size (you can do it yourself if you have a good tile saw).
If you buy one that is substantially smaller than your oven, not only will it not work as well, but it is also more likely to break with the movement of the boat unless you use clips to keep it from shifting. See Using a Baking Stone for a simple and inexpensive way to keep the stone from moving in the oven.
Shape
Many stones are round, specifically for pizza, but the better ones for evening out hot spots and helping retain heat in the oven are rectangular. They’ll cover more area in the oven, your pans won’t hang over the stone (which can lead to hot or cold spots where the stone isn’t) and they are easier to keep from shifting with the motion of the boat.
A number of stones (particularly round ones designed for pizza) have handles on them. The handles make it almost impossible to put regular baking pans on the stone and I recommend staying away from any stone with handles.
Storage
With most things you buy for the galley, you have to think about where you will store them. No such problem for a baking stone — just leave it right in the oven! Since you’ll be using it every time you bake, there’s no reason to take it out and it’s really the safest place for it if you clip it in place.
Alternatives
If you can’t get a baking stone where you are, you can create the same effect by using unglazed ceramic tiles (the key being UNglazed). They can be cheaper, but they also tend to be thinner and thus easier to break or crack and also don’t hold heat as well as the thicker ones. If they’re the typical 4″ or 6″ square size, it’s hard to clip them in so that they don’t shift with the movement of the boat. However, they are definitely better than nothing.
My Suggested Baking Stones
A good baking stone for your boat oven is likely to cost $50 to $60, including cutting it to size.
- Pizzacraft 15″ Square Cordierite Baking/Pizza Stone
- Solido 14″ x 16″ Pizza Stone
- Cucina Pro Professional Grade Baking Stone for Oven or Grill- XL Size 16″ x 14″
The one I bought is no longer available from Amazon. The first one is very similar (the size is slightly different and the material less breakable, which makes it even better). Both baking stones are 5/8″ thick, which makes them work better than thinner ones and also it is less likely to break. Depending on your oven, both are likely to need to be cut down slightly, which any tile shop can do.
Second choice(s) — which are also good for really small (2-burner stove) ovens:
If you really don’t want to deal with having to cut down a stone, these stones designed for a toaster oven will work. In many ovens, you can place two of these side by side and pretty well fill the space. Check the measurements of your own oven to determine whether you need two or just one — if you have a 2-burner stove, you’ll probably only need one.
The big drawback to these stones are that they are only 1/4″ thick, which makes it much more susceptible to breakage.

Carolyn Shearlock has lived aboard full-time for 17 years, splitting her time between a Tayana 37 monohull and a Gemini 105 catamaran. She’s cruised over 14,000 miles, from Pacific Mexico and Central America to Florida and the Bahamas, gaining firsthand experience with the joys and challenges of life on the water.
Through The Boat Galley, Carolyn has helped thousands of people explore, prepare for, and enjoy life afloat. She shares her expertise as an instructor at Cruisers University, in leading boating publications, and through her bestselling book, The Boat Galley Cookbook. She is passionate about helping others embark on their liveaboard journey—making life on the water simpler, safer, and more enjoyable.
Simplify meal prep on board with proven strategies for provisioning, maximizing fridge space, and cooking delicious meals aboard your boat.


Carolyn Shearlock says
Glad to hear it!
Carolyn Shearlock says
The problem with using such small stones is trying to keep them in place on a boat oven. You could try laying them on a jelly roll pan (a cookie sheet with sides), but otherwise they’ll slide all over and fall off the oven rack. NOTE: I haven’t tried putting them in a pan, so I don’t actually know how it would work — just an idea if that’s all you can get.
Carolyn Shearlock says
I do think that putting it on the rack will do more for evening out the temps. Putting it under means that the uneven heat source is still between it and what you’re baking. Try it and let me know if it does better — I’m curious!
PS. Glad you find the book helpful!
Carolyn Shearlock says
I have had NO problem with mildew, and we’re in a very hot and humid location. If you don’t use the oven often enough to keep the stone dried out, I’d suggest turning the oven on (with the stone in it) for just 5 minutes or so every 3 to 4 days to keep the stone dried out so that mildew won’t form.