A few weeks ago, I wrote about the easiest way I’d found to clean non-skid decks. And I said something about our gelcoat being really chalky in general (it’s a common problem in older Gemini catamarans . . . well, in older fiberglass boats in general).
Tami Shelton, a reader who has become a friend, asked if I’d like to know how she got great results in renewing the gelcoat on their Catana catamaran. Of course I did! And several other readers left comments to that effect, too.
A year and a half ago, when our boat was on the hard, I worked to polish up the sides of the hulls on Barefoot Gal. But the results really weren’t as nice as I would have liked them to be . . . and and I still have a lot of the cockpit and deck to do. I’d love to know how to get Barefoot Gal looking good without having to paint her!
The total cost of the project, including buying the tools, is about $400 (plus your labor) – and you’ll have the tools for the next time you need to polish the boat (hopefully you won’t have to de-oxidize!) as well as most of the supplies. That’s an awful lot less than the cost of painting your boat.
Here’s Tami’s description of the process (all links are to Amazon):
The Story, including the Shameless Plug for Donnie . . . Mr Donnie Brennan, who is the Olympic boatwright and proprietor of Diversified Marine, Mobile Alabama, gave me an invaluable lesson in gelcoat polishing.
TOOLS
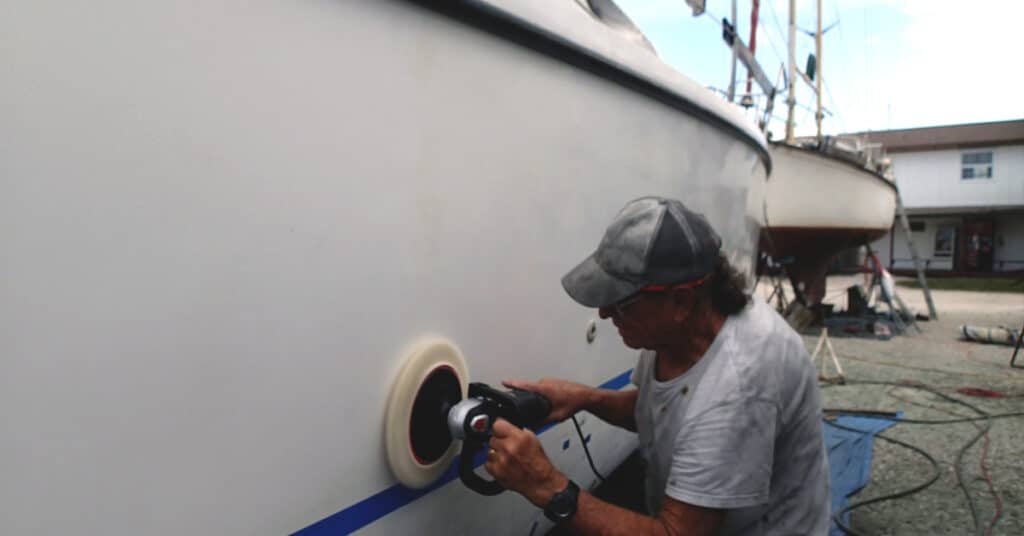
Buy good tools. A high-quality buffer-polisher is essential. I blew the dosh on a Makita 9237CX3 7-Inch Variable Speed Polisher-Sander with Polishing Kit and a couple additional WOOL high quality polishing pads for the polisher.
The compound of choice is 3M High Gloss Gelcoat Compound. I bought a gallon container, which is probably enough to do 20 of my boat’s hulls (40′ Catana) but I don’t think there is a smaller container available. Split the cost with friends?
TECHNIQUE
So, the technique is… first, wash the boat.
Second: to quote Donnie, “if you want to bring your oxidised gelcoat back 100%, you’ll have to start with wet sanding.” I didn’t do that, but that was Donnie’s advice. I was pleased with my result without sanding – if you want best results, wet sand.’
After washing, I wiped the boat with oxalic acid hull cleaner and then rinsed again. If you’re doing this on the hard, do be sure to protect your bottom paint from the oxalic acid. (Carolyn’s note: The oxalic acid will remove a lot of stains. I’m not sure which brand Tami used, but the one I’m familiar with is Sudbury Hull Cleaner.)
Next, pick an area to start, about 2×2 feet at a time. Take a chip brush/paintbrush, and dip a bit of the compound out of the can onto the brush and dab that on five or six spots across the area you’ve chosen to work. Hold the buffer with the pad up against the work, and start the pad at a low speed. Work the compound around a bit, and then increase the buffer speed up to the recommended speed that 3M lists on the can (1500 – 2500 RPM).
[SAFETY NOTE from Carolyn: Watch out for the cord on the buffer! Hold the buffer so the cord doesn’t go “around” the buffer. The boater next to us in the yard tore the cord apart (luckily didn’t cause a fire) as his cord tangled in the buffer pad while it was on. There’s a lot of torque in the buffer and it’s easy for it to walk if you’re not gripping it tightly.]
As the compound begins to dry out on the pad, you want to stop and clean your pad. FREQUENTLY. Take a paint stir-stick, hold a corner of the stick onto the pad center and run the buffer at high speed, moving the stick from center outward rather like a vinyl record needle type movement. This will knock the dried-out compound and the oxidized gelcoat off the pad, and fluff the pad up. Then go back to the area you were just working and polish it again with your newly cleaned pad. Now, you’ll really start to see the area shine as you work the buffer around.
It takes some fiddling. Start out with lighter pressure and then increase as you get a feel for how the compound is cutting the oxidization. Don’t be afraid of it, but do start out gently.
After you’ve done three or four 2-foot square areas, you’ll note that your pad doesn’t clean as well with your stick, so then you need to change to another pad. Alternatively, clean your pad with a good rinse in a bucket with lots of fresh water. Put the wet pad back on the buffer and turn it to high speed and that’ll sling the water out and dry the pad pretty quickly. [Another note from Carolyn: think where the water will be flung and go to a place where you won’t spray people or the area you’re working on. Yeah. You know what I did the first time I dried a polishing bonnet.]
One of the keys that I found to doing this is to keep a clean pad. If the pad is gumming up, clean it or switch.
Using the best tool makes this job go far more quickly. The high-quality polisher ain’t like your old car buffer, a good tool makes light work.
Once your compounding is completed, be sure to finish it off with a high quality wax to protect your new finish. I like the Star Brite PTFE Marine Polish, myself. Re-wax every 6 months to a year.
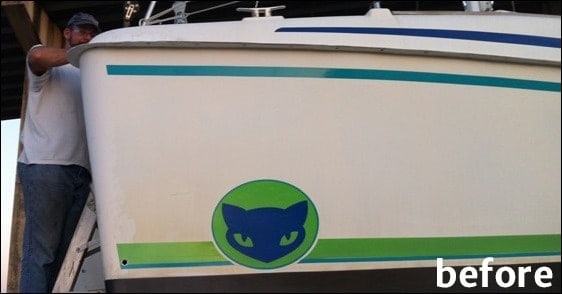
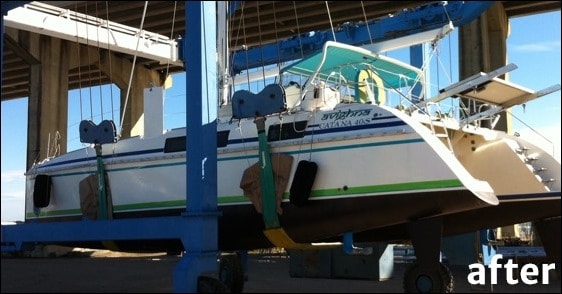
Tami didn’t get photos of the rejuvenating as they were doing it, but did have these before and after pictures. Note the dull yellow color in the “before” shot and the glossy reflections in the “after”!
Carolyn again: Armed with these tips, I’m actually looking forward to working on our cockpit! I know from past experience that buffing is hard on the neck and shoulders but I’m happy to put up with it for a shine like that!
Our cockpit has a bunch of small strips of smooth gelcoat between nonskid as well as a few just plain small areas where a full-sized buffer won’t fit. I have small 3” buffing pads that go on our cordless drill (I used these when rejuvenating our windows). If you have small areas, you may want some of these (make sure they’ll fit your drill).
Read Next

Carolyn Shearlock has lived aboard full-time for 17 years, splitting her time between a Tayana 37 monohull and a Gemini 105 catamaran. She’s cruised over 14,000 miles, from Pacific Mexico and Central America to Florida and the Bahamas, gaining firsthand experience with the joys and challenges of life on the water.
Through The Boat Galley, Carolyn has helped thousands of people explore, prepare for, and enjoy life afloat. She shares her expertise as an instructor at Cruisers University, in leading boating publications, and through her bestselling book, The Boat Galley Cookbook. She is passionate about helping others embark on their liveaboard journey—making life on the water simpler, safer, and more enjoyable.
Richard Philbrick says
Yes, with compound and a lot of elbow grease you can get it to shine, but eventually neglected gelcoat WON’T come back and then you have to paint the hull. But, don’t worry, as my old friend used to say when we were restoring boats for a living….”Basically it’s nothing but a big stripe.
Ritchard Findlay says
I have had great success with another 3M product, “Imperial Compound”. My old girl had been left to sit in a boat yard for years, and the gelcoat was terrible. I’ve brought it back beautifully with this product. It is apparently a mid-grade rubbing compound and glaze (finishing polish) in one. I’ve recommended it to many members of our club, and it has become a common as Robins in the spring.
Jim Watson says
I started with 800 grit, then 1200 grit and then 1500 grit sandpaper on a power sander, then hit it with the buffer with Meguiar’s® Ultimate Compound . A final coat with Meguiars Ultimate Polish, 20 years of neglect disappeared.
ben munday says
way too much work. I’ve dona ll of the above. you p[robably eneded up with way more hull material removed than if you’d done it in less steps. all you need to be doing is removing sanding marks from the previous stage, and frankly, compunds don’t really leave any. on the other hand, sand is a pro move. next time count your hours and go 220, some ultra-cut compound (800-1200) and a polishing compund, then wax. it is by far more effective, and way faster, ultimately way safer. the pro-tips are in the tools. and you’re not getting that out of me. lets just say, hardcore grit is a pro move and you need-to-be-tooled-up, it’s not just a “polisher”.
Jonathan Caldwell says
The tool to remove glazing from pads is called “spurs”. Much easier and more thorough than a stick. [Carolyn note: you can find these on Amazon at http://amzn.to/1STNlHJ ]
Marie Holmes says
Spurs work Jonathan; but they will tear up your wool pads pretty good. My husband and I use the stick method and it works pretty well. It pays to have several wool pads.
tami says
We tried a spur and it was too aggressive. Even the stick will make the fur fly…
Carolyn:
I think my email bounced, but I wanted to say ‘you’re welcome,’ and we are so glad to give back a little. Your site has just been a real help to us. Thanks.
Marie Holmes says
All of the new wool pads shed a lot in the beginning. Once they are used awhile; the shedding decreases somewhat.
ben munday says
I agree about spurs, they deeply increase your material cost by blowing through pads. clean yarn is cool, but if you have core strength, it’s not that big a deal, use more pressure- even when glazed it’ll polish.
Lynn Duggan says
I am a great fan of PRISM. I use it to renew shine on almost everything from metal to gel coat and it works beautifully.
Not much hard rubbing and lasts a long time! Great in the cockpit! It is just not a metal polish. Given it as gifts to sons to polish cars and boats..
Carolyn Shearlock says
Thanks Lynn — I love Prism! I’ve used it on lots of things, but it’s just not enough on our chalky gelcoat — I think it’s just too far gone.
Beth Hipp Tyler says
Thanks,
Marie Holmes says
I have really learned a lot about fiberglass and gel coat over the last eight years with my husband and my first experience owning a boat. When I met him he had a Carver 356 Aft Cabin, we traded that in on a Carver 396 Aft Cabin. Last year we sold that boat and bought a Carver 450 Voyager in Jacksonville Florida.
We have always had at least four-five wools at a time. We use two for cleaning and two for wax. As they get thin we rotate them down to compound. We use two pads the first day and I take them home and wash them. Then we switch to the two clean ones the next weekend day. By the following weekend we have four clean ones.
The boat we bought last summer in Jacksonville, Florida was severely chalked. My husband started with 3M Super Compound to get down to shiny gelcoat, then Imperial compound. Then he switched to 3M Finess It II to clean it. The last two coats are Diamond Lustre liquid wax. All of it is put on with an orbital and wheeled off with a DeWalt “grinding” wheel with velcro attachment for the wool pads. Dan has been using the wheel for almost eleven years. It really, really pays to buy a good one straight out the door.
Once we have our shine back, he won’t need to compound any more. We can just clean and wax at the beginning of each summer. (We only have 5-6 months of boating in Michigan). Quite often he will clean and wax the brow and cabin sides about halfway through the summer; just to protect the gelcoat.
I am wax on and Dan is wax off when their is room for both of us to work.
We will have to do some wet sanding this summer. Where the old boat name was on the transom has raised glass and gelcoat. We will for sure have to sand that smooth to put our new name on the boat.
The secret to a good shine is to keep it up. It’s work; but worth it.
David Ditacchio says
I know a better product.
ben munday says
watcha got? I’m very interested. I very much like, the 3m product line. also, it’s good to know who rebadges what. but a better product line? hmmmm. I have, in stock, four lines. very interesteg to put test blobs on cardboard and take a look.
Chris Wannop says
Good article.
Might just add my 2 cents worth.
I’ve spent the last five years looking after a fleet (12) of Charter Boats here in Australia, where the UV gives Gelcoat a VERY hard time.
Health and Safety:
Be sure to wear eye protection!
By it’s very nature, polish is abrasive, and getting it in your eyes is excruciating (like welding flash). Ask me how I know!
Ski goggles work well, especially the treated lenses that don’t fog up.
All of these machines are quite noisy because of the the right-angle gears. You will be using it near your ears for lengthy periods.
Ear plugs or muffs are cheap.Hearing aids are expensive……….
If your mop is clogging with polish, it’s because you aren’t spraying water on the job.
All of the good machine grade polishes are “Ablative”. That is, they wear down as you polish, so that they get finer as you use them in order to give a great shine.
I use an old paintbrush to paint an even layer about 1 metre (3 feet) square onto the job.
I then have a water squirt bottle and give the area a little spray of water.
This does several things:
It cools and lubricates the surface and mop.
It stops the mop clogging with excessive compound.
It helps keep “fresh” compound on the surface for the mop to work with.
As you work the compound around the surface and it starts to dry out, keep giving it a mist of water spray and then polish again until the polish is all gone. Rinse and repeat as necessary.
The “Waffle Style” foam pads work really well too.
Don’t press too hard, let the machine do the work, keep the area that you are working on wet with the spray until all of the polish is gone.
Keep the mop almost flat on the surface that you are polishing. Holding it at an angle will cause localised overheating.
Don’t be afraid to use plenty of water spray (But not enough to wash the compound off on to the floor.)
You’ll find that this makes your job much easier, but it’s still quite a workout!
ben munday says
After working a number of product lines, I have found some are more and some less compaible with adding water to the job. dependant on humidity, and direct sunlight. Best I have done (speed, effectiveness, consistency), is right out of the bottle 3m. I must work at an even pace. adding water increases the amount of product used (slinging), distorts my ability to identify when enough is enough, and cran drastically increase time. although it is a much smoother ride.
Tom Conover says
I decided to regelcoat the outsides of my hulls on a 38′ catamaran sailboat. This is a lot of work although the results were worth it. I did repairs and had a local fiberglass repair outfit spray the gelgoat. Lots of sanding. I cleaned the polishing bonnet frequently with a hose and then spun it in an empty 5 gal bucket for the water sling issue. If you are doing this process frequently a good polisher is worth the investment, but I did the whole job with a used knock off plastic bodied polisher and it still is doing well. The weight of the lighter polisher was something to consider unless you are doing horizontal polishing. You can easily repair hull dings with gelcoat matched to your vessel by taking a small panel off a locker to a gelcoat supplier for a color match. If you spray gelcoat it is worth adding something like Durateck to the gelcoat to improve flow and reduce some sanding as it dries with a nice shine after spraying. There is a very good article on this whole process on SailboatOwners website under the forums tab listed as Tips For a Great Buff Wax. I used this technique for my entire regelcoat job.
ben munday says
what I have found to be a large variable in my process is the pad and quality of wool. so many are yarn pads some are whole wool. BIG difference. the lanolin and the strength of the fiber (cost of pads as you blow through them with the spur), and the finess of the pad, are appropriate for various situations.
Remember, a fairer and glossier hull is a detriment to fuel efficiency and does NOT make the boat go faster. It just makes you drive at a higher rpm!
Diana and John Anderson says
We have a 13 year old Gemini catamaran, and I will be doing the gelcoat restoration. Do you have any suggestions regarding wet sanding? And how do we handle the non skid areas???
Carolyn Shearlock says
That is a question that plagues all Gemini owners! How aggressive you want/need to be with the wet sanding depends on how bad the gel coat is. You need to get down to the non-chalky part, but don’t want to take too much off. Generally, using somewhere between 400 and 1000 grit works well. Hand sanding is best so that you don’t go too far, too.
Another option for the whole job is to use Poli Glow, which doesn’t require the wet sanding — a friend did this on his Gemini and his boat looked amazing. Unfortunately, it was lost in Hurricane Irma so I don’t know how long it would have held up, but I understand that if you do a maintenance coat each year, it does well.
We don’t use anything other than a nonskid cleaner (read my post about this) on our nonskid as we want to keep it as “grippy” as possible.
Diana Burkley says
Hi Carolyn, thanks for the response. I am beginning to wonder if I can do the topsides gelcoat work, and then paint the nonskid with Awlgrip. It is just so stained and beat up, porous and cracked.
Carolyn Shearlock says
I understand. It’s a problem we all have. There are some nonskid paints but I don’t know anything about them or whether they are suitable to go over existing nonskid. Keep me posted on what you decide to do and how it goes.
Anonymous says
Felix Roge
Anonymous says
Rich
Anonymous says
This is what Dean did to the Lang. When he was done the sun was blinding off the hull, came out great. He had 5 or 6 guys on it