I needed a place to store produce and we really didn’t need to hang more clothes in the cabin behind the galley, which we now consider to be the pantry.
Answer: turn the hanging locker into a produce locker with hanging baskets.
The basic idea came from a post here on The Boat Galley (!) where Jackie Bartz showed a hanging fruit basket she’d made using plastic colanders (see it here). Once I had the supplies, it took me less than half an hour to make and install it.
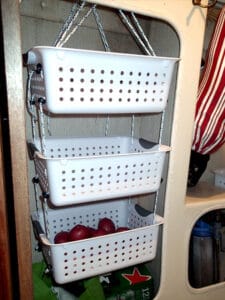
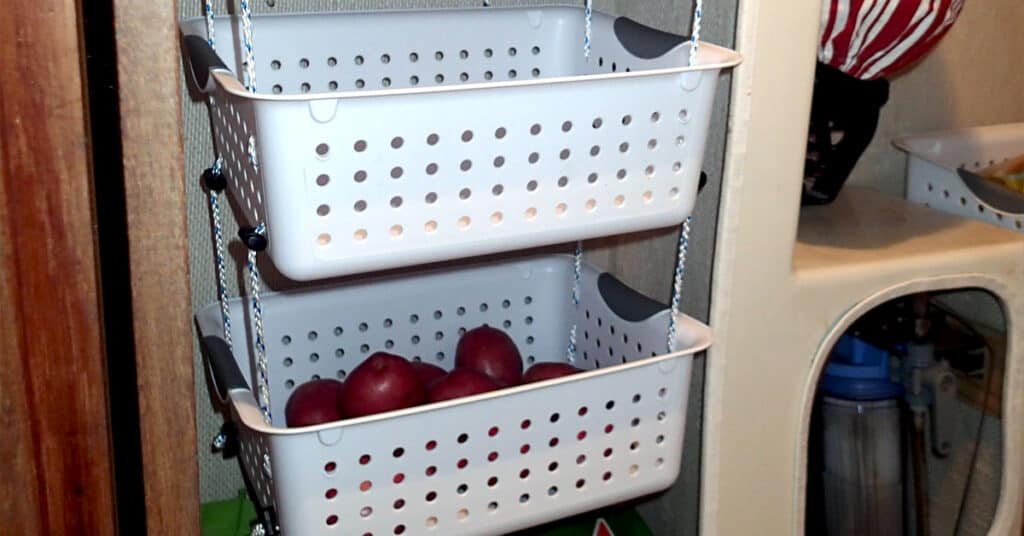
With my space, I needed rectangular containers. I wanted ones that were ventilated, but that had solid bottoms in case I got a rotten potato or squished tomato – it’d be a lot easier to clean up and nothing would drip to the next basket down. Sterilite containers – the same ones I like for organizing lockers – were the answer. I did some measuring and the medium sized ones would work for me.
If you’re looking to do hanging baskets, you can find some to fit almost any space. The key is to get ones that are sturdy enough for what you’ll put in them so they won’t bend into a taco shape. If necessary, you can strengthen bins by gluing wood or a piece of a plastic cutting board on the bottom.
 I wanted to loop the hanging line through the existing holes in the baskets, but I knew that with the line I was using, most knots would slip right through. And I knew that trying to tie the knots at exactly the right places to keep the bins level would be a pain.
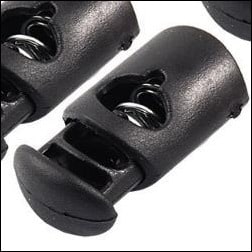
So I cheated and used cordlocks – those things that you use on laundry bags and ditty bags to easily open and close them. I got mine in the camping department at Walmart; they’re a little cheaper from Amazon. You’ll need four for every level of baskets plus an additional four (in other words, I used 16 for three levels of baskets).
You also need some nice looking 1/8” or 3/16” line. Almost any line this size will be strong enough. The only “special” thing is that it needs to melt nicely when you burn the ends.
Measuring the line is not an exact science. I simply held it around the hanger bar where I’d hang the baskets and then out to where I thought the corner of the bin would be and down to the level of the bottom bin. Then I added a couple feet to allow for tying off the line and just in case my guesstimate was off a bit. You need a total of four pieces of line this length.
Burn the ends of the line and use your wet fingers to (carefully!) make each end into a point that will be easy to pass through the cordlock. Dave cringes every time I “shape” the melty end of line but it’s one of those things I learned to do in Scouts that is really handy. Yes, I have occasionally gotten tiny burns on my fingers but nothing that even raises a blister. Of course, I take no responsibility if you get a burn.
If you haven’t shaped the end of a line before, you hold the end of it in a flame like “normal” burning the ends. When the end melts a bit, quickly blow it out if it’s caught fire, lick your fingers, and form the end into a point (re-lick your fingers if you need to do a second pass).
If the line is particularly limp, making it hard to thread through a hole, you can also pass the section just behind the end quickly though the flame. It won’t really melt but will just shrink a little and have a bit more body to it.

Put a cordlock on one end of each line and tie an overhand knot right at the end of the line. Push the cordlock against it.
Take your bottom bin and thread the other end of each line from the bottom corner outside to inside, then (with the size baskets I used; yours may be different) inside to out through the next to the top hole and back to the inside through the top hole.
Slip another cordlock on each line – this will form the stopper for the next basket. To “measure” where I wanted the cordlock, I took the line over the top of the basket and down to where the previous cordlock was and set the new one to line up with it. This worked with the spacing I had and my baskets – you could also just measure up a certain distance from where the line comes through the last hole. Set the cordlocks on each line.
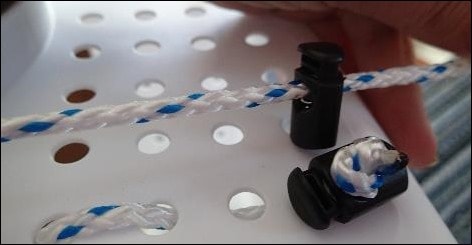
Run the line through the bins in the same way as before and add more cordlocks for each level until you’ve got as many as you want.
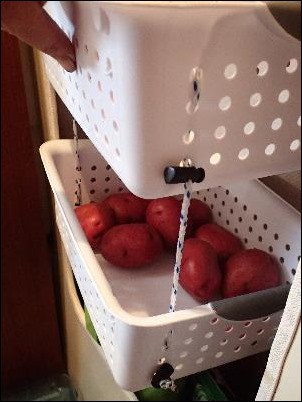
Hanging the baskets in the locker was the only part where it gets a little awkward – or at least it was for me. Take one of the back lines and wrap it around the hanging pole and bring it back down to the basket. Pass it through one of the top holes and put a cordlock on it on the outside of the bin. Do this with the other back line, then the front lines. Exactly how you run the lines will depend on your locker and bin configuration.
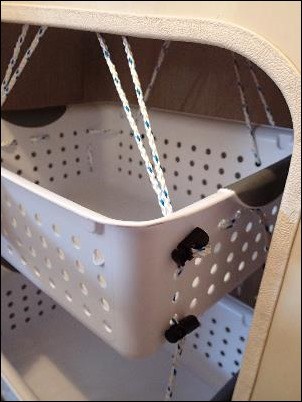
Once all four lines are on, adjust the cordlocks you just added until the bins are hanging level and at the height you want. If needed, adjust any other levels until you are happy with the bin arrangement.
I left the ends of the lines long for now – wove them through the holes in the top bin – and will cut them off in a week or so once I know I like the arrangement of the bins.
I plan to add a curtain to provide shade for the produce but other projects have priority right now. For the time being, I’m just putting a dish towel over things like potatoes that like to be in the dark.
Wondering just what all you can put in bins like this? Well, I store most of my veggies in bins as there is just no space in our boat’s tiny refrigerator.
Like it? Pin it for later!

Carolyn Shearlock has lived aboard full-time for 17 years, splitting her time between a Tayana 37 monohull and a Gemini 105 catamaran. She’s cruised over 14,000 miles, from Pacific Mexico and Central America to Florida and the Bahamas, gaining firsthand experience with the joys and challenges of life on the water.
Through The Boat Galley, Carolyn has helped thousands of people explore, prepare for, and enjoy life afloat. She shares her expertise as an instructor at Cruisers University, in leading boating publications, and through her bestselling book, The Boat Galley Cookbook. She is passionate about helping others embark on their liveaboard journey—making life on the water simpler, safer, and more enjoyable.
Your VHF can do so much! Learn how to use ALL its features for just $39:




Jackie says
Good idea with the cord locks, Carolyn! I may just use those on the fruit basket I have now in the kitchen. (Yes, we’ve gone to land, but still have the boat.) It NEVER seems to hang level no matter what’s in it or not. The one on the boat never seemed to have this problem!
Janice Armstrong says
Who has an unused hanging locker just kicking around….lol?
The Boat Galley says
Well, unused in the sense that we have no hanging clothes. 🙂
Janice Armstrong says
Ok fair enough…we fill every spare inch….mostly with tools I hate to say. My husband needs to organize better.
The Boat Galley says
We have plenty of tools, too . . . but Dave DOES like to eat. Particularly veggies. He got one full for tools, I got one for food.
Jo C says
You used hard bottomed baskets so you could clean up a problem easily, but I see no easy way to dis-assemble this for cleaning. Care to continue?
Carolyn Shearlock says
I can just reach in and pick up the bad item, wash the basket and then wipe it with a bleach solution and let it dry, then put food back in. I check the bins every day so I can’t imagine something getting so bad that I had to dissemble the whole thing, but if I had to, I could.
jim kindred says
Love this Carolyn, except I’m going to replace my hanging closet shelves with these baskets…
Melinda Taylor says
Who has unused hanging lockers????
The Boat Galley says
We just don’t have hanging clothes on the boat. So now it’s a locker in use!
Ellen Jacobson says
Great idea! I might do this in the hanging locker in our v-berth as a temporary solution.
Melissa Johnson says
neat! i might use this for our truck camper!
Beth Coates says
Any news on your Barefoot Gal?
Anne Driver says
Super cool! Thanks for sharing, but I am unfamiliar with the phrase “unused space”.
Kimberly Lancashire says
I did something similar in our galley using woven baskets and twine. Great space saver!
Karen Lancashire says
Very creative, Love It !! Kim
Kimberly Lancashire says
Thank you! <3
Mary says
This question regards wicker baskets. I already have a lot of them. I was wondering if they are safe to bring on my boat for storage. I’m worried about the wicker attracting bugs like cardboard does.
Carolyn Shearlock says
I’ve never really heard of people having problems with bugs in wicker. The bigger problem seems to be in keeping it clean — there is a lot more dust and dirt on a boat and it’s hard to get it out of all the little crevices.