Make sure you don’t lose small parts during boat projects. If a unique part or tool goes astray, it may mean a simple job becomes a nightmare.
Learning the Hard Way
When we bought Barefoot Gal, Dave tore the stove apart as one of our first boat jobs. Over three days, Dave and I (mostly Dave with me being the chief tool hander and third hand) worked on the repair.
The goal was to fix a propane leak in one burner. The job expanded when we discovered that the real problem was that a spill had run through the burner plugging everything up. Of course, it had never been cleaned.
The end result was that we (read: mostly Dave) had to tear the stove top almost totally apart to clean it. And the best place to do that was in the cockpit, once we got the stove out of the galley.
And so we employed a rule we’d learned the hard way on our previous boat.
Step 1: Plug Your Drains and Scuppers
Plug the cockpit drains and scuppers before doing anything else. It doesn’t have to be fancy — rags or used paper towels will do just fine. The one time we forgot to do this — you guessed it — we lost a critical screw down it. Luckily, Dave was able to jury-rig a substitute, but it taught us a very good lesson.
Not only is there Murphy’s Law at work, but everything slopes down to the drains, making it even more likely that items will roll down the drain.
This time, nothing was lost although many things were dropped. And I now have a stove that works really well!
Step 2: Make a Clear Work Area
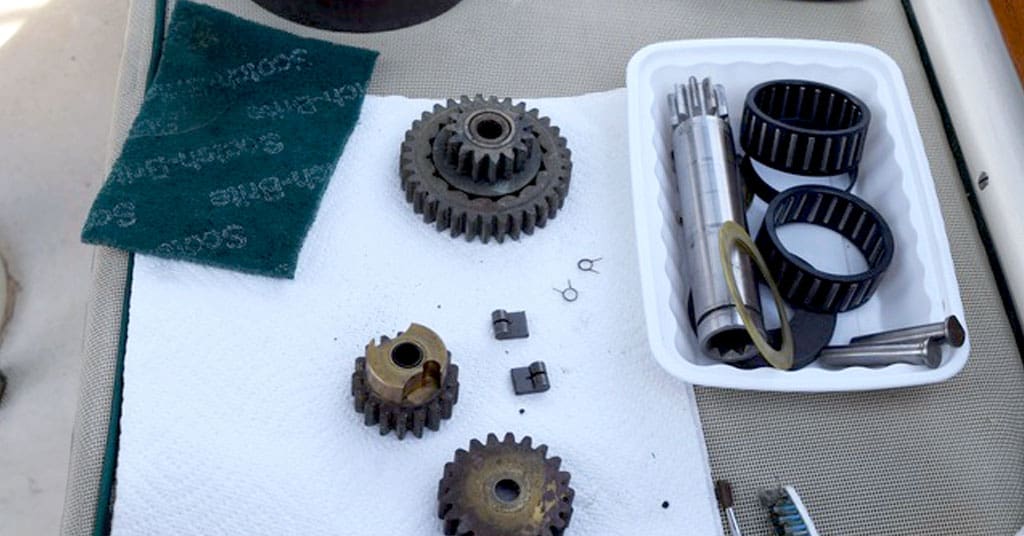
Don’t try to work on a project with clutter from a previous project. Clear your work area. And have places to contain small parts as you work.
A diesel engine diaper (Amazon) is an easy and readily available light surface to put under your work. It’s easier to see small or dark parts against a white background. Even a paper towel is a good choice.
And yogurt cups or deli containers make easy catch-alls for screws, tools, or other bits and bobs. All the better if the containers have lids. If a project lasts several days (which happens more than we’d like to admit), you run less risk of dumping parts accidentally.
For bigger projects, a canvas drop cloth (Amazon) can be a handy way to cover the cockpit and scuppers at the same time.
Some cruisers recommend magnetic dishes for screws and bolts (Amazon). But keep in mind that magnets on board will affect your compass swing.
Step 3: Take Photos
It’s easy to lose small parts during boat projects if you don’t remember what all the projects are. Dave and I take many pictures at every step of a project. It helps us replace them in the right order. And keeps us from reassembling systems with missing parts.
I always use the highest resolution possible so that we can zoom in later if need be to see details. I also take photos from a number of different angles. Sometimes you can see an important detail in one view but not another. I try to download them onto the computer fairly quickly and label them (or put into folders). That allows us to find them easily during reassembly.
Step 4: Bag and Tag
We began the job of rebuilding our diesel engine with Dave disconnecting and removing everything before taking the engine through a tight opening.
I assisted by tagging everything that can’t be threaded back where it came from. For example, I tagged motor mount bolts with where they came from (port next-most-aft motor mount). They were then put into a bag with others from the same area (for example, all the motor mount bolts). All the bags are kept together in a “box” of some sort. I used a small paint pan I scavenged from the trash.
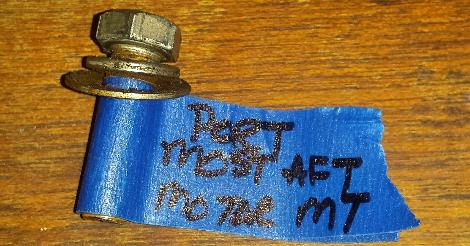
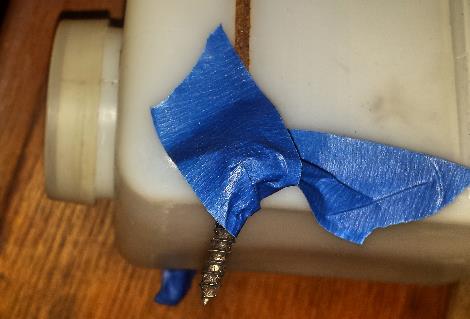
Anything that goes together stays together. Washers and nuts are put back on bolts. I taped screws into mounting holes. And I taped brackets taped onto what they hold.
Exactly how I tag things varies by the item, but the most common way is to wrap some blue tape around the item. I use it to make a flag for the description. This also works well for wires and hoses in the engine compartment.
Some items I just tape the screws back into the item, as with the coolant overflow container:
Celebrate Completion of the Job
A little extra time in preparation can make even a finicky job go more smoothly. So celebrate finishing your boat repair without losing any small parts. You’ve earned it.

Carolyn Shearlock has lived aboard full-time for 17 years, splitting her time between a Tayana 37 monohull and a Gemini 105 catamaran. She’s cruised over 14,000 miles, from Pacific Mexico and Central America to Florida and the Bahamas, gaining firsthand experience with the joys and challenges of life on the water.
Through The Boat Galley, Carolyn has helped thousands of people explore, prepare for, and enjoy life afloat. She shares her expertise as an instructor at Cruisers University, in leading boating publications, and through her bestselling book, The Boat Galley Cookbook. She is passionate about helping others embark on their liveaboard journey—making life on the water simpler, safer, and more enjoyable.
The Boat Galley says
Oh, we take LOTS of digital photos of how things go together!
Chris&Janet says
We use a no longer network connected smartphone’s video camera on some projects where movement and not just placement need tracking. We upload the vids to the laptop for the next time we have to tackle the project.
Carolyn Shearlock says
Glad you find it so useful! 🙂
The Boat Galley says
And that’s why “five minute jobs” take a half day . . .
Barbara Lowell says
Me too Patricia. Thot I was the only landlubber!!!
Barbara Lowell says
Yes this actually happened to me … I had to replace my hard drive (Luckily it was recently backed up but Apple service guy charged me around $350 or maybe it was more, can’t remember. Anyway I found out later I overpaid and I was doubly annoyed.
Susie Burall says
Just don’t put a magnet anywhere near the compass!!!
The Boat Galley says
That assumes you don’t drop them putting them into the dish. Yes, we’ve lost them that way, too.
David Lake says
was just trying to be helpful
The Boat Galley says
No, it’s a great suggestion 🙂 We’re sometimes a little fumble-fingered!
The Boat Galley says
Definitely. And it’s some sort of magnet that will attract non-magnetic parts even.