
For previous installments about our boat renovation, please see:
- Our Boat Renovation Begins
- Boat Renovation: Choosing Teak Cleaner and Finish
- Boat Renovation: Cleaning Teak
Teak Guard Finish is extremely easy to apply, a major advantage over varnish or Cetol.
You will need:
- Teak Guard Finish (company website)
- Blue painter’s tape
- Foam brushes
- Rubbing alcohol
- White scrubbies
- Drop cloths or trash bags to use as drop cloths
- Rags or paper towels
- Cup to put small quantity of Teak Guard Finish in that brush can be easily dipped in
- Water for clean up (not a large quantity)
This guide assumes that you have already cleaned the teak and let it dry. Read the instructions book that comes with TeakGuard for more details on application.
Teak Guard Finish is actually designed for exterior applications, but there is no reason you can’t use it on the interior of the boat, as I did.
The Finish should be applied within 24 hours of when an area is cleaned. If life happens and you don’t get the first coat on within 24 hours, do another light cleaning before applying Finish.
While taping off the surrounding area and using drop cloths (in my case, several trash bags that I used over and over as they were a better size than any true “drop cloth”) is highly recommended, drips and spills are relatively easy to clean up. If still wet, a damp rag will clean up the spill on most hard surfaces. If semi-dry, rubbing alcohol on a rag will do it. And if dry, you may need to use a white scrubby with rubbing alcohol. White scrubbies are gentler than the more common green scrubbies and can be found at most hardware and home improvement stores, or on Amazon.
Shake the Teak Guard Finish well — there should be no thick reddish-brown splotches on the inside of the container.
Pour a small amount in a clean cup that your brush will easily fit in. I generally only poured about a half inch at a time so that it wouldn’t settle too much as it used it up. Be sure to re-shake the Finish every time you go to pour some out.
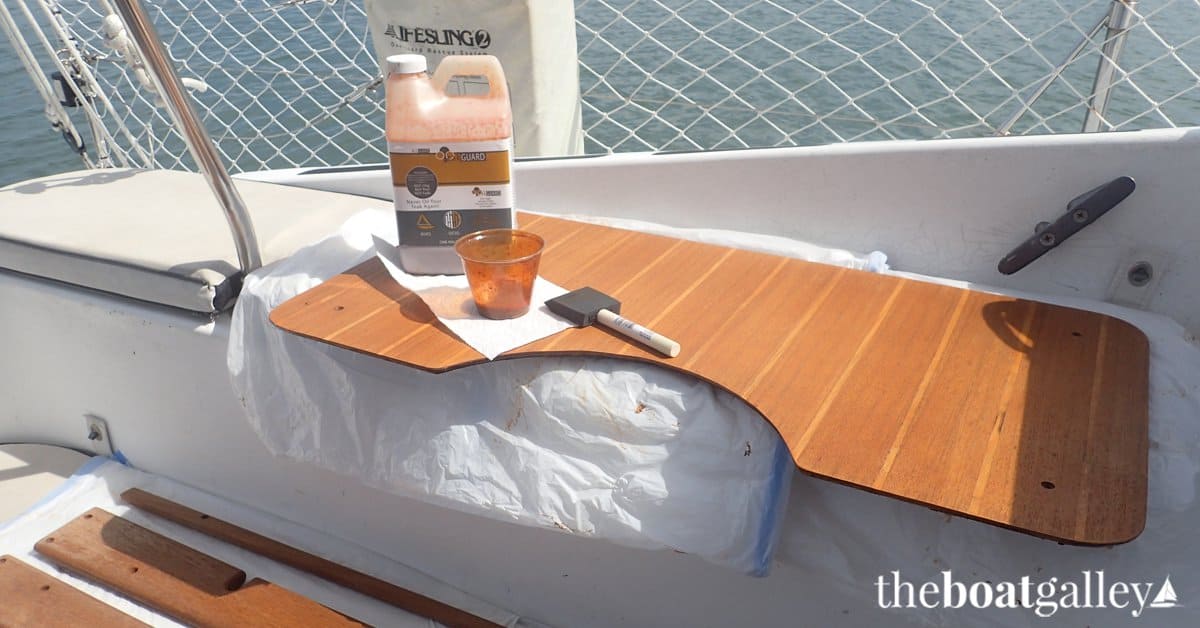
Use a foam brush, keep it fairly dry and apply a thin coat of the Finish. If it runs or puddles, use a rag or paper towel to gently blot the excess. It’s fine to apply in bright sunlight and warm temps. I don’t think it was ever below 90 degrees F. when I was applying the Finish.
Let the first coat dry. Depending on the temperature and humidity, this can take anywhere from 15 minutes to an hour.
Apply a second coat. Let dry overnight.
If a very smooth finish is desired, rub with bronze wool before applying additional coats. I did not do this as I was looking for a more casual appearance.
IMPORTANT: If using Teak Guard Finish on any surface that will be walked on, do not try for a “very smooth finish.” You need a rougher surface so that you do not slip on it. With the Teak Guard Finish on our floorboards, the standard finish provides very good footing, even for the few times a year that I wear socks. It has also eliminated slipping problems for the dog (yes, we had previously put down carpets so she could walk without sliding).

I applied two coats a day with a minimum of six coats on any area. High-touch areas such as door frames and hand holds got 10 coats. Handles for sliding locker doors got 12 coats. Areas around the stove, where there are a lot of grease spatters and had previously been just black with mold as a result, also got 8 to 10 coats.
I literally did no prep work between coats as I was applying Finish on consecutive days. No sanding is required or even recommended. If you go longer than a day, wipe the surface off with a very slightly damp rag to remove any salt or dust. You do not have to allow the surface to fully dry before applying more Finish.
I left the tape in place between coats, removing it only after the final coat. I waited at least two days to apply tape to any just-finished teak, so I skipped around the boat a bit rather than work on immediately adjacent areas. Also I used the “delicate surfaces” tape on any areas I’d just applied Finish to. (See Scotch Delicate Surfaces Painter’s Tape on Amazon.)
Unused sealant in your cup can be poured back into the jug of Finish for future use. Rinse the cup out and let dry; eventually, some residue will remain but it was never a problem for reusing the container.
Rinse the foam brush out and allow to dry for reuse another day. The Finish is non-toxic.
VERY IMPORTANT: Do not allow the bottles or jugs of TeakGuard finish to freeze. Do not store them in an unheated place in the winter if freezing temperatures are possible.
We had to remove and replace some of our teak pieces after they’d been covered in Finish, and this meant removing bungs and then replacing them with unfinished bungs. After putting them in place and trimming to the height of the wood around them, I simply applied several coats of TeakGuard Finish — 2 coats per day — and feathered it into the surrounding area so there wasn’t an obvious line. I applied coats until the bungs blended as well as I could hope for. New bungs will never blend as well as original bungs which are cut from the same wood as the primary piece, so there is always a bit of color difference.
My method of working was to clean a section each day and then apply Finish to the sections I’d cleaned over the last several days, so that I was applying the first two coats to one area, the second two to another, the third two to still another. I found it helpful to write what coat number had been applied on the tape next to an area. Without that, I quickly lost track of what coat number I was on!
Every year or so, I’ll need to add a maintenance boat of Teak Guard Finish. It will probably be less often since this is all interior, but the way to tell that it needs a coat is if the finish is starting to show a bit of haze. For the maintenance coat, simply wash with soap and water, rinse, let dry, tape and apply the Finish. There is no sanding!
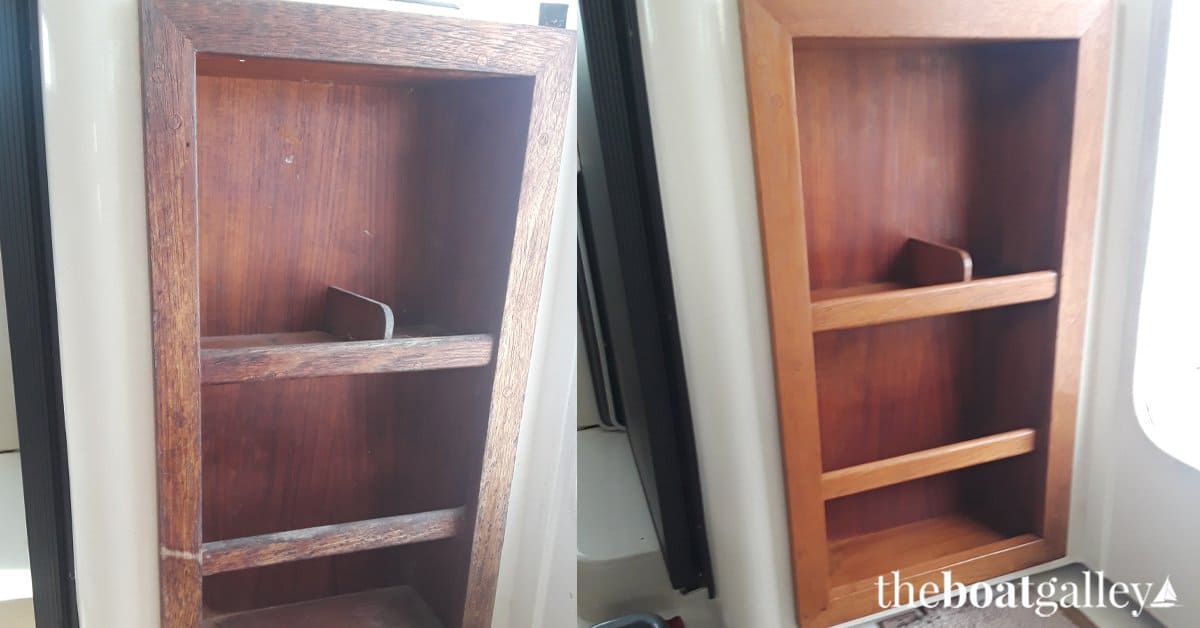
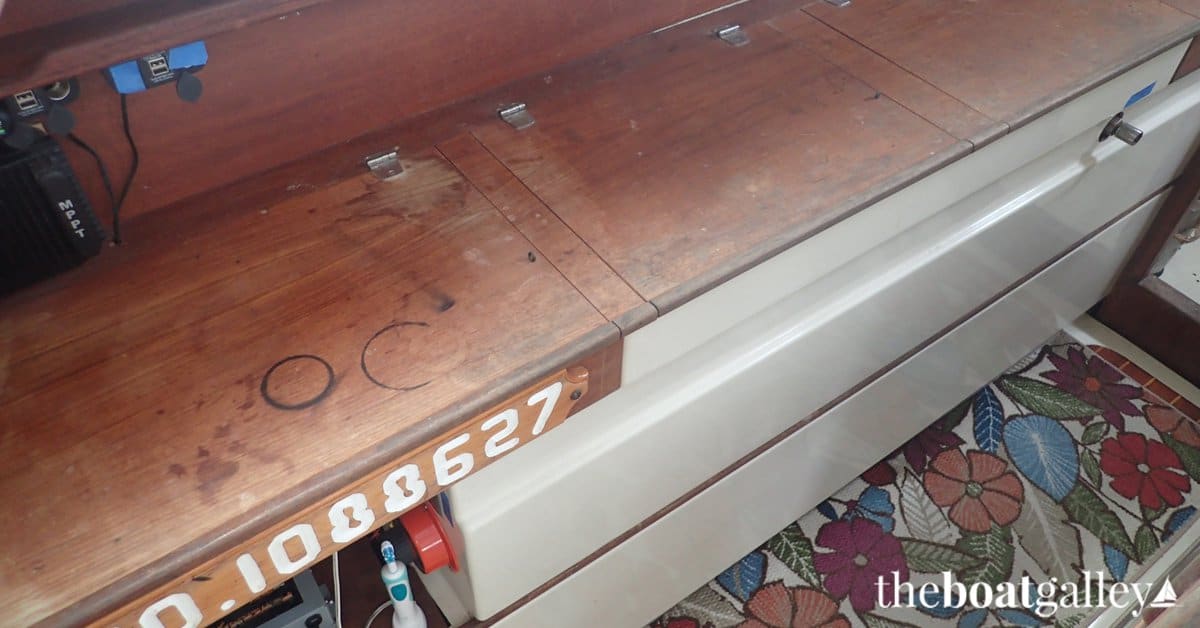
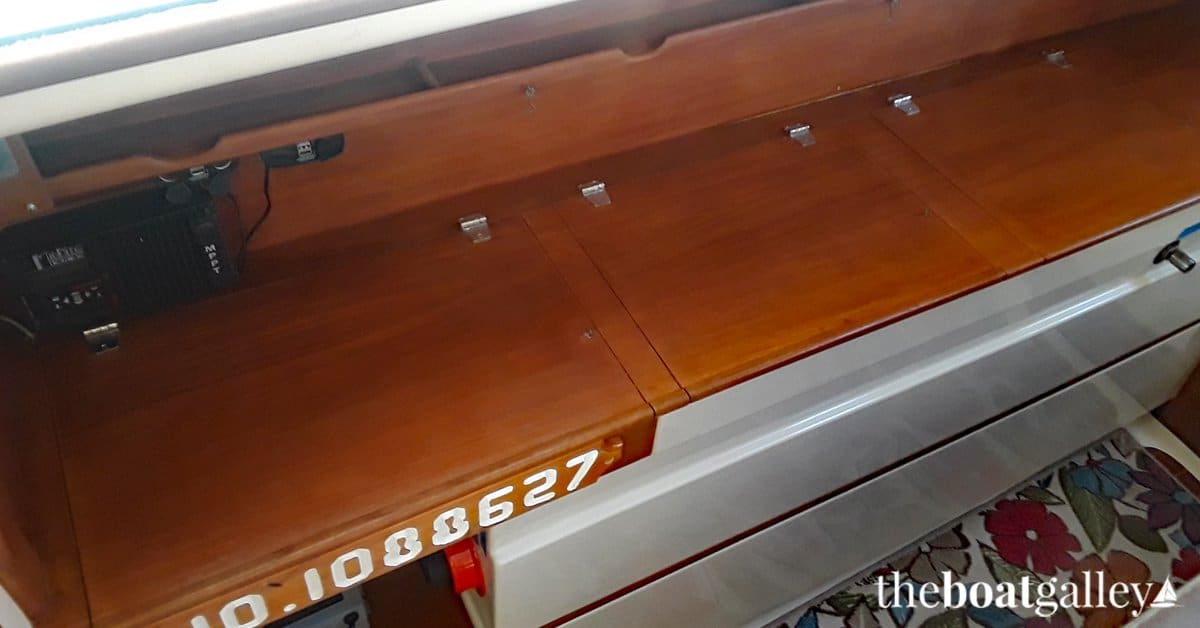
Before and after:


Carolyn Shearlock has lived aboard full-time for 17 years, splitting her time between a Tayana 37 monohull and a Gemini 105 catamaran. She’s cruised over 14,000 miles, from Pacific Mexico and Central America to Florida and the Bahamas, gaining firsthand experience with the joys and challenges of life on the water.
Through The Boat Galley, Carolyn has helped thousands of people explore, prepare for, and enjoy life afloat. She shares her expertise as an instructor at Cruisers University, in leading boating publications, and through her bestselling book, The Boat Galley Cookbook. She is passionate about helping others embark on their liveaboard journey—making life on the water simpler, safer, and more enjoyable.
Allan Smits says
Hi Carolyn,
Great article on teak care! We have a Gemini cat just like yours, and we relate to the pieces of teak you’ve redone with Teak Guard. I recently sanded and varnished the panels in the cabin entry-way, and they turned out fine. I haven’t used Teak Guard, so I have some questions. I assume that if your teak has a varnish or Poly on it, that must be first remove to use Teak Guard? For the other solid teak in the cabin, did you need to sand it first before cleaning and using Teak Guard? Ours has had years of teak oil applied, but it’s starting to look dark and dirty, particularly where hands contact it regularly, and I would like to address these areas. Thanks!
Carolyn Shearlock says
Yes, you do have to sand off any varnish. You do NOT have to sand off teak oil, but you do have to use their cleaner. I wrote about that part of the process in this product and you can see before and after the cleaning part. Boat Renovation: Cleaning the Teak
Allan says
Thanks! I’ll definitely give the cleaning and finishing a try with Teak Guard on our interior solid teak pieces. Can’t wait to see the differences. Is it really low VOC or just claim to be. My wife is very sensitive to the paint and varnish VOCs, and I can’t afford VOCs lingering in the cabin too long.
Carolyn Shearlock says
I did not notice a smell at all. Boat was wide open (summerime) when I applied it, but it’s non-toxic and cleans up with water. Totally different from paint or varnish.
Steve Tudor says
A very helpful series as I am anticipating similar ‘improvements’ this summer. I have appreciated ALL your tips in your blog.
Leo Uhran says
Carolyn,
I’m about to apply Teak Guard to my 36″ Teak Ships Wheel. Almost completed urethane removal back to bare wood.
I’ve used it in the past (re-did my entire topside of the last boat I owned with this product and was very happy with the results. Do you think because of being a wheel with hands on it constantly this will be a bad place to use it?
I’m also applying this product to my new companionway doors made from Mahogany wood. I did a sample and it looks great. I’m pretty sure you can use it on any wood.
SV Paper Moon
38′ Downeast
Carolyn Shearlock says
I know that on one doorframe where we ALWAYS put our hands to steady ourselves, it has needed touchup more often than on other areas, even on the floor where we walk on on other handrails. If you use TeakGuard, I’d use at least 12 coats and several maintenance coats a year. You might get longer life out of varnish but it’s so much more work to put on! Personally, I’d go with the TeakGuard but I can’t guarantee it since I haven’t used it in that application.
Leo Uhran says
Carolyn,
Thanks for the feedback.
I figured I needed many extra coats on the wheel with regular maintenance applications. I don’t want to use urethane and ever have to go thru the stripping and sanding process again… on anything! A teak wheel has much intricate detail. Would you like to see before and after photo’s? It may be something to share with others who might like to see if they are considering the change to Teak Guard. I highly recommend the product. How it changed the topsides of my Pearson 365 was just amazing.
SV Paper Moon
38′ Downeast
Carolyn Shearlock says
I’d love to share your pictures with other readers. Please send them to [email protected], along with anything you want to say about your project and a bit about yourself — we’ll turn them into a post to show others what’s possible!
Liz Ann Mulvany says
Carolyn,
I plan to clean and refinish all of the interior teak on our Pacific Seacraft 37. It has never been varnished (thank goodness, less work for me) only oiled. I started with the companionway steps and cleaned them one day and then put the two coats of Finish on the next day. It seems to make them a bit darker than I expected. Do subsequent coats make even darker. Our boat interior is small and I was hoping to lighten the teak to make it look a bit lighter and airy. I’m concerned that it will be dark again after putting on several more coats.
SV Lagniappe
Carolyn Shearlock says
Mine was almost black from the teak oil and mold/mildew, so it ended up being much lighter inside. I really scrubbed the teak (used wet sandpaper on much of it) to get all that old oil out. I didn’t think there was a lot of color change with additional coats. My teak generally turned out a honey color, but a lot of that will be determined by the wood itself. You’ve probably already seen the pictures of mine: https://theboatgalley.com/choosing-teak-cleaner-finish/
Here’s another: