Running new electrical wires on a boat generally is no fun. More often than not, where they need to go is hidden in the bowels of the boat, twisting and turning. But an electrician’s fish tape, a crimped-on screw connector, and a few other tips make the job a bit easier.
We installed a new, 12-volt refrigerator to replace the original propane fridge. There was just one problem: we had to run new wiring for it. There wasn’t any old wiring to even use as a guide – we were going from scratch.
It didn’t seem like it would be a big deal: straight line, it would be about an 8-foot run. The way it had to run, though? About 18. And all hidden behind panels that could not be removed. There were a couple of access points in the middle, but they had very tight cutouts. No way would we be able to just snake a wire from one end and expect it to come out where it should.
I’d like to share a few tips that made the job more manageable, as well as some great ideas from other boat owners.
Tip 1: Electrician’s Fish Tape
Electrician’s fish tape (Amazon) is designed for just such things. It’s a springy, semi-flexible wire tape that comes on a reel in various lengths.
Feed it from the end with the more restricted opening. Hopefully you can reach it and wiggle the end of the tape through, then push it towards the other opening. The tape is rigid enough (unlike the wiring) that it will go straight and not just ball up when it hits an obstruction. Feeding the tape is easiest with two people. One needs to push it and then sweep it from side to side. The other must yell “stop” when they see it in the other opening and grab it. It’s possible to do by yourself, though. It just takes a lot of going back and forth, moving the fish tape just a little at a time.
In the past, we’ve always been able to pull the new wire through by simply taping it to the fish wire and gently pulling. Not this time! The opening was tight enough that the joint would be pulled apart, and we’d have to feed the fish tape all over again. It only took me two failed attempts to decide there had to be a better way.
Tip 2: Crimp on a Screw Connector
I needed a connection that wouldn’t come apart even when I tugged on it to get it through the tight spots. The fish tape had a nice eye on the end; I just needed a way to attach the wire to it. First I tried stripping a section of wire and then passing it through the eye and twisting it back together and taping it. Nope, it pulled apart again.
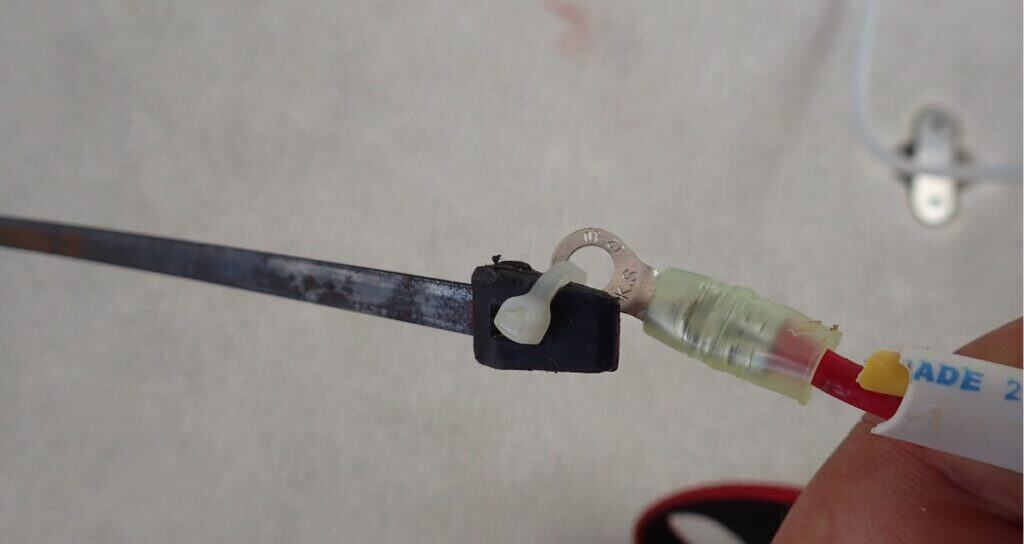
Finally, I sacrificed a screw connector. I crimped it onto the wire, then used a cable tie to attach it to fish tape. I put a little wrap of electrical tape over the joint so that it was nice and smooth and wouldn’t snag. It held perfectly, even with me having to tug a fair amount to get it through one blind spot. I couldn’t believe how easily it worked. After the wire was run the whole way, I just cut it off.
You can see both the end of the fish tape and the screw connector I crimped to the wire in the photo above. The big thing in buying fish tape is to get one that is stiff enough to push through a narrow opening. Because they’re made of stiff metal, it can be a bit of a chore both to unwind and wind the tape. Look at it as part of the onboard fitness program!
On our boat, 25’ was sufficient, and we’ve even used it to pull new reefing lines through the boom. If you’re running wires inside your mast, sometimes a longer fish tape is handy (sometimes you can do it with gravity; sometimes wires need some help if they have to pass through particular channels). NOTE: Fish tapes are made of mild steel (the ones made of nylon aren’t stiff enough to do the job). Store it in a Ziploc with a desiccant pack to remove moisture from the air. If you have a microwave, Dry & Dry (Amazon) works well, as you can recharge them over and over.
You can also buy electrical threading rods made of fiberglass (Amazon). I have not used them myself, but they eliminate the issue of rust.
Tips from Other Boat Owners
We’re not the only boat owners who have had to run new wires. Fellow cruisers have some other good ideas to make a bad job easier.
Lubricate the Wire
Several boat owners suggested lubricating the wire you need to run. Harold poured dish soap down the hose he had to run coaxial cable through. He let it sit long enough for him to get a coffee and returned to finish the job.
Will K. suggests a similar method, but he suggests using Armour All protectant (Amazon) to make the plastic coating on the wire slippery and let it slide through more easily. Liz A. suggests sail track or silicone lubricant.
Use a Conduit
Several boat owners claim it’s easier to run a larger conduit through the space and run the wire through the conduit. Stuart and Virginia split a length of plastic shroud cover, inserting a few inches of wire. If the wire is too small, wrap it in electrical tape. If you run the shroud cover first, you can find the best route for the wire. Even if the wire is larger than the diameter of the shroud cover, the split will still grip the electrical wire quite well.
David N’s conduit of choice is household irrigation tubing (Amazon) (the kind used in sprinkler systems). Push the conduit through the gap and push the wires through the conduit.
Other Methods
Mathieu suggests adding a round nose to help wires through difficult turns. Cut a zip tie in two, bend them to make two loops in front of the nose of the fish, and tape them to the fish. Michelle used long, thick zip ties taped together to thread wires through a sticky area.
When Peter B struggled even using a fish tape, he cut the nozzle off a new caulk tube. He inserted the end of the fish tape into the nozzle and secured it with electrical tape. With a bit of WD40 on the nozzle, the tape went through easily.
Ted B uses old coated lifeline or shrouds. Since they are stainless steel, they won’t rust, and you can roll it up to store. Crimp a screw connector, and it’s ready to go.
Finally, Liz A took a long piece of thread and inserted it at the beginning of the wiring run. She secured one end and left the other end free. ut the hand nozzle of your ShopVac at the far end of the wiring run, to suck the free end of the thread through. Use the thread as a leader to pull a stronger string through. Use the string to pull the wire through. If the thread is lightweight enough, the ShopVac will suck it through even if you can’t make a vacuum seal at the far end of the run. You just need enough suction to get an air current flowing through there.
Run a Messenger Line for the Future
Finally, once you’ve threaded wires, several boaters suggested running a messenger line in case you need to use it for a future projects. One bit of advice: use a messenger line that’s at least 1/8″ wide (preferably wider). A thin line can cause chafe.
More Help
Working on 12-volt electrical wiring isn’t terribly difficult. If you’re careful and properly size your wire, you can save a great deal of money on boat jobs and become more self-sufficient. Our 12-volt DC wire size chart is a handy reference you can keep right in your toolbox. It’s one of the helpful Boat Galley references I’ve developed to make boat life easier.

Carolyn Shearlock has lived aboard full-time for 17 years, splitting her time between a Tayana 37 monohull and a Gemini 105 catamaran. She’s cruised over 14,000 miles, from Pacific Mexico and Central America to Florida and the Bahamas, gaining firsthand experience with the joys and challenges of life on the water.
Through The Boat Galley, Carolyn has helped thousands of people explore, prepare for, and enjoy life afloat. She shares her expertise as an instructor at Cruisers University, in leading boating publications, and through her bestselling book, The Boat Galley Cookbook. She is passionate about helping others embark on their liveaboard journey—making life on the water simpler, safer, and more enjoyable.
Leave a Reply