
A composting toilet on a boat eliminates the holding tank, pumpouts, clogged hoses, and most of the smell — but it does have a learning curve. Good news, though: we can flatten out that learning curve substantially.
We installed a Nature’s Head composting toilet (that link gives you $25 off if you buy one) on our Gemini 105 catamaran, Barefoot Gal, and used it full-time for years of cruising the Florida Keys and Bahamas. We loved it. We’d make the same choice again. But we also had several problems that took a while to solve: fly infestations, coconut coir disasters, and more than a few moments of wondering what we’d gotten ourselves into.
This is the article we wished had existed when we started. Spoiler alert: you DON’T have to have the same problems we did; I’ll tell you exactly what worked and what didn’t for us.
Why Switch to a Composting Toilet?
For us, the traditional marine head had become a constant source of frustration. Our holding tank held only 18 gallons, which meant a pumpout every four days — not workable when we wanted to spend time in the remote anchorages of the Florida Keys, where you have to be 12 miles offshore to discharge legally. The tank vent was positioned so that fumes drifted straight into the cockpit every time we flushed. And the hoses, joker valves, and pump required regular repairs that were genuinely unpleasant to perform.
The composting toilet solved all of that. No holding tank. No pumpouts. No joker valves or hoses to replace. We also removed two below-waterline thru-hulls in the process, which was a significant safety improvement. If you want to go deep on that part of the project, here’s our article on filling in a thru-hull.
The benefits we anticipated all held up. What we didn’t anticipate was the learning curve on actually using the thing well.
Choosing a Brand
When we made the switch, the main options for boats were the Nature’s Head, the Air Head, and the C-Head. We chose the Nature’s Head for two reasons: its 2.2-gallon urine tank (the largest of the three, which matters when you’re entertaining guests aboard) and the overall fit and finish. We’ve been happy with that choice.
We’ve met plenty of cruisers using the Air Head and C-Head who were equally happy with theirs. If the dimensions of one brand fit your head space and another doesn’t, that may make the decision for you — the measurements vary meaningfully between brands.
Whatever brand you choose, the principles in this article apply. Choice of compost medium, coconut coir prep, fly prevention, and ventilation work the same way regardless of which unit you have.
Installation: What to Expect
Installing the composting toilet itself took us about a day once the space was ready. But we also chose to remove and fill in our thru-hulls, which added several weeks to the project and significant materials cost. That part is optional, but we considered it worthwhile from a safety standpoint and to reduce ongoing maintenance.
Cost varies considerably depending on the brand, whether you fill the thru-hulls, and whether any remodeling is needed in your head space. Budget accordingly and don’t be surprised if it’s a bigger project than you expect.
“Composting” Doesn’t Really Mean Composting
Despite the name, what’s in the bin when you change it is not compost — and it won’t be headed to anyone’s garden.
When you’re using the toilet full-time, the waste doesn’t have nearly enough time to break down into true compost. What you’re really doing is drying and separating solids from liquids, which is what eliminates the smell. The solid waste mixed with coir is bagged and goes in the trash — it’s allowable in regular household trash, just like baby diapers or adult incontinence products. The urine is emptied separately and can be disposed of overboard offshore or ashore as local rules allow.
True composting would require months of additional time in a proper compost pile — and even then, the end product should never be used on food crops. For a boat, that’s not realistic and not the point. The point is a clean, low-odor, low-maintenance system that doesn’t require a holding tank or a pumpout station. On those terms, it delivers completely.
Choosing a Composting Medium
You have several choices for the composting medium that goes in the bin:
- Coconut coir (ground-up fibers from the outer layer of a coconut shell)
- Peat moss
- Cedar chips or shavings (the kind sold for small pets)
- Other types of pet bedding pellets
Coconut coir is the usual choice for boaters. Here’s why:
- It’s a renewable resource; peat takes millions of years to form
- Peat moss often comes with bugs already in it; coir almost never does
- Coir is more absorbent than cedar chips or pellets
You can get coir either loose or in compressed bricks.
Compressed bricks are the most space-efficient choice for a boat. They require prep (rehydration), but one small brick stores neatly and expands into a full change of medium. We’ll walk through the exact prep method below.
Loose coir (Amazon) — such as this 8-quart bag — requires no prep at all. Open the bag and it’s ready to use. The trade-off is storage space: an 8-quart bag takes up considerably more room than a stack of bricks. If you have the space, it’s a convenient option.
Cedar chips (Amazon) — the kind sold as small-animal pet bedding — are worth considering if storage space isn’t a concern. The natural oils in cedar are a mild bug repellent, which is a genuine advantage. The trade-off: cedar is less absorbent than coir. The bags also tend to be large (the link above is 24 liters), which is a lot of space on a boat. Smaller bags are available but cost considerably more per use.
Prepping Coconut Coir Bricks
This is where almost everyone struggles at first, including us. Every source we found before installing said to add water until the medium was “moist but not wet” — which is completely useless guidance.
Too much water and you get seepage around the crank handle and it won’t absorb the poo. Too little and the brick won’t break apart. You want to use the least possible water that enables you to break up the bricks into a powder that resembles sawdust.
We eventually landed on an exact method that worked reliably. Here it is.
We used coconut coir bricks (Amazon) — 650g (about 1.4 lb) bricks, sold in a 5-pack. Each brick makes roughly one change for the Nature’s Head.
What you need:
- One 650g coconut coir brick
- 1 cup boiling water (room temperature works but takes much longer to rehydrate)
- A 2-gallon Ziploc bag
- A screwdriver or similar pointed tool
- A 2-gallon or larger bucket with an airtight gamma seal lid for storage
If your coir bricks are a different size, adjust the amount of water accordingly.
The process:
- Put a brick in the Ziploc bag.
- Use a screwdriver to poke a few holes into the top edge — this helps the water penetrate.
- Carefully pour 1 cup of boiling water over that top edge, then seal the bag. Having a second person hold the bag upright while you pour helps; if it tips before it’s sealed, it’s messy.
- Set the sealed bag in a sunny spot on deck.
- A couple of times a day, turn it over and work the bag with your hands to move moisture into the dry areas — no need to open it. After a day or two, it will be sufficiently rehydrated to crumble into powder.
- Open the bag and crumble the coir into the bucket, breaking up any lumps thoroughly. NOTE: if you have a blender or food processor aboard, you can use it to do the “crumbling” — to me, it was a toss-up as to whether the time savings were worth the clean up.
- Put the lid on the bucket and store it until you need it. The lid MUST be airtight or the coir will pick up moisture from the humidity in the air.
We kept a bucket ready ahead of time so we were never scrambling when a change was due.
Store the dry, unopened bricks in a sealed container away from moisture — we used a heavy-duty dry bag in the sail locker. The coir will absorb ambient humidity if left unsealed, which defeats the purpose of a measured water ratio.
How Much to Use and How Often to Change
These instructions are for the Nature’s Head. If you have a different brand, consult your owner’s manual for the correct fill level.
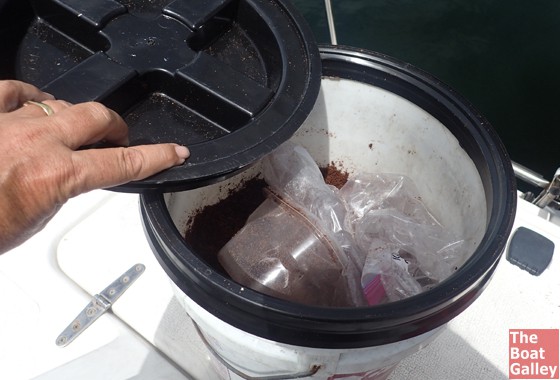
Fill the compost bin to about 2 inches below the agitator — not flush with it as the Nature’s Head instructions suggest for peat moss. Coconut coir swells as it absorbs moisture from waste, so starting lower prevents the bin from overfilling and the handle from jamming.
How often you change depends on how many people are using the toilet full-time. With two of us aboard full-time, we changed every three weeks. Manufacturers often say a month for two people, but in our experience that was too long — the job was much less pleasant when we waited. If it’s a nasty job or you find bugs in the compost, you’ve waited too long. Adjust your interval down.
Keeping the Urine Container Clean
The urine container needs attention each time you empty it to prevent odor and mineral deposits from building up in the bowl and container.
Many people start with vinegar — a half inch of white vinegar in the container after emptying, plus a 50/50 vinegar/water spray in the bowl after each use. It’s cheap and effective in the US, but it gets expensive and bulky fast when you’re cruising anywhere that vinegar isn’t cheap and plentiful. We paid almost $20 for one gallon on Eleuthera in 2016, and carrying enough for a three-month Bahamas trip just wasn’t realistic.
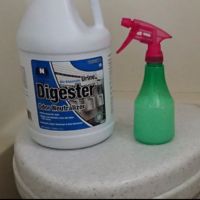
We switched to Urine Digester, a bio-enzymatic liquid originally designed for treating pet accidents. It outperforms vinegar in every way: equally effective at stopping odor, better at preventing deposits from building up in the bowl and container, and it smells better in the head when you spray it. Best of all, one gallon lasts close to three months of full-time use — far less to carry than an equivalent supply of vinegar.
The method: mix it 50/50 with water in a spray bottle. When you empty the urine container, put about a cup of water in, swish it around, and empty again. Then give three or four sprays of the Urine Digester mix inside the container. Every time you use the toilet, spray two or three squirts in the bowl — this cleans the bowl and adds a bit more to the container at the same time.
Sugar is a third option you’ll see mentioned online. It works, but it’s the least effective of the three for odor and deposit control. We used it in the Bahamas when we ran out of other options. It’ll do in a pinch.
Don’t Put Toilet Paper in the Compost Bin
We never put toilet paper in the compost bin. It takes up space, can tangle with the agitator, and isn’t necessary. The same approach many cruisers use with conventional heads applies here: use a lidded wastebasket with a liner and dispose of paper separately. More on that approach in our article on preventing a clogged head.
Preventing Flies and Gnats
The trick to never having a fly or gnat problem is simple: add Gnatrol to the fresh coir at every single compost change — consistently, without skipping. That’s it. We went years without an infestation once we started doing this.
Gnatrol is a biological larvicide (Bacillus thuringiensis israelensis) that specifically targets fungus gnat larvae. It’s organic and safe to use in an enclosed space. Use 1 tablespoon of Gnatrol WDG powder mixed dry into the fresh coir at each change. Sprinkle it over the top and it gets worked in as you crank. Don’t mix it with water first.
One note on dosage: we started with 1 teaspoon and still had occasional gnats. Increasing to 1 tablespoon stopped the problem entirely.
It can be challenging to find Gnatrol in small quantities. The most reliable source we’ve found is figBid, which sells it in 1 oz, 2 oz, and 8 oz packages with free shipping. A 2-oz container lasted us about 10 months at a three-week change interval.
The current Gnatrol WDG (Water Dispersible Granule) form is better than the older liquid formula — 2-year shelf life, more concentrated, and easier to measure.
Some people also add 2 tablespoons of moth flakes (essentially ground up mothballs) to the fresh coir at each change. We did this in addition to Gnatrol and found it helped keep adult bugs away. Moth flakes are a pesticide, though, and the fumes can be irritating in an enclosed space. If you have pets aboard — especially cats, which are more sensitive to these chemicals — skip the moth flakes and rely on Gnatrol alone.
What Didn’t Work For Us
Before we found Gnatrol, we tried everything the internet recommended. None of it solved the problem:
Diatomaceous earth. Reduced the problem somewhat but never eliminated it, especially in the heat of the summer.
Bacillus Thuricide (liquid BTI). Sold as having the same active ingredient as Gnatrol. It is not the same. We switched to it when we couldn’t source Gnatrol and had a full infestation within two months. The bacterial strain matters — Thuricide is a different strain and is not an effective substitute.
Rid-X Septic Tank Treatment. The idea was that speeding up waste breakdown would make it less attractive to flies. No noticeable difference.
Sevin powder. This is a chemical pesticide with real toxicity concerns for both people and pets — don’t breathe the dust. We tried it anyway. It didn’t kill the bugs.
If You Have an Infestation
Move fast. Every day you wait, the flies lay more eggs.
Dump the compost as you normally would into a trash bag. Then get every bit of material out of the bin. Remove the fan if your unit has one — the wires are small, fragile, and generally can’t be repaired, so handle it carefully. We started carrying spare fans after learning this the hard way.
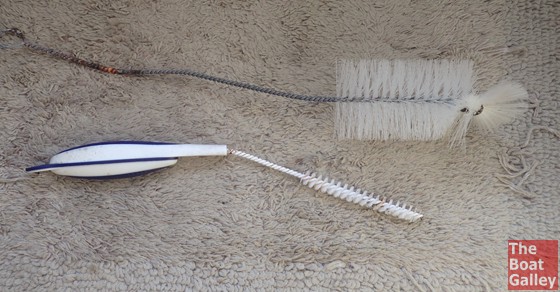
Then scrub everything thoroughly. Larvae will be in every nook and cranny of the bin and around the lid. You need brushes that can reach into tight spaces — a narrow 1/2″ tube brush (Amazon) and a 2″ diameter wire handle brush (Amazon) with handles you can bend to reach awkward angles. Coarse bristles, not soft. Use a tank sprayer with water to flush out loosened larvae.
After scrubbing, pour and spray white vinegar throughout the unit. Dump it out and let everything dry completely. Refill with fresh coir and Gnatrol at the full 1-tablespoon dose – maybe even 2 tablespoons.
For the next week, use a shot of flying insect spray into the bin daily to catch any surviving adults. If any larvae made it through your cleanup, you’ll have another infestation — so be thorough the first time.
Ventilation and Smell
All composting toilets designed for boat use have a small 12-volt fan that vents to the outside. Its job is to draw air through the solids chamber to dry them out — and dry solids don’t smell. Ours vented through the old pumpout port with a mushroom vent on deck. Check your owner’s manual for the specifics on your brand.
Three things we learned the hard way:
- When you lift the seat to remove the urine container, it’s easy to slightly dislodge the fan’s electrical plug. Check every time that it’s seated and you can hear the fan running.
- Close the vent and unplug the fan when underway. If you take a wave over the deck fitting, water can get into the compost — we knew cruisers who had water come down the hose and kill their vent fan.
- Clean the vent intake and fan screen periodically. Reduced airflow is the most common cause of odor problems.
With good ventilation, a properly functioning composting toilet has virtually no smell. We kept a bottle of Med-Aire Biological Odor Eliminator (Amazon) on hand for the rare moments when we wanted it — a quick spray eliminates biological odors rather than masking them. One 8-ounce bottle lasted us nine years. That tells you how rarely we actually needed it.
The Bottom Line
Success with a composting toilet means getting a few things right: the medium and any prep, and staying ahead of any bugs — but once you’ve got those in place (and you do, since you’ve read this article, right?), it’s an easy system to maintain. No holding tank. No pumpouts. No joker valves, no pump rebuilds, no blocked hoses to deal with in the heat of a tropical anchorage. It will take you anywhere: remote anchorages, ports without pumpout facilities, weeks at anchor in places most boats can’t stay as long as they want to.
We used ours for years of full-time cruising and never once regretted it. If you’re thinking about making the switch, we say go for it.
More for Your Life Aboard
The composting toilet is just one piece of life on the water. Our free weekly newsletter covers all of it — boat systems, provisioning, passage planning, safety, and the real day-to-day of living aboard — every Wednesday, straight to your inbox. Join 22,000 subscribers at The Boat Galley Newsletter.


Carolyn Shearlock has lived aboard full-time for 17 years, splitting her time between a Tayana 37 monohull and a Gemini 105 catamaran. She’s cruised over 14,000 miles, from Pacific Mexico and Central America to Florida and the Bahamas, gaining firsthand experience with the joys and challenges of life on the water.
Through The Boat Galley, Carolyn has helped thousands of people explore, prepare for, and enjoy life afloat. She shares her expertise as an instructor at Cruisers University, in leading boating publications, and through her bestselling book, The Boat Galley Cookbook. She is passionate about helping others embark on their liveaboard journey—making life on the water simpler, safer, and more enjoyable.
Carolyn Shearlock says
From what I understand, they generally infest after it’s opened and hydrated and in use (we have never seen any immediately or when the prepared coconut is being stored but rather several weeks into using it — but I assume anything is possible). We don’t have a microwave on board, so I can’t try it.
Carolyn Shearlock says
Update via email:
Recall your recommendation for gnats was a Bacillus thuringiensis (Bt) formulation.
Home Depot carries for $8 “Thuricide” Bt caterpillar control, concentrated liquid.
Reading the label… I believe this won’t work if you have put diatomaceous earth in your media; says ‘do not combine with alkaline material’ and diatom earth would qualify.
That said, I should think this would be instead of DI anyway.
Carolyn Shearlock says
The website says about a week for 2 people, but most that I know actually get closer to two weeks.
Carolyn Shearlock says
I do know some people have built their own and they are cheaper. You can find plans online.
Carolyn Shearlock says
Apparently Amazon is no longer selling the small containers of Gnatrol. The active ingredient in Gnatrol is bacillus thuringiensis. Another reader reports that Home Depot sells a liquid version called “Thuricide” — you can also buy it on Amazon: https://amzn.to/2IA5kFl
clint stoever says
We’re using our old deck pump out fittings as our air exit for our heads on our sailing catamaran. We simply added a PVC adaptor and a 30 degree PVC piece. We can then turn them as needed. We typically turn our windward side PVC piece aft as to allow air flow. We turn our leeward side PVC piece out and this seems to allow foul air to flow away from the boat. When at anchor, we turn them both out and this help keep the smell away from the cockpit. Hope this helps.
Johnnie Allred says
Go to Lowes or Home depot and ask for Bt.
Kelly Couch says
Oh man… that’s not an option. We live here full time and have kids with chemical sensativites….. 🙁
Carolyn Shearlock says
I live here full time too. Are you sure they are sensitive to Home Defense? They say it’s okay for kids and pets and everything as soon as the spray dries. It doesn’t bother my husband and he definitely has reactions to some pesticides. It’s much less smelly than Raid or anything, which are the only other options if you’ve tried the DE and thuricide (and Raid, etc. doesn’t work nearly as well).
bob says
We had this problem e-mailed C-Head and they sent us a mixing spoon with a hole cut into it. It was frustrating and off-putting so I cleaned up the pee section and took out my electric heat gun and molded the aft dam back an inch at the top and tried to keep the curve the same as the bottom of the shute. I hope your effort looks better than mine. It is possible to overheat the plastic so be careful by constantly monitoring the heat going to the plastic. Too hot and it bends too quickly, too cold and you can stress hard spots. This process made the pee reservoir just larger enough to work. It also raised the height of the dam at the back and this helps as well. We learned this by using a sepperat unit at home and it came with a fitting to raise the height of the dam and that worked well. My wife gives this her thumbs-up of approval. She also hopes this helps your friend.
Carolyn Shearlock says
Dave says he fills ours about an inch below the mixing bar, I say a couple inches. I’d definitely take some of the coconut out based on our early experiences — as it absorbs moisture from the poo, it will expand and make it impossible to turn. And if you add too much water, it won’t absorb the moisture from the poo AND the moisture will seep out through the holes for the mixing bar. Definitely use less coconut!!
P.S. Adding that much more water is not the solution. In my experience, the folks at NH use peat moss instead of coconut and their answers about what we needed to do to “fix” our problems just made things worse. It was only when we talked to other NH users that we got ideas that worked: namely, drier coconut and not filling it so full.
You can buy non-compacted coconut on Amazon and use it with ZERO water very successfully — we used it for nearly a year. So water is not needed. If you get it, make sure it does NOT have fertilizer added.
James Shell says
If someone would try the equine stall pellets from Tractor Supply, Co., it might prove very useful. I use it in the simpler sawdust toilet with excellent results, in my experience better than coir or peat moss.. The sawdust that is produced from the hydration of the pellets may work as well, or better, than coir or peat moss. It certainly is cleaner to handle…but that is a low priority characteristic. We must have odor control and lasting ability in the tank.
(https://www.tractorsupply.com/tsc/product/tractor-supply-pine-pellet-stall-bedding-40-lb?solr=1&cm_sp=SearchPreview-_-DidYouMean-_-Product&cm_vc=-10005)
Garet says
James, do you pre-hydrated the pellets, or put the dry, compressed pellets directly in the receiving bin?
Carolyn Shearlock says
Yes, no problem. Some people who just use their boats on weekends only change it once a year. Just crank the handle every day to keep things mixed. It will actually decompose better if left longer and not used as much.
Carolyn Shearlock says
We prepare one brick at a time, and it’s more than enough for a change. We use 2 gallons of prepared coir per change.
Christin Miller says
I tried the horse sawdust pellets for my Airhead. With a little axra moonstone from the poo it became heavy and wet would not dry out and became impossible to turn.
I do use the pellets in my cat litter box.
Fiona says
We started microwaving our coconut coir in small batches and storing them in large baggies ready to hydrate when we need them. We haven’t had any gnats since (knocking on wood) but this is still a fairly new process we started so the jury is still out but it does seem to be helping.
Carolyn Shearlock says
I’ve never heard of anyone doing that, but don’t see where it would be a problem. And if it works for you, great!
Carolyn Shearlock says
No. Are you full-time aboard?
Chuck B says
No, only weekends right now. Plus, this is in California where the air is relatively dry. And the fan is running 24/7. I moistened the coconut coir according to Air Head’s instructions before reading about your coir-to-water mix ratio, so it was perhaps a bit more water than necessary, but not by a whole lot. Certainly the coir did not feel damp at all. But now the tank is filled with gray fur. :-/ Just installed the Air Head a few weeks ago so I’m new to this.
P.S. Apologies for the slow response, I’m not getting notifications of replies.
Carolyn Shearlock says
I’d almost wonder if it wasn’t something in the coir — mold lying dormant. When you mix up your next batch, try keeping it drier and maybe add a tablespoon or two of bleach to the water to kill anything that might be in the coir.
Sal says
To get rid of gnats in your house, make a gnat trap. I used to work in a genetics lab and this is a fast solution as long as you just need to remove them and you’ve sealed all incoming sources!
Take a bottle or jar and a piece of paper (paper for a printer works well). Curl the paper into a funnel that will fit into the top of your jar snugly. One open end (the end going into the jar) should be just barely big enough for a gnat to fit through. The other open end should be fairly large. Tape the funnel to maintain the shape and fit it into the top of the jar. If there are any gaps at all, tape the funnel and the jar lip together to seal those. Before you do this, however, add a bit of banana as bait to the jar.
Within just a day or two, your jar will have trapped your gnats. They can get in, but not out! You can either empty it outdoors or place the whole thing in your freezer first to kill the gnats.
Marla says
Thank you for all this info. I am on my 2nd month using an Airhead and just now experienced gnats in the solid tank. No problem the first month. Emptied and replaced coir after 4 weeks. This time no such luck. Will try the drier coir suggestion. Just wanted to double check that after you pour the cup of water over the brick and put it out in the sun you have it out for a few *days* before you break apart or hours. Thank you!