January 2015: We’re just beginning to rebuild our diesel engine. The first step has Dave getting everything disconnected and removing everything he can so that the engine can be removed through a tight opening.
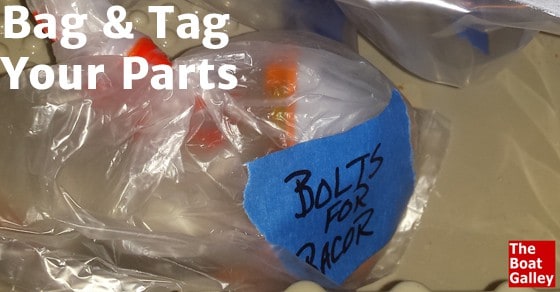
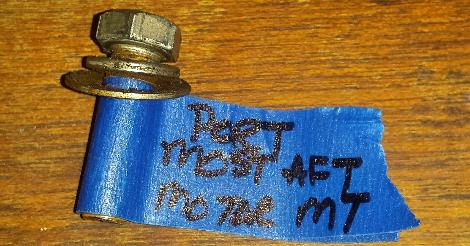
While he’s doing the actual work, one of my jobs is to tag everything. Every bolt that is removed is either put back where it came from or, if it must stay out over the course of the project (motor mount bolts) gets tagged with exactly where it came from (port next-most-aft motor mount) and put into a bag with others from the same area (for example, all the motor mount bolts). All the bags are kept together in a “box” of some sort — in this case, a small paint pan I scavenged from the trash.
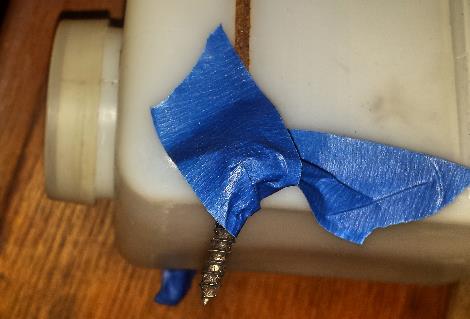
Anything that goes together stays together — that is, washers and nuts are put back on bolts, screws taped into mounting holes, brackets taped onto what they hold.
Exactly how I tag things varies by the item, but the most common way is to wrap some blue tape around the item and make a flag where I write the description. This also works well for wires and hoses in the engine compartment.
Some items I just tape the screws back into the item, as with the coolant overflow container:
Finally, we take lots of digital photos of how things went together. I always use the highest resolution possible so that we can zoom in later if need be to see details. I also take photos from a number of different angles as sometimes an important detail will be visible in one but not another. I try to download them onto the computer fairly quickly and label them (or put into folders) so that we can find them easily during reassembly.

Carolyn Shearlock has lived aboard full-time for 17 years, splitting her time between a Tayana 37 monohull and a Gemini 105 catamaran. She’s cruised over 14,000 miles, from Pacific Mexico and Central America to Florida and the Bahamas, gaining firsthand experience with the joys and challenges of life on the water.
Through The Boat Galley, Carolyn has helped thousands of people explore, prepare for, and enjoy life afloat. She shares her expertise as an instructor at Cruisers University, in leading boating publications, and through her bestselling book, The Boat Galley Cookbook. She is passionate about helping others embark on their liveaboard journey—making life on the water simpler, safer, and more enjoyable.
Michael O'Quin says
I always take a lot of pictures. Picture before, during and after. I like your idea of re-assembling the bolt & washers/nuts with tape. I usually screw everything back into where it came from.
Best of luck on your rebuild.
John Huft says
One way to keep from wondering where that leftover bolt is supposed to go.
LaDonna Thomas says
And you take plenty of pics? That always helps Denis
Charles Reynolds says
Any bolt, nut, or screw which endures significant strain or vibration should be replaced with new bolts. Also, any bolt or screw exhibiting damaged threads or head should be replaced. This is your opportunity to make this job easier next time by having good, unworn, fasteners. Yes, there’s some money involved. Bolts aren’t as cheap as they used to be. Be certain to match thread-pitch as well as bolt size and grade of steel. It is extremely rare to need to replace a washer.
Bruce (s/v Migration) says
We took every single piece off equipment and hardware off the topsides of Migration during our refit these past 2 years, and nearly everything out of the interior. Here’s a couple of things we learned:
If you are doing a long refit, make sure you use good blue tape if you tape any parts together. Poor quality tape makes a gooey mess after several months.
If you tape fasteners to hardware, think about how you will get the tape off… leave a folded over piece so it is easy to unwrap.
If you label something by putting a piece of tape on it (e.g., a cowl vent), be careful that the marker doesn’t bleed through the tape.
If something has multiple fasteners and they are of different sizes, put a note inside the bag with a diagram of the exactly where the fasteners go. It’s surprising how many times we thought, “Oh this is easy, we’ll remember the short one went here…” but then had to crawl into a small space to see where that short screw went because we’d forgotten.
Finally, as Caroline and Michael said, take lots of photos! And from different angles.
Frank Kleinburg says
I have always found it best to put the bolt back into the hole from which it came in most cases. That way you not only have all of the bolts when ready to put something back together, you know into which hole each bolt goes. I use the labeled bag when needed, but put the bolt back into the hole when I can. flk k
The Boat Galley says
That’s what we do when we can. But on many boat projects, that doesn’t work . . . which is why we then bag & tag!
Susan Parker says
We tag everything using tape or our Brother label maker. If it’s something larger a spare pump or alternator, I seal it using my Food Saver machine.