Barefoot Gal needed new lifelines. With all our other DIY projects, our original plan was to remove the old lifelines and get new ones made.
Dave had talked about doing them ourselves, but it just seemed like a huge project to me with everything else we had going on. Switching to a composting head had turned into a longer project than expected, and we still had other projects on the list.
To make a long story short, we started to have them made by a rigging shop but some problems in getting them there combined with a friend who offered to loan us his swager to do them ourselves ended up with us saying “oh, okay, why not?”
This turned out to be about the easiest boat project we’ve ever done. Well, outside of figuring out and getting the right parts. But seriously, it was less than two hours of relatively easy work to make all our new lifelines . . . and correct some problems that our old ones had.
On most projects, my big contribution is figuring out the parts list and ordering parts. Here, we had already decided that we wanted 1/8″ 1×19 316 stainless uncovered wire. For those who wonder about our choice:
- The majority of offshore boats use 3/16″ wire, but Geminis have always used 1/8″. We thought about upsizing but some research showed us that even with 1/8″ wire, the Gemini stanchions were almost certain to break before the wire. Why spend the extra money on wire and fittings for no increase in safety? (NOTE: Do not assume this is true about your boat and the breaking point of your stanchions. Research your own configuration.)
- The Gemini’s deck configuration is such that we usually walk on the coach house roof instead of the side decks. If we got thrown from up there, we’d almost certainly go over the lifelines . . . if untethered. As far as we’re concerned, our tethers are a bigger safety factor than our lifelines.
- We wanted 316 stainless as being more corrosion resistent than 304, which is used by many rigging shops as “standard.”
- We wanted uncoated as vinyl coated lifelines have two problems: as salt water is trapped between the cover and the wire, corrosion is more likely to occur and it will be impossible to see inside the cover. Uncoated are easy to rinse off and easy to see.
- Switching to line wasn’t an option. There would have been too much chafe where they pass through the stanchions.
So the wire was easy to figure out. I just had to measure it, add a few feet for good measure, and order. E-rigging had by far the best prices (and super-fast shipping, too, I might add):
Then I started measuring the fittings we intended to reuse. Oh, boy. This is where things got interesting — and where I was really glad we were doing the job ourselves.
It turned out that previous owners had changed some fittings on the lifelines and there were four sizes of fittings in use; some had been cross-threaded as well. Some were missing turnbuckles for adjustment and others had no locking mechanisms. After cataloging what we had and what was missing or bad, I ended up ordering all new parts.
The primary manufacturer for hand swage fittings is C.S. Johnson. Their web site has a downloadable PDF guide to all possible parts (make sure you look at the hand crimp ones and not the machine crimp parts) and from it, I could get the part numbers, then look for them online.
Fisheries Supply is the only place that sold the native 1/8″ fittings (without a converter sleeve, that is) that I wanted. (You can also get Norseman/Sta-Lok type fittings; hand swaging was our choice.) I have to give Fisheries major props for promptly resolving a problem with parts that had been mislabeled and getting the correct ones drop-shipped from the manufacturer to us overnight — with no extra charge despite only having paid for standard ground shipping.
We had our friend’s swager (similar to a crimper for electrical connections, just larger). If you need one, Fisheries Supply has the best price, but yes, they are expensive at about $250.
NOTE: You have to use the proper “matched” swager for the fittings. Don’t mix brands unless they say they’re compatible. Nicopress oval swagers won’t work on the round lifeline fittings.
ANOTHER NOTE: You can also get and use a “bolt-type” swager for under $50. They do a good job, but take a LOT longer to do each swage. If you can borrow or rent the lever type, it’s a much easier job.
We also needed a wire cutter. A good wire cutter. Good ones cut the wire cleanly with cutting surfaces completely encircling the wire, so it’s easy to get the new fittings on; small ones that may work perfectly for “normal” 12 volt wiring simply smash things up and make it impossible to put the fittings on. We made a test cut on the old lifelines with our old wire cutter and quickly realized we needed to get a proper one for the job.
We could have gotten by with a cutter sized for 1/8″ wire, but we decided that if we were investing in a cutter, we’d go up one size and have one that could cut our stays if we ever lost the mast.
So there we sat with all the parts. Time to get to work!
On each one, we began by running the wire through the stanchions, if needed.
Then we swaged the fixed (non-adjusting) end and attached it. You could do the swaging single-handedly, but it’s easier with two people (the second person does not have to be strong but they need attention to detail; many kids would make great helpers). I held the wire and the fitting (one in each hand), making sure that the wire was all the way into the fitting, and lined up the swager on the fitting (you make three crimps per fitting).
When all was correct, I’d tell Dave “good” and he’d make the crimp as I held it. Then I’d help adjust the swager to move over a bit, he’d do the second crimp, and the same for the third.
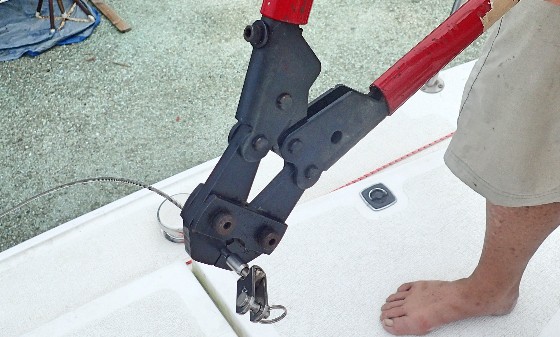
Dave is considerably stronger than I and had a reasonably easy time with the swager. I did a couple, just to see if I could — I had to put one handle on a solid surface and then push the other handle to it. Yes, I could have done all the swages if I’d had to, but strength is definitely a factor in this project.
Then we’d go to the other end of the lifeline we were working on — the adjustable end. We’d adjust the fitting according to its instructions and attach it to the stanchion. Then we’d measure the wire by Dave holding it up against the fitting, and I’d put a piece of tape one the wire with one edge where we needed to cut.
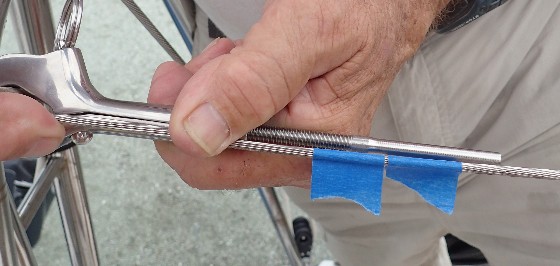
IMPORTANT: Put another piece of tape on the other side of the cut to keep the end nicely together. It’ll be much easier to put into the fitting for the next swage (we didn’t do this on the first cut we made and learned the hard way).
TIP: It’s tougher to cut the wire than to make the swage. It takes muscle, but isn’t impossible. Putting one handle on something solid helps.
Take the fitting off, carefully take the tape off the wire so the strands don’t separate, put the wire in the fitting and swage it on, then put it back in place. There! One lifeline done.
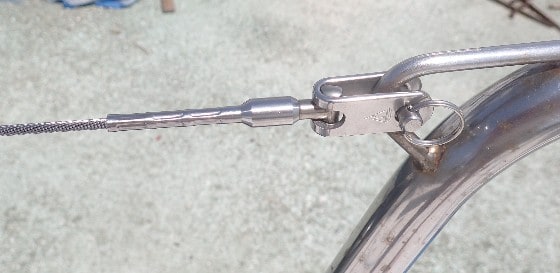
We had 8 lifeline sections to do, with a total of 16 swages. It took us less than 2 hours to do it all, including a break for a cold drink and showing a couple of fellow cruisers what we were doing. Later, Dave spent about a half hour tensioning each section and tightening down the jam nuts.
The hardest part of the job? Corralling the wire on the spool as we cut it. If you do not hold it and tape it down very securely every time you make a cut, it will uncoil and spring around like a demented Jack-in-the-box.
Seriously, this whole job was SO much easier than I expected! Our total cost — reusing none of our existing parts but borrowing a swager — was $635. And now we have a wire cutters that will cut our stays if need be.

Carolyn Shearlock has lived aboard full-time for 17 years, splitting her time between a Tayana 37 monohull and a Gemini 105 catamaran. She’s cruised over 14,000 miles, from Pacific Mexico and Central America to Florida and the Bahamas, gaining firsthand experience with the joys and challenges of life on the water.
Through The Boat Galley, Carolyn has helped thousands of people explore, prepare for, and enjoy life afloat. She shares her expertise as an instructor at Cruisers University, in leading boating publications, and through her bestselling book, The Boat Galley Cookbook. She is passionate about helping others embark on their liveaboard journey—making life on the water simpler, safer, and more enjoyable.
Your VHF can do so much! Learn how to use ALL its features for just $39:





Brenda Harbottle says
“Demented Jack-in-the-box”, you’re so funny!!! 🙂
Cheryl says
Great post! I’m guessing, our lifelines seem to be a bit older on our 24′ San Juan as the plastic covering is weathered and cracked in places? Should we replace the lifelines? The person who sold us the boat said that you hold the boat or rigging to move about and not the lifelines? The stanchions have some surface rust at the bottom where they attach to the boat. Before deciding to replace the lifelines, would we need to replace the stanchions or is it only a matter of looks.
We did not pay much for the boat and are only using it to learn to sail, so we don’t want to spend more on it than we have to but also want to be safe. It looks like the stanchions have holes for two sets of lines. Ours only has the top line. Is the purpose of the lifelines if someone fell?
Any thoughts from seasoned sailors?
Carolyn Shearlock says
I’d ask someone (maybe more than one) near you to take a look and tell you what they think — get them to explain what they’re looking at and what they’re thinking (not a rigger who’s trying to get a job . . . ). If the lifelines themselves are rusted, I’d replace them. And on many boats, the stanchions will break before the lifelines, so if they seem rusted out, you might want to look at replacing them. If it’s just a bit of surface rust, no problem.
Lifelines aren’t just looks — they’re the last line of defense of someone going overboard. (Yes, you should grab other things first. But as a last resort, that’s their purpose.) A lot depends on where you’re sailing and what the risks are(cold water, big water, etc.), how fanatical you have to be about replacing them. On a small lake in the middle of summer, a dunk isn’t likely to be life-threatening. A slip into the ocean, particularly in cold water, could be.
I checked photos of San Juan 24’s online and it looks like they all have just one lifeline — the top one — so it sounds like you’re okay on that count.
Cheryl says
Thanks Carolyn, we’ll have them looked over. Although the lake is not too large it is very cold as the water comes down from the mountains. Skiers and swimmers wear wetsuits :). Love your posts!
Cait says
If there’s rust coloring on the covered wire – replace the wire! If simply means that the lifeline is old and has soaked up enough salt to weaken it. Don’t risk your life on weak lifelines.
Chris in Oregon says
Replaced all of my lifelines this summer with dyneema line. Have a friend who uses it everyday in his business and he gave me a lesson on properly splicing it. I am happy with it and yes the stations will go long before it breaks.
Joel Vannorsdel says
When I did new rigging on my Hunter 37 Cutter, we actually used a 2×4 and hack saw to cut the stainless wire, but is a much larger size. What we did was take a piece of 2×4 scrap and cut a slot across an end cut the 4′ way. Then drilled a hole (the size of the wire) the 2″ way that goes through the cut slot. Now to use you push the wire through the drilled hole and cut through the slot with a good hack saw. Worked perfect and then we used QuickAttach fittings. For us a perfect job and lots of fun.
Mike Auton says
Thank you for a wonderfully helpful article! Can I ask about removing the existing (in our case plastic coated) life lines from the fittings? Do you have to buy new fittings that connect with the turnbuckles/pelican hooks?
Carolyn Shearlock says
You can re-use the Pelican hooks, toggles and so on, but the threaded fitting that goes on the end of the wire itself canNOT be reused. You have to get new ones and swage them onto the new wire.
Mike Auton says
Thanks Carolyn, I think I have now mapped out how to do this myself and save $600 in the process!
Looking forward to getting rid of the old rusty ones 🙂 The rust is bleeding though the plastic coating and they look awful.
Frost Raven says
So do you think that I might be able to remake all of my stays the same way
Carolyn Shearlock says
No, for the pressure that can be on stays, if you want to do it yourself, look at Norseman or Sta-lok fittings. Its a similar process, but with a mechanical fastening of the fitting instead of a crimp.
Kim Brown-Harris says
Robert Harris
John Nieminen says
Heather Drummond
Tucker Mitchell says
Sam Whittemore
Kitty Cook Chatelain says
Good timing! Just found out today we need new lifelines. Thanks.
Stephanie says
Hi – what tools did you use to get the old ones off?
Carolyn Shearlock says
Simply unscrew the fittings and unpin the ends — basically the reverse of putting them on, except that you don’t have to swedge the ends on. Some of those screw-on fittings can probably be re-used.
Andie Pope says
Chris in Oregon, question for dyneema lifelines. Is there a video or online instructions on splicing? TIA, Andie Pope S/V Cheap Thrills