One of our first tasks aboard Barefoot Gal was to find and fix the propane leak on the stove that we’d discovered during the survey. We knew the leak was right in the vicinity of the left burner as there wasn’t a leak when using the right burner.
Dave figured it’d be a relatively simple job (simple by boat standards, that is) of removing the stove top so that he could get to the gas connections to tighten them (or possibly replace a line). It ended up taking the better part of three days.
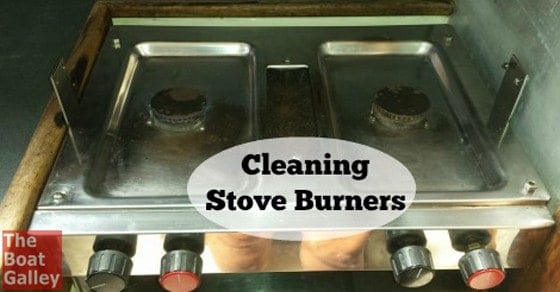
We think that the problem was originally caused by the same thing that created at least half the work in the repair: something on the stove (baked beans, maybe?) that had boiled over or been spilled and totally covered the propane burner. This, in turn, hadn’t been cleaned (more on the likely reason below) and, we think, clogged up the gas orifice and perhaps the resulting back pressure created a leak in a connection.
The stove is a Voyager 2000 and we (well, Dave) ended up taking it almost totally apart to clean it and tighten up the propane connections.
And while you probably have a different make stove on your boat, the lessons we learned are equally applicable on other stoves.
First, the burner caps were held in place with tiny set screws in the side. This created a big problem for Dave in trying to clean the burner (how to get the cap off?) and was probably the reason that the original spill wasn’t cleaned up. Even when the burner was cleaned up, they were almost impossible to see. And getting enough of the spilled whatever out to get our smallest Allen wrench in the head took several hours.
Since every other boat stove I’ve ever used didn’t have “secured” caps on the burners, we decided to leave the set screws out after cleaning everything up. That way, when I spill something (not an “if” but a when) it’ll be easy for me to lift the cap off and clean it all up.
The second problem was that whatever had spilled and then baked on had corroded the heads of the little screws that hold the burner to the stove top. The heads simply broke away as Dave tried to take the screws out. That meant having to drill out tiny stainless screws so we could resecure the burner to the stove top. Yeah, that was fun.
 Dave finally had to totally remove the stove from the galley so that he could better see and reach to work on it, then had to take the stove top off to clean and resecure the burners and tighten fittings on the under side.
The details of all that aren’t important. The episode just ties in to two topics that I frequently talk about, however: cleanability and taking care of problems as they arise.
Cleanability: the stove was poorly designed with those set screws in the burner cap. To clean any spills, you simply have to be able to remove the burner cap both to clean out all the little holes in it, and to clean anything that spilled inside. Once something was spilled, necessitating the removal of the set screws, they were impossible to find. Catch-22! We improved the cleanability greatly by simply not reinstalling the set screws.
Not ignoring a problem: Yes, figuring out how to remove the burner cap was a pain. But it was obvious that there was a problem and that it had to be removed to clean it. Simply ignoring it (the stove top was wiped up, but I found lots of the same gunk down the sides of the stove and the wall beside it) only made the problem worse. We can’t be sure, but we think that all that hardened gunk may have actually caused the propane leak by stopping the flow of propane in the normal manner and causing it to leak at a nearby connection. And a propane leak isn’t a minor problem – it could cause an explosion. YIKES!
The combination of problems meant that we tackled the problem, it took the better part of three days to fix. And four trips to the hardware store, 14 miles away (but the Cub Scouts did have a great hot dog fund raiser at the store last Saturday). You can bet I’ll clean up any spills as they happen . . .

Carolyn Shearlock has lived aboard full-time for 17 years, splitting her time between a Tayana 37 monohull and a Gemini 105 catamaran. She’s cruised over 14,000 miles, from Pacific Mexico and Central America to Florida and the Bahamas, gaining firsthand experience with the joys and challenges of life on the water.
Through The Boat Galley, Carolyn has helped thousands of people explore, prepare for, and enjoy life afloat. She shares her expertise as an instructor at Cruisers University, in leading boating publications, and through her bestselling book, The Boat Galley Cookbook. She is passionate about helping others embark on their liveaboard journey—making life on the water simpler, safer, and more enjoyable.
ChrisW says
A couple of tricks. This is where a Dremel tool can really come in handy. Use a small shop vac hose next to the work site and crud goes up the tube without harsh chemicals and odors. Secondly, remember the old vibro-engravers that allowed you to etch your SSAN into metal and plastic (how naive we were back then)? These tools can act as miniature inpact hammers to loosen up small screws other parts that have seized from corrosion or baked on crud. I fabricated a flat tip and a ball tip that are gentler on the work site that the old pointed carbide tips.
Carolyn Shearlock says
Oh yeah, we used the Dremel and the Shop Vac. Since the screw heads disintegrated, couldn’t use the Dremel on them. But did use it on several other screws that had rounded out Phillips heads (basically slotted them).
The Sea and Sailors says
Important!
Myvista says
Dawn Power Dissolver. Spray it on and wait a while – cleans even burnt on grease easily. Use on BBQ also. Have not had problems with it affecting metal finish etc.
Charlotte Caldwell says
My dream would be a propane stove that fit seamlessly into the countertop and where nothing could drop down the sides!
Cap'n Jan says
Wow, Carolyn – this is a long distant past post, but I feel your pain through the years. The FIRST thing that I did to that stove was remove the burner set-screws – ABSOLUTELY STUPID IDEA. I have a 6 burner center grill Five-Star range in mt ‘dirt house’ 30 years old now, and I have intimate knowledge about keeping it clean, and it is a job. But I am a Cook and the heck with those induction things. I like cooking with gas. Although my mind could be changed for cooking on the boat.
The Voyager 2000 is an ok range, but we can’t use the oven, it just doesn’t work, partly because the installation rung the stove badly so the door doesn’t fit. We are going to have to remove that stove one of these days, and the mess under and beside it will take a day to clean up. There is literally no rational way to clean beside or under it unless it is removed. I may look into having a stainless (even aluminum) plate built that prevents spills from going down the back or sides.
Did you make any other adjustments to make using that beast easier, and easier to clean?
Carolyn Shearlock says
Hi Jan! Unfortunately I haven’t really figured out a good way to keep those areas from getting spills. The other one that is hard to clean is that area between the two burners. I do my best.